Introduction
Welcome everyone to our candle making demonstration! We are so excited to bring together a group of passionate and experienced candle makers, all eager to show you the steps involved in candle making. Our presenters have extensive experience in the fields of art, design, and scents and they will be teaching you the ins-and-outs of this rewarding craft. Together we’ll explore topics such as:
• The tools and materials needed for a successful candle making project
• How to choose an appropriate wax
• How to mix fragrances with wax
• The various types of wicks
• Tips on how to create unique designs with melted wax
• Safety information about proper usage of heated materials
At the end of this session, we’ll provide a solution-oriented approach on several common issues related to candle making, including best practices for scenting, troubleshooting techniques for difficult batches, and tips on running efficient operations when managing multiple projects. You’ll also find out how to enter our upcoming Candle Making contest; an exciting opportunity for you or your team members to showcase your newly acquired skillset!
Gain Insight on the Candle Making Process from the Professionals
If you’re looking to learn how to make candles yourself, then a candle making demo could be the perfect activity for you. Not only will it provide you with knowledge from professionals, but you can also get a hands-on experience of the entire process. During a candle making demo, experts will take you through each step of the process”from choosing your candle wax and wick to adding scents and colors. You’ll be given valuable tips for each step and can even practice pouring wax or creating decorative designs with the different colors and scents. The demonstration will also teach you about the types of wax available, as well as the different measures that are necessary for successfully creating your vision. At the end of the session, you’ll go home with a finished product that is both beautiful and unique. Additionally, many demos offer further educational opportunities by providing various books or pamphlets on candlemaking so that you can continue learning beyond the session.
Gather the Necessary Materials and Equipment for Candle Making
Before starting a candle making demonstration, it is important to gather all of the necessary materials and equipment. This includes the wax, wick, candle molds or containers, a double boiler system for melting the wax, dyes and fragrances (if desired), wax thermometers to keep track of the melting temperatures, scissors to trim wicks after each pour, stirring utensils and fuel or fire source for heating. Before beginning the process of candle-making, assemble all of these items and clearly lay them out so that they are easily accessible throughout the demonstration. Additionally, safety musts be considered when dealing with heated wax and open flames. Every place where candles will be made should have an appropriate fire extinguisher nearby in case of emergency. Once all of the necessary materials and equipment are gathered properly and safety measures are taken into consideration then you can begin your candle-making demonstration.
Delve into the Science Behind Wax and Wicks
At the candle making demo, you will learn so much more than just how to make a simple candle. You’ll gain insight into the science behind wax and wicks. You’ll explore the different types of wax and their melting points as well as how different oils and scents interact with the wax. You’ll direct your attention to wick selection”learn about sizes and types”how different wicks affect the burn time, aesthetic value and quality of your candle. There will be an in-depth discussion on safety when handling hot wax and sticks, plus tips for creating unique candles with dye blocks or chips, glitter, herbs and flowers. Finally, you’ll discover strategies for efficient pouring to ensure beautiful finished products. With this knowledge comes enhanced creativity; start inventing beautiful, one-of-a-kind vessels to keep or give away!
Select the Right Scent and Color for Your Candle
When making a candle at home for the first time, it is important to select the right scent and color that best reflects your desired outcome. You can do this by checking out sample fragrances from candle making suppliers or by creating your own unique scent blend with a combination of essential oils. Be sure to run a test patch of any fragrance you choose before committing to suitable wax for the mix. Furthermore, color plays an important part in making candles look attractive; there are many options in terms of dyes or pigments available on the market today. You may also prefer to make all-natural beeswax candles which will boast their signature golden yellow tone without use of dye. Finally, keep in mind that the colors and scents should contrast each other so one will not overpower the other when burning. For example, consider pairing leathery, smoky aromas with rich colors such as deep blues, reds and purples. On the other hand, fruity or floral smells work best with more subtle lighter colors such as whites and pastels. Ensuring you have chosen appropriate shades and surprising blends will guarantee your next candle-making project actually sets alight to success!
Step-by-Step Demonstration of Candle Making
1. Gather all the necessary supplies: wax, wick, a double boiler and other tools (such as candle molds).
2. Heat wax in a double boiler carefully until it is fully melted.
3. Prepare the wicks by tying them to a dowel and dipping them into the melted wax to help keep their shape when attached to the mold.
4. Place the prepared wick into your chosen candle mold.
5. Slowly pour in melted wax until your mold is almost filled and leave to cool for at least an hour, or until completely solidified.
6. Once cooled, carefully remove from the mold by gently pulling on the wick or use a small knife to loosen any parts which have become stuck.
7. For a cleaner finish, melt any remaining excess wax with a heat gun or craft knife and then carefully trim off any excess with scissors if needed.
8 Finally enjoy your freshly made homemade candles!
Tips and Tricks to Enhance Your Candle Making Technique
Enhancing your candle making technique can be achieved by a few simple tips and tricks. Prior to beginning your project, make sure that you have the right supplies. Be sure to include everything needed to create your candle such as thermometer, hot glue gun, wick, wax, pot, heater and any additional scent or color desired. Ensure that all items are in good condition before proceeding.
When gathering materials for the task at hand, it is important to consider safety measures. Wear gloves when handling hot wax and keep away from flammable objects like paper towels or streams of water. One should also establish a safe work area with proper ventilation and adequate light to avoid accidental burns and spills. Utilizing caution while working is key when completing your project.
Once you have learnt the basics of candle pouring and understand the required safety precautions you will likely want to experiment with different materials or techniques to achieve exciting new results! Consider incorporating essential oils or exfoliating agents for scent or texture, respectively; just remember that some additives must be pre-mixed with the completed wax before being placed into molds! Another popular technique used by experienced crafters is layering different colored fragrances or embedding items like cotton balls during the traditional pour process for a more personalized touch!
Explore Creative Ways to Present Your Candles
Candle making is a great way to express creativity and have fun. But if you are running demonstrations or workshops, you may be looking for ways to spruce up your presentations. Here are some ideas for taking your candle making demos up a notch.
One way to make your candle making demo more engaging is to explore new types of wicks, waxes, and scents. Introducing different materials can lead to interesting conversations among participants that oftentimes will lead to unique results! You can also invite partakers to create candles together with multiple sets of materials as a team-building exercise.
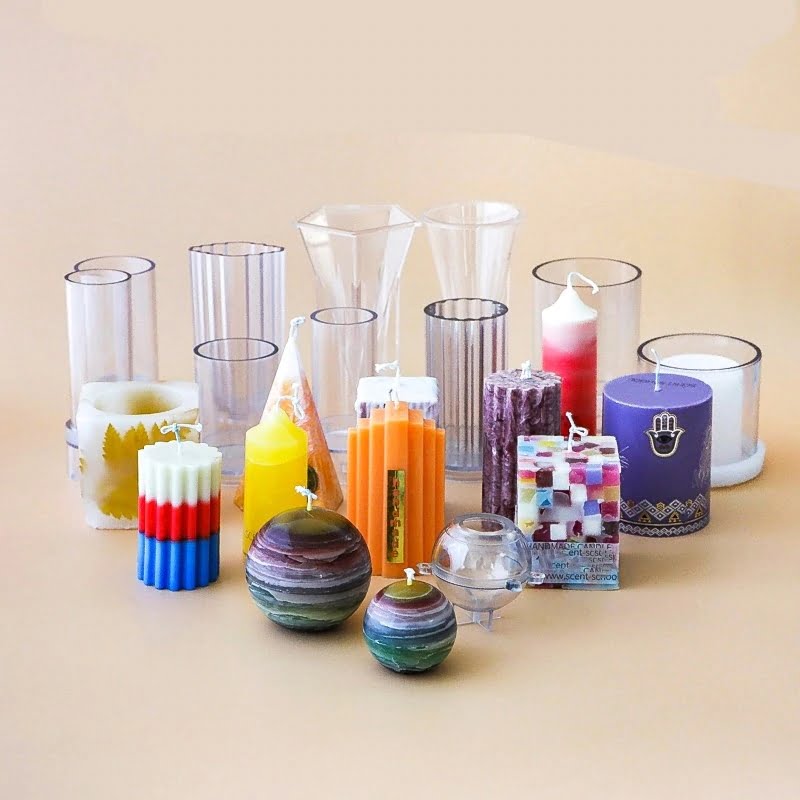
You may want to brainstorm ways of moving away from the traditional molds used in commercial production and encourage participants to experiment with molds of various shapes and sizes. This will improve the variety of colors, textures, and designs available in the final product further increasing its uniqueness.
Finally, increase visual appeal by giving participants an opportunity to practice wrapping techniques such as tying ribbons around candles or decorating them with beads so they could take their custom creations home at the end of the session!
Conclusion
Candle making is a fun and creative activity that can help you explore your creative side. From melting wax to creating scents, there are plenty of ways to express yourself through the art of candle making. Whether you’re a novice or an expert, candle making is something that anyone can enjoy. With a few basic materials, you can ignite your creativity with candles that reflect your unique style and personality. The possibilities are endless when it comes to designing and decorating custom creations, adding a special touch for those around you or just savoring the moment for yourself. Take the time to experiment with different shapes, colors and fragrances; before you know it, you’ll be able to create truly beautiful works of art out of plain old wax. Through this demonstration we hope that you’ve learned a few new things about candle making and find yourself inspired to become a part of this exciting craft.

Welcome to my candle making blog! In this blog, I will be sharing my tips and tricks for making candles. I will also be sharing some of my favorite recipes.


