Introduction
Making your own teacup candles is a fun and unique craft project. You will need a few basic supplies to get started, including candle wax, a heat source, wicks, teacups or mugs, an important addition – fragrance (optional) and any decorations you’d like.
Wax: To make your teacup candles you will need to purchase or gather up some wax. Paraffin wax is the most common type of wax used for making candles as it has a lower melting point than beeswax and is easily accessible in craft stores. If you decide to use paraffin wax make sure that it contains no additives so that your candle can burn correctly. Soy wax is also easy to get hold of and burns more slowly than paraffin making the teacup candle last longer.
Heat Source: Whichever kind of wax you opt for, you will need some form of heat source like a double boiler or an electric hot plate to melt it with before pouring into the cups. It is important not to overheat the wax as it can become difficult to work with if allowed to cool too quickly so you may want to keep the pot/pan of melted wax on extremely low heat at all times during pouring process instead.
Wicks: Wicks are necessary for all types of candles – they provide air flow which allows the flame on top to burn steadily. When choosing wicks for teacup candles make sure that they’re long enough but not too thick – this will help ensure even burning without having them get lost amongst chunks of hardened melted wax surrounding them in each cup.
Decorations & Fragrance (optional): Now comes the fun part – adding decorations! This could include everything from sprinkles or glitter being scattered across the surface after pouring out melted-down wax, bits of dried fruit floating across the top layer or even scented oils dripped into each teacup when still warm (though this should be done while wearing gloves!). The options are endless when making custom creations! As far as fragrances go, if you decide on adding scent then always use real essential oils and never synthetic fragrance as these could contain toxins that won’t be evaporated away as easily during burning process
Supplies
Making your own teacup candles can be a fun and rewarding activity. It’s an easy craft that requires very few supplies, but those supplies must be chosen with care to ensure a beautiful and fragrant end product. Below are the essential materials needed to make the perfect teacup candle:
First, you will need high-quality wax beads. Soy wax is the most popular option for teacup candles; it has a lower melting temperature than other waxes, meaning it will burn slowly and evenly with less smoke or odor. Other types of wax can also be used; paraffin, beeswax, coconut, and vegetable waxes may each give you unique characteristics that play nicely together in a finished teacup candle.
Second, you’ll need a suitable wick. Choose one that is designed specifically for use in containers such as tea cups or jars – this type of wick is thicker and tends to resist curling or fraying as it burns. It should be cut to the correct length for the size of your tea cup before use.
Third, select your favorite scent(s). Fragrances are available in both liquid and solid forms; you can mix and match any combination to create your desired aroma. Essential oils work well as they add natural scents while also providing health benefits such as calming stress and improving sleep quality.
Fourth, assemble your ingredients into their container of choice – ideally tea cups with handles for easy removal from hot wax! You should ensure the wick is in place before pouring any molten wax. Finally, let the candle cool completely before moving to prevent damage or spillage. Once set and hardened, enjoy your homemade addition to any room!
Preparing the Teacup
If you are going to make your own teacup candles, the first step is to prepare the teacup. It is important to clean the teacup with warm soapy water to remove any dirt or oils that might affect the look of your candle. Let it dry completely before proceeding. If you have any loose pieces on the inside of your teacup, such as a sticker, use nail polish remover (acetone) and a cotton swab or small paint brush to carefully remove it. Finally, use a wax paper liner or parchment paper cut into a circle the same size as the top of your cup and place it inside. This will keep any melted wax from leaking out when you pour in your wax later on.
Wax Selection
Making your own teacup candles is an easy way to give your home a unique and inviting scent. When selecting your wax, you want to choose one that complements the room that it will be sitting in. Think about what kind of mood or ambience you are trying to create and find a wax fragrance that fits those needs. For example, if you are trying to create a calming atmosphere in your living room, select a wax with a subtle floral, woody, or earthy scent that won’t overpower the space. If you are looking to provide a bit of energy and brightness to your kitchen or dining area, consider choosing an invigorating citrus or berry scent as this can help add vibrancy and life to the room. Additionally, if burning multiple scents together try for ones with complimentary notes by combining fruity and light florals or robust spices with sweet herbs for an inviting blend.
Melting and Pouring Wax
Making your own teacup candles is a fun and rewarding craft. It’s a simple process that results in wonderfully unique candles to enjoy, give away, or even sell. Before delving into the steps of melting and pouring the wax, it’s important to understand that each element of the process matters greatly. From selecting the right kind of wax to wick size and positioning, everything needs to be considered if you want beautiful, high-quality options. Read this step-by-step guide for a successful candle making experience.
1. Choose your wax wisely! A popular choice for teacup candles is paraffin wax due to its relatively inexpensive cost and good qualities for burning evenly with minimal smoke or outcry/soot formation. However, cheaper waxes will produce low-grade candles in both quality and scent throw so make sure you select a refined option like paraffin or soy if you’re after something a little more special.
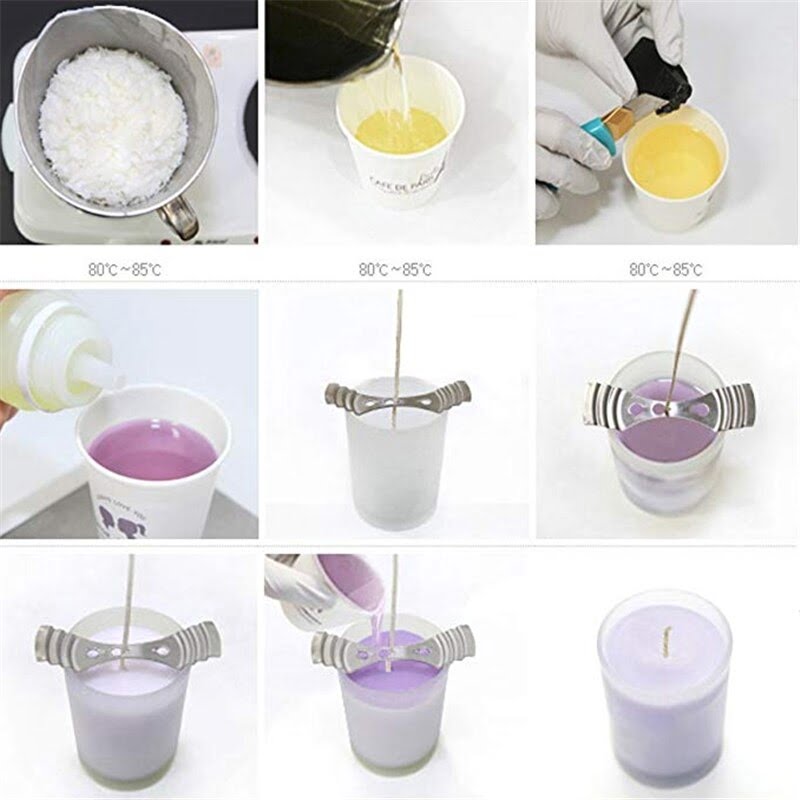
2. Measure out your wax! Make sure to measure enough wax for your teacup; usually around 8oz per cup although this depends on the size and depth of the teacup being used (4oz would also work depending on cup size).
3. Prepare your wick: Cut the wick slightly longer than necessary as it will curl slightly when burning; 8 – 10 inches should be plenty long enough for most cups. Insert one end through the bottom center of your cup (this helps hold it straight) whilst looping the other end around an extra stick or holder; this helps keep it off the bottom at all times which prevents excessive pooling in some cases.
4. Melt the wax: Place your chosen wax flakes in either a double boiler setup or place them directly into an appropriate vessel placed over heat source suitable enough to melt solid ingredients like boiling water (hot plate etc.). Ensure wax is completely melted before proceeding further by gently stirring very occasionally throughout heating period; don’t forget safety precautions such as wearing oven mitts when handling hot vessels etc…
5. Pour your melted wax: Once complete melted, thoroughly check wick placement one last time before carefully carefully pouring liquid wax into teacups ensuring not to fill over midsection edges but instead fill up so just below rim edge remains visible (this allows slight excess during curing process which helps settle fragrances down effectively). Do NOT blow on top or try to move wick around during pouring stage as this can cause air bubbles & early combustion respectively; instead use alternative devices such as bamboo skewers bent appropriately for position adjustment purposes only (just remember not too fiddle with it throughout rest of curing process too much!).
Finishing Touches
Once you’ve chosen the right wax and added the fragrances to your tea cup candles, it’s time to give them some personality. There are a few key components that can make your teacup candles stand out.
Wicks: In order for your candle to burn properly, it must have an appropriate wick. The type of material you use for wicking will depend on the type of wax and fragrance mix used in the candle. Natural fiber wicks such as cotton or hemp are most commonly used in teacup candles due to their slow burning nature and lack of smoke production when lit. Make sure each wick is adequately anchored before adding the melted wax.
Tops: Adding a top layer to your candle can help with its overall look and provide protection from dust and debris. Choose from a variety of styles including lids, covers, and silicone holders. Try something unique like bamboo slices or colorful beads to add flair and personality!
Embellishments: Give an extra tactile layer by adding embellishments such as glitter flakes, paper cutouts, ribbons, buttons, or dried flowers to your tea cup candles! It’s these details that will make them truly special and one of a kind! Once everything is done, keep these beautiful pieces away from direct sunlight and moisture so they will last longer!
Common Candle Making Mistakes
Making your own teacup candles can be a fun and rewarding activity — but you should watch out for potential mistakes. DIY candle-making can be complicated, so it’s important to have some knowledge of the process before diving in. Here are a few common rookie errors and tips to help you avoid them:
1. Making sure the wax is properly melted: Be careful not to heat your wax too quickly, as this could cause an unsightly appearance or unpleasant smell. Keep small batches of wax at low temperatures, stir occasionally and pay attention to your thermometer during the melting process.
2. Choosing the right wick size and type: A wick that is too big will cause flames of excessive height while a wick that is too small won’t provide adequate fuel for burning. Consider the diameter of your container, ideal burn temperature range, fragrance load and the quantity of candle wax when deciding on a wick size and type.
3. Properly anchoring the wick: Once you find the right wick size, make sure it is firmly anchored in place for optimal performance during burning. You can use glue dots or pre-primed metal tabs for added stability prior to pouring in hot wax.
4. Not ‘cold-sniffing’ after pouring: This means sniffing your candles once cooled which helps identify scents more precisely than smelling while melting or after burning since hot wax releases stronger scent notes than colder temperatures do. It also eliminates guesswork if any changes need to be made regarding essential oils or fragrance values before lighting up or gifting your teacup candles!
Caring for Your Teacup Candles
Once you have successfully made your own teacup candles, it is important to care for them properly in order to prolong the life and beauty of your creations. Proper care will ensure that your candles last longer and burn safely and evenly. To begin, when lighting the candle for the first time, give it a long initial burn to maximize its life. Allow the wax to reach the edges of the cup each time you light it and slowly build up an even layer called a ‘melt pool’. This creates a strong barrier and prevents tunnelling which could cause endangering draughts or broken teacups. Additionally, always use high-grade, paraffin wax for refilling as this type has a higher melting point than other alternatives. Finally, remember to keep wicks clean and trim as needed as long wicks can cause excessive flickering or smoking. By following these tips, you can guarantee that your teacup candles will look beautiful and be effective for longer periods of time.
Display Options
When it comes to displaying your homemade teacup candles, there are numerous creative ideas to take advantage of. Here are some of the options you can use that will help accentuate the beauty and fragrance of these special candles:
1. Place them on a shelf, either alone or among other items. A well-positioned shelf can be used to strategically showcase your unique candles, especially if the background features neutral colors. Placing your candles in groups will emphasizes the different colors and add visual appeal to the display.
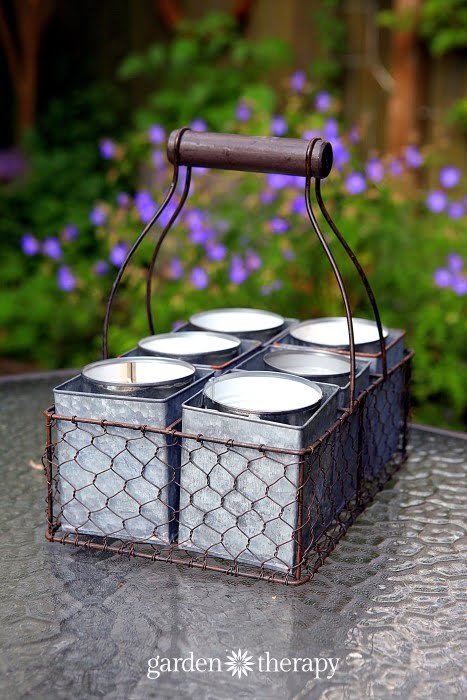
2. Use a tray or basket with their favorite colors and shapes. Grouping them together makes your display look more organized and aesthetically pleasing. For an added touch of luxury, you can also place jewels, stones, and crystals between the candles for an impressive presentation.
3. Hang them from strings or hooks with colorful ribbons attached at different heights for an eye-catching display option. This technique will bring attention to each individual candle while giving you more creative options when designing a memorable set-up in your home or office space.
4. An interesting idea is to place your teacup candles around a pillar candle in the center of a room or table setting for a decadent display that has a rich ambiance feel to it. The different sizes and colors will catch everyone’s attention as they gather around this beautiful centerpiece, creating a luxurious atmosphere that’s sure to draw eyes every time it’s seen!
5. Why not also think outside the box and arrange your teacup candles in unusual ways by suspending above from branches from trees? Utilizing nature can be an amazing way to display these pieces of art in places like gardens, balconies, patios & terraces where people will be able to admire fully appreciate its beauty!
Conclusion
The beautiful and fragrant teacup candles you have now created can be displayed for all to admire or gifted as a unique, thoughtful present. Whether you are making them yourself or giving them away, the process behind making this type of candle adds extra value. Every moment spent creating your own customized design was an opportunity to grow creatively and explore the possibilities of craftsmanship.
Now that you’re done, take time to appreciate the beauty and wonderful aroma of your teacup candles. Get cozy with them and inspect their individual characteristics; notice how each one is unique from the rest. Try combining different scents to find your favorite flavor and explore new fragrances that catch your eye. Place a few around your home to give it an inviting atmosphere and enjoy their calming presence. Your newly crafted original teacup candles are filled with hours of effort, artistry, and creativity; don’t forget to savor their delightful aroma each time you pass by!

Welcome to my candle making blog! In this blog, I will be sharing my tips and tricks for making candles. I will also be sharing some of my favorite recipes.

