The art of candle making has been enjoyed by many for centuries, offering a creative outlet and the ability to craft personalized, fragrant ambience. While traditional methods of making candles from scratch are still widely practiced, there has been a surge in the popularity of candle making kits. These kits provide beginners and enthusiasts alike with an accessible and convenient way to explore this soothing craft.
In recent years, candle making kits have become increasingly popular as more people seek out hands-on hobbies and DIY projects. The allure lies in the simplicity and ease that these kits offer. With a comprehensive set of tools and materials, individuals can embark on their candle making journey without the need for extensive research or specialized knowledge.
One of the biggest benefits of using a candle making kit is the opportunity to create your own unique candles tailored to your preferences. By starting with a kit, you have access to all the essential tools and ingredients needed to craft beautiful candles right at home. With step-by-step instructions provided in the kit, even beginners can confidently navigate through each stage of the process.
Additionally, candle making kits often come packed with a variety of wax options, fragrance oils, colorants, and even decorative elements like molds or containers. This allows users to experiment with different combinations and techniques, resulting in endless possibilities for customization. Whether you prefer classic white candles or vibrant colorful creations, a candle making kit provides everything you need to bring your visions to life.
In the following sections of this article, we will delve into the various aspects of candle making kits – from essential tools required to step-by-step instructions on how to use them effectively. We will also explore different wax types available in the market along with tips on selecting scents and blending fragrances for truly personalized creations.
Furthermore, we will discuss ways to add colors and decorations to your candles as well as troubleshoot common issues that may arise during the process.
So if you find yourself captivated by the art of candle making or simply want to explore a new creative hobby, a candle making kit offers an excellent entry point into this enchanting world. Get ready to embark on a journey of self-expression and craftsmanship as we dive into the details of crafting your own candles with ease and precision.
Benefits of Making Your Own Candles
Save Money
Using a candle making kit to create your own candles can be a great way to save money in the long run. Purchasing store-bought candles can quickly add up, especially if you are someone who enjoys burning candles frequently.
By investing in a candle making kit, you will have all the necessary materials and tools at your disposal to make multiple candles at a fraction of the cost of buying them from a store. Not only will this save you money, but it also allows you to customize your candles according to your preferences.
Personalization
One of the biggest benefits of making your own candles is the ability to personalize them. With a candle making kit, you have complete control over the type of wax, scents, colors, and decorations that go into your candle creations.
This means that you can create unique and customized candles that reflect your personal style and taste. Whether you prefer floral scents or earthy fragrances or muted colors or bold hues, a candle making kit gives you the freedom to experiment and create one-of-a-kind candles that cater specifically to your preferences.
Creative Outlet
Making candles with a candle making kit is not only a practical activity but also serves as a creative outlet. It allows you to explore different techniques and experiment with various combinations of scents, colors, and decorations. The process itself can be quite therapeutic and relaxing, providing a much-needed break from our busy lives.
Additionally, creating beautiful and aesthetically pleasing candles can give you a sense of accomplishment and satisfaction. Whether you choose to make candles for yourself or give them as gifts to friends and family, the creative aspect of candle making adds an extra dimension of enjoyment to the process.
By investing in a candle making kit, not only do you get the tools needed for making candles but also the opportunity for cost savings, personalization, and a creative outlet. So, if you’re someone who loves candles and enjoys crafts, a candle making kit can certainly be a great investment for you.
Essential Tools and Materials Needed
To start making your own candles with a candle making kit, you will need a few essential tools and materials. Having the right equipment will make the candle making process easier and more enjoyable. Here is a comprehensive list of items that you will need for your candle making kit:
1. Wax: The most important component of any candle is the wax. There are several types of wax available, including paraffin wax, soy wax, beeswax, and palm wax. Each type has its own unique qualities and characteristics.
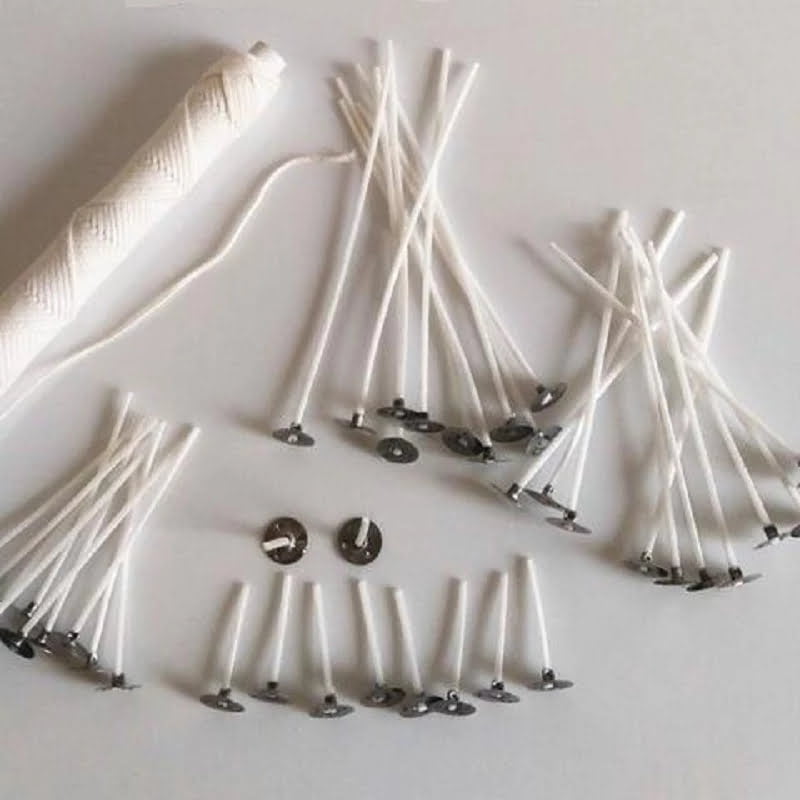
2. Wicks: Wicks are used to support the flame and provide a consistent burn for the candle. It is important to choose wicks that are suitable for the type of wax you are using and the size of your candle container.
3. Containers: Candle containers come in various shapes and sizes, such as jars, tins, or molds. Choose containers that are heat-resistant and non-flammable to ensure safety while burning the candles.
4. Thermometer: A thermometer is essential for checking the temperature of the melted wax. Maintaining the correct temperature is crucial for proper fragrance release and an even burn.
5. Double Boiler or Melting Pot: A double boiler or a dedicated melting pot is used to melt the wax gently and evenly without direct heat exposure.
6. Stirring Utensil: A heat-resistant stirring utensil like a wooden spoon or metal whisk should be used to stir the melted wax, fragrance oils, and colorants together.
7. Scented Oils: Fragrance oils add pleasant aromas to your candles. Choose from a wide variety of scents to create different moods or themes.
8. Dyes or Colorants: Coloring agents can be added to the melted wax to create vivid colors and unique designs in your candles.
9. Mold Release Spray (if using molds): If you plan on using molds instead of containers, mold release spray will help your candles release easily from the molds.
10. Candle Labels and Packaging: Lastly, consider investing in labels and packaging materials if you plan on giving away or selling your homemade candles. This will give your candles a professional touch.
Having these essential tools and materials will set you up for success with your candle making kit. With these items at hand, you’ll be ready to dive into the creative and rewarding world of candle making.
Step-by-Step Instructions
Gather Your Materials
To begin making your own candles using a candle making kit, you will need to gather all the necessary materials. These typically include a melting pot or double boiler, a thermometer, a stirring utensil, candle molds or containers, wicks, fragrance oils or essential oils, dyes (if desired), and wax. Make sure you have all these materials on hand before you start the process.
Melt the Wax
The first step in making candles is to melt the wax. Place the wax flakes into a melting pot or double boiler and heat it over low to medium heat until it reaches the desired temperature.
It is important to closely monitor the temperature using a thermometer throughout this process to ensure that the wax does not overheat and become dangerous. Different types of wax have different melting points, so refer to the instructions provided with your candle making kit for specific temperature guidelines.
Add Fragrance and Color
Once the wax has reached the desired temperature and fully melted, it’s time to add fragrance oil or essential oil of your choice. The amount of fragrance oil needed will depend on how strong you want the scent of your candle to be. Generally, around 1 ounce of fragrance oil per pound of wax is recommended.
If desired, this is also when you would add dye to give your candle a pop of color. Again, refer to the instructions provided with your kit for specific guidance on how much dye should be added based on the amount of wax being used.
Prepare Molds and Wicks
While your scented and colored wax is still liquid, prepare your molds or containers by attaching pre-waxed wicks at their centers. There are various types of wicks available, so choose one that is suitable for your preferred candle size and material.
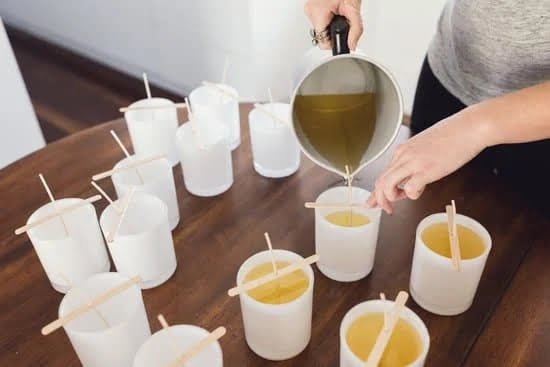
To keep the wick upright while pouring in the wax, you can use a wick holder or simply tie the top of the wick around a pencil or chopstick and rest it across the mold or container.
Pour and Set
Carefully pour the scented and colored wax into the prepared molds or containers. Fill them to your desired level, leaving some space at the top. Allow the candles to cool and set completely before moving them. This process usually takes several hours, so be patient and avoid disturbing the candles during this time.
Remember, following precise instructions is crucial to ensure safe and successful candle making. Always read and understand the guidelines provided by your candle making kit manufacturer before starting any project.
Choosing the Right Wax
When it comes to making candles, choosing the right wax is crucial. The type of wax you use will affect the burn time, scent throw, and overall quality of your candles. There are several types of wax available for candle making, each with its own unique properties. In this section, we will explore different types of wax and their suitability for candle making.
1. Soy Wax: Soy wax is a popular choice among candle makers because it is natural, renewable, and environmentally friendly. It has a smooth texture and provides excellent scent throw when used with fragrance oils. Soy wax candles also have a longer burn time compared to other waxes. However, soy wax may not hold color as well as some other waxes, so if you want vibrant colored candles, you may want to consider other options.
2. Paraffin Wax: Paraffin wax is the most widely used wax for candle making. It is affordable and easy to work with. Paraffin wax has good scent throw and can easily be colored using liquid or dye chips. However, one downside of paraffin wax is that it is derived from petroleum which makes it less eco-friendly compared to other waxes.
3. Beeswax: Beeswax is a natural wax that gives off a sweet honey-like aroma when burned. It has a beautiful golden color and creates a warm glow when lit. Beeswax has a slow burn rate and produces minimal soot or smoke when properly trimmed. While beeswax can be more expensive than other waxes, many people prefer it for its natural properties.
4. Coconut Wax: Coconut wax is another great option for candle making because it has excellent scent throw and provides a clean burn with minimal soot or smoke. It also has good color retention when used with dyes or pigments. Coconut wax is a little harder than other waxes and may require a higher fragrance load for optimal scent throw.
| Type of Wax | Properties |
|---|---|
| Soy Wax | Natural, renewable, good scent throw but may not hold color well |
| Paraffin Wax | Affordable, easy to work with, good scent throw but derived from petroleum |
| Beeswax | Natural aroma, slow burn rate, minimal soot or smoke but more expensive |
| Coconut Wax | Excellent scent throw, clean burn with minimal soot or smoke but requires higher fragrance load |
Finding the Perfect Scents
When it comes to making personalized candles, selecting and blending the right fragrances is crucial in creating a unique and delightful sensory experience. The scent of a candle can evoke various emotions and set the mood in any space. In this section, we will explore some tips on how to find the perfect scents and blend them effectively to create personalized candles that reflect your style and taste.
The first step in finding the perfect scent for your candle is to consider the purpose or theme you have in mind. Are you looking for a calming scent for relaxation, a fresh scent for an invigorating ambiance, or a warm scent for a cozy atmosphere? Understanding the mood you want to create will help narrow down your fragrance options.
Next, it’s important to sample different fragrances before choosing the ones you want to use. Many suppliers offer sampler packs or fragrance oils specifically designed for candle making. This allows you to test out a variety of scents without committing to large quantities. Take note of which scents appeal to you and keep track of your favorites.
Once you have selected your fragrances, it’s time to start blending them together. Creating unique blends can be as simple as combining two or more fragrances in equal parts or experimenting with different ratios until you achieve your desired aroma. Be sure to record the measurements and formulas used so that you can recreate successful blends in the future.
By following these tips and exploring different fragrance options, you can create personalized candles that not only illuminate a space but also fill it with captivating scents that suit your preferences. Experimentation is key when it comes to finding the perfect blend, so don’t be afraid to mix and match different scents until you discover combinations that truly excite your senses.
Adding Colors and Decorations
One popular way to add color to your candles is by using candle dyes. These come in various forms such as liquid, blocks, or chips, and are available in a wide range of colors.
You can mix different dyes together to create custom shades or experiment with different concentrations to achieve the desired intensity. It’s important to follow the manufacturer’s instructions when using candle dyes and test a small amount of melted wax with the dye before adding it to the entire batch.
Another method for adding color is by incorporating colored wax sheets or wraps into your candles. These sheets, often made of beeswax or paraffin, are available in various colors and can be used to create beautiful designs on the surface of your candles. To use this technique, simply cut the sheets into desired shapes or strips and apply them onto the outside of the candle while it is still warm and pliable.
In addition to colors, you can also decorate your candles with various elements such as dried flowers, herbs, or spices. Before incorporating these decorative elements into your candles, ensure that they are completely dry and free from moisture. You can embed them into the wax by gently pressing them onto the surface or carefully dipping them directly into the melted wax. This adds an aromatic touch to your candles and creates a visually appealing texture.
Overall, adding colors and decorations is a fantastic way to enhance the visual appeal of your homemade candles. Whether you choose vibrant hues or natural elements, these techniques allow you to unleash your creativity while making beautiful candle creations that both look stunning and smell amazing.
Troubleshooting Tips
While making candles with a candle making kit can be a rewarding and enjoyable experience, it is not uncommon to encounter some challenges along the way. Fortunately, many common issues that arise during the candle making process have simple solutions. In this section, we will explore some of these common problems and provide troubleshooting tips to help you overcome them.
One common issue that many beginners face is air bubbles forming within the candles. These air bubbles can create unsightly gaps or holes in the finished product. To prevent this, ensure that you are pouring the melted wax at a suitable temperature. If the wax is too hot, it may create air pockets as it cools too quickly. Additionally, gently tapping the mold or container after pouring can help release any trapped air bubbles.
Another problem that may arise is uneven burning of the candle. This can be caused by factors such as an incorrect wick size or lack of proper wick maintenance. To avoid uneven burning, make sure to select an appropriate wick for your chosen wax type and container size. It is essential to trim the wick to the recommended length before each use and keep it centered in the candle while it is cooling and solidifying.
Scent fading is another issue that can occur when making scented candles. Over time, some fragrances may lose their potency, resulting in a less intense scent when lit. To maintain a strong fragrance in your candles, consider using fragrance oils specifically designed for candle making instead of essential oils. Fragrance oils are specially formulated to withstand high temperatures and retain their scent better over time.
By being aware of these common issues and implementing the suggested solutions, you can troubleshoot any problems that may arise when making your own candles with a candle making kit. With practice and attention to detail, you will soon be able to create beautiful candles that burn evenly, contain vibrant fragrances, and make wonderful additions to your home or thoughtful gifts for others.
Packaging and Selling Your Candles
When it comes to packaging and selling your homemade candles, presentation is everything. The way your candles are packaged can greatly impact their overall appeal and perceived value. Additionally, effective marketing techniques can help you reach a wider audience and increase sales. Here are some ideas to consider when it comes to packaging and marketing your candles.
Firstly, choosing the right packaging is essential. There are many options available, from simple glass jars to elegant tins or even unique containers like teacups or mason jars. Consider the style and theme of your candles when selecting packaging materials. For example, if you create rustic or farmhouse-style candles, a mason jar with a twine bow could be the perfect choice. If your candles have a more luxurious feel, opt for sleek glass containers with metallic accents.
Next, don’t forget about labeling. A well-designed label not only provides important information such as scent and burn time but also adds a professional touch to your candles. Invest in high-quality labels that are durable and waterproof to ensure they withstand any potential moisture from the candle wax. Include your brand name or logo on each label for brand recognition.
In terms of marketing, social media platforms can be powerful tools for promoting your handmade candles. Create visually appealing posts that showcase the beauty of your candles and share behind-the-scenes content of the candle-making process. Engage with your followers by responding to comments and messages promptly.
Additionally, consider participating in local craft fairs or farmers markets where you can showcase your candles in person. Offer samples for potential customers to smell and experience firsthand. Use attractive display setups that highlight the uniqueness of your product.
By focusing on creative packaging ideas and implementing effective marketing strategies, you can increase the visibility and desirability of your homemade candles. Remember that presenting high-quality products in an appealing way will leave a lasting impression on customers, ultimately leading to increased sales and success in the candle-making industry.
Safety Precautions
In conclusion, while making your own candles using a candle making kit can be a fun and rewarding experience, it is important to prioritize safety. Following the necessary safety precautions ensures that you can enjoy the process without any mishaps or accidents.
First and foremost, always read and follow the instructions provided with your candle making kit. These instructions are designed to guide you through the process safely and should not be disregarded. Additionally, it is crucial to work in a well-ventilated area to avoid inhaling any harmful fumes from melting wax or fragrance oils.
When handling hot wax, make sure to use heat-resistant gloves or oven mitts to protect your hands from burns. It is also recommended to have a dedicated workspace for candle making where there are no flammable materials nearby. This minimizes the risk of fires and other accidents.
Furthermore, keep children and pets away from your workspace while working with a candle making kit. The hot wax and other materials can pose potential hazards to their safety. Always store your supplies securely, out of reach of children, to prevent any accidental ingestion or misuse.
Lastly, when it comes to using fragrances and colorants in your candles, be cautious about choosing safe options that are specifically formulated for candle making. Avoid using anything that may cause irritation or allergic reactions when burned. Remember, safety should always come first when indulging in any DIY project like candle making.
By following these essential safety measures, you can enjoy the process of making homemade candles with peace of mind. So go ahead and light up your space with beautiful, handcrafted candles knowing that you have taken all necessary precautions to ensure a safe environment for yourself and anyone who enjoys the fruits of your labor.

Welcome to my candle making blog! In this blog, I will be sharing my tips and tricks for making candles. I will also be sharing some of my favorite recipes.


