Are you interested in creating your own beautiful, fragrant candles at home? Learning the steps in candle making can be a fun and rewarding hobby. Whether you want to give personalized gifts to friends and family or start your own candle-making business, understanding the process is essential.
Candle making has been around for centuries and continues to be a popular craft today. With the right materials and tools, anyone can create their own custom candles to enjoy. From choosing the perfect wax and wick to adding fragrance and color, there are many important steps to consider when making candles.
In this article, we will guide you through the process of candle making, sharing valuable tips and insights every step of the way. From selecting the right materials and tools to troubleshooting common issues, you’ll gain a comprehensive understanding of what it takes to successfully make your own candles at home. So let’s get started on this creative journey into the world of candle making.
Materials and Tools Needed for Candle Making
When it comes to making your own candles, having the right materials and tools is essential to ensure that the process goes smoothly and the end result is a beautiful, high-quality candle. Before you begin making candles, it’s important to gather all the necessary supplies.
First and foremost, you will need wax for your candles. There are different types of wax available, each with its own unique characteristics. Some popular choices include soy wax, beeswax, paraffin wax, and gel wax. Additionally, you will need wicks for your candles. Wicks come in various sizes and styles, so be sure to choose the right one for the type of candle you want to make.
In addition to wax and wicks, you will also need a double boiler or a melting pot to melt the wax, a thermometer to monitor the temperature of the melted wax, a heat source (such as a stove or hot plate), a pouring pot or pitcher for pouring the melted wax into molds or containers, and molds or containers for shaping the candles.
Other optional tools and materials may include fragrance oils or essential oils for scenting the candles, dye chips or liquid dye for coloring the candles, and wick holders and centering devices to keep the wick in place while the candle cools.
Once you have all of these materials and tools on hand, you’ll be ready to move on to the next step in candle making – choosing the right wax for your candles.
Choosing the Right Wax for Your Candles
Choosing the right wax is a crucial step in the candle making process. The type of wax you choose will greatly impact the quality, burn time, and fragrance throw of your candles. There are several types of wax to choose from, including paraffin, soy, beeswax, and palm wax. Each type of wax has its own unique characteristics and benefits.
Paraffin Wax
Paraffin wax is a popular choice for candle making due to its affordability and ability to hold fragrance well. It is readily available and easy to work with, making it a great option for beginners. However, some people may prefer to avoid paraffin wax due to its petroleum-based origins.
Soy Wax
Soy wax is a natural alternative to paraffin wax and is derived from soybean oil. It is biodegradable, sustainable, and produces minimal soot when burned. Soy wax also has a great scent throw and provides a longer burn time compared to paraffin wax.
Beeswax
Beeswax is another natural option for candle making that has a subtle honey aroma. It has a longer burn time than both paraffin and soy waxes and produces very little soot when burned. Beeswax can be more expensive than other types of wax but is considered eco-friendly and sustainable.
When choosing the right wax for your candles, consider factors such as cost, availability, burn time, fragrance throw, and sustainability. Experimenting with different types of waxes can help you find the perfect fit for your candle making projects. Remember to always follow safety guidelines when working with hot wax to ensure a successful and enjoyable candle making experience.
Selecting the Perfect Wick for Your Candles
When it comes to making candles, selecting the perfect wick is crucial in ensuring that your candles burn efficiently and evenly. The wick is responsible for carrying the melted wax up to the flame, so choosing the right wick size and material is essential for a successful candle-making process.
Understanding Wick Sizes
Wick sizes are available in various diameters, which will determine how large of a pool of melted wax surrounds the wick during burning. A larger diameter wick will create a larger flame and melt more wax, while a smaller diameter wick will produce a smaller flame and melt less wax. It’s important to match the wick size with the diameter of your candle container to ensure an even burn.
Choosing the Right Wick Material
Wicks can be made from different materials such as cotton, wood, or metal. Cotton wicks are the most common and are suitable for most candle types. Wood wicks create a crackling sound when burning, giving off a cozy ambiance. Metal-core wicks are often used in container candles to keep them straight and upright during burning.
Considering Fragrance and Color
It’s important to consider any added fragrance or color when selecting your wick. Some fragrances may require a larger wick size to ensure that enough scent is released while burning. Additionally, if you’re adding color to your candles, certain dyes may affect the way the wax burns, so adjustments may need to be made with your wick selection.
By understanding the importance of selecting the perfect wick for your candles, you can ensure that they burn evenly and efficiently, providing a beautiful glow and delightful aroma. The right combination of size and material will contribute to the overall success of your candle-making efforts.
Adding Fragrance and Color to Your Candles
- Choose the right fragrance oils: When adding scent to your candles, it’s important to select high-quality fragrance oils that are specifically designed for candle making. These oils come in a wide variety of scents, from floral and fruity to baked goods and earthy aromas. Be sure to measure the correct amount of fragrance oil for the amount of wax you’re using, as using too much can affect the candle’s burn quality.
- Add color: There are various options for coloring your candles, including liquid dyes, dye chips, and even natural ingredients like spices and herbs. Liquid dyes are easy to use and come in a range of vibrant colors, while dye chips provide more muted tones. If you prefer natural options, consider experimenting with botanical elements like turmeric for yellow hues or beetroot powder for pink tones.
- Incorporate the fragrance and color: Once you’ve chosen your desired scent and color, carefully incorporate them into your melted wax according to the manufacturer’s instructions. Stir the fragrance oil or dye into the wax thoroughly to ensure an even distribution throughout the candle.
Keep in mind that both fragrance oils and dyes should be specifically intended for candle making purposes in order to ensure safety and quality in your finished products.
After following these steps in candle making on adding fragrance and color to your candles, allow the wax to cool slightly before pouring it into your containers or molds to complete the process of creating beautiful fragranced and colored candles.
The Step-by-Step Process of Making Candles
Once you have gathered all the necessary materials and tools for candle making, it’s time to dive into the step-by-step process. The first step is to prepare your work area by covering it with newspaper or a plastic tablecloth to protect against spills and mess. Then, set up your double boiler or melting pot and begin melting the wax. Be sure to use a thermometer to monitor the temperature, as different waxes require specific melting points.
Once the wax has reached the desired temperature, it’s time to add any desired fragrance and color. This step requires careful attention to measurements, as too much fragrance can affect the burning quality of the candle, and too much dye can affect its appearance. Stir in these additives thoroughly before moving on to the next step.
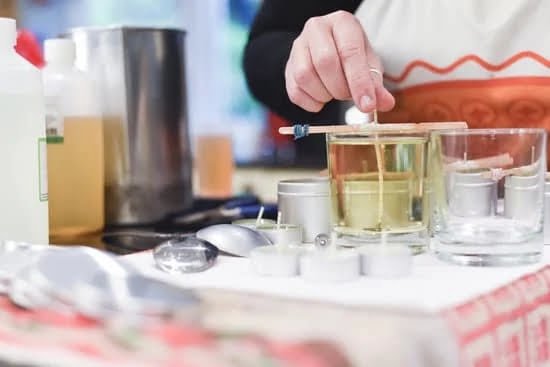
Next, prepare your containers by securing the wick in place using a wick holder or chopsticks balanced across the opening. Slowly pour the melted wax into each container, ensuring that the wick remains centered throughout this process. Allow the candles to cool completely before trimming the wick to about ¼ inch above the surface of the wax. Congratulations – you have now successfully completed all steps in candle making.
It’s essential for beginners in candle making to follow each step carefully and practice patience during this creative process. While each step may seem simple on its own, mastering them all requires attention to detail and dedication. With practice and experience, you’ll soon be able to create beautiful and fragrant candles that will be enjoyed by friends and family alike.
Troubleshooting Common Candle Making Issues
When making candles, it is common to encounter several issues that may affect the quality of your finished product. One of the most common problems in candle making is tunneling, which occurs when the wax does not melt evenly across the surface, leaving a hole in the middle of the candle. To prevent tunneling, ensure that you allow your candles to burn long enough for the entire surface to liquefy during each use.
Another common issue is frosting, which results in a white, powdery film on the surface of your candles. This can happen when the wax cools too quickly or if there are temperature fluctuations during the cooling process. To minimize frosting, try pouring your wax at a slightly higher temperature and avoid exposing your candles to drafty areas while they are cooling.
Wet spots are another problem that many candle makers encounter. These are air pockets between the wax and container that create an unattractive blemish on the surface of the candle. To prevent wet spots, try preheating your containers before pouring the wax and allowing them to cool slowly after pouring.
Safety Tips for Candle Making
When it comes to candle making, safety should always be a top priority. Here are some important safety tips to keep in mind when creating your own candles:
- Work in a well-ventilated area to avoid inhaling fumes from the melting wax and fragrance oils
- Wear appropriate protective gear such as gloves and goggles to prevent burns and irritation from hot wax
- Never leave melted wax unattended on the heat source to prevent accidental fires or burns
- Keep flammable materials away from the work area to reduce the risk of fire hazards
- Use a dedicated workspace with a heat-resistant surface to minimize the risk of accidents and spills
In addition to these general safety precautions, it’s important to also consider safety measures specific to each step in candle making. For example, when adding fragrance and color to your candles, be sure to carefully measure and mix the ingredients according to the manufacturer’s instructions. Failure to do so could result in skin irritation or an uneven burn when using the finished candle.
Similarly, during the process of selecting the perfect wick for your candles, be mindful of choosing one that is suitable for the size and type of candle you are making. Using a wick that is too large can cause excessive smoking and soot buildup, while a wick that is too small may result in tunneling and poor scent throw. Always follow guidelines provided by reputable sources or consult with experienced candle makers for guidance on wick selection.
Conclusion and Tips for Successful Candle Making
In conclusion, candle making is a versatile and rewarding hobby that allows for creativity and personalization. By following the steps in candle making outlined in this article, you can create beautiful and unique candles to enjoy yourself or give as thoughtful gifts to others.
From selecting the right materials and tools, to choosing the perfect wax and wick, adding fragrance and color, to mastering the step-by-step process of making candles, there are endless possibilities for creating your own custom candles.
To ensure successful candle making, it is important to pay attention to detail and follow safety tips for handling hot wax and open flames. Additionally, troubleshooting common candle making issues such as uneven burning or air pockets in the wax will help you improve your craft. It’s also important to remember that practice makes perfect, so don’t be discouraged by any initial setbacks in your candle making journey.
Remember that with some patience and dedication, you can master the art of candle making and enjoy the satisfaction of creating something truly special. Whether you are a beginner or an experienced hobbyist, there are always new techniques to learn and ways to improve your candle making skills. So gather your materials, follow the steps in candle making provided here, and let your creativity shine through as you embark on this enjoyable craft.
Frequently Asked Questions
What Is the Process of a Candle?
The process of making a candle involves melting the wax, adding fragrance and color if desired, placing the wick in the container, and then pouring the melted wax into the container around the wick. Once the wax cools and hardens, a candle is formed.
What Is the Formula for Candle Making?
The formula for making candles involves combining wax, fragrance oils, dyes or colorants, and a wick. Different types of wax can be used such as paraffin, soy, or beeswax, depending on personal preference and desired quality of the candle.
How Do You Make Soy Wax Candles Step by Step?
To make soy wax candles, start by measuring out the amount of soy wax needed and melting it in a double boiler. Once melted, add fragrance oil and dye if desired. Place the wick in the container and carefully pour the melted soy wax into it. Allow the candle to cool and harden before trimming the wick and using it.

Welcome to my candle making blog! In this blog, I will be sharing my tips and tricks for making candles. I will also be sharing some of my favorite recipes.


