Are you looking for a relaxing and creative hobby to take on? Look no further than DIY soy candle making. In this article, we will explore the step-by-step instructions for creating your own beautiful soy candles right at home.
From the advantages of using soy wax to necessary materials and tools, as well as safety precautions and troubleshooting common issues, we’ve got you covered. So, let’s dive in and learn how to make your very own handmade soy candles.
Soy candle making has become increasingly popular due to its many benefits, including a cleaner burn and longer-lasting scent. Whether you’re new to candle making or an experienced crafter, learning how to make soy candles can be a rewarding and enjoyable experience. With our comprehensive guide, you’ll be able to create personalized candles that are perfect for gifting or simply enjoying in your own home.
Before you get started on your DIY soy candle making journey, it’s important to gather all the necessary materials and tools. From soy wax to wicks and fragrance oils, we’ll walk you through everything you need to have on hand before diving into the candle making process. So roll up your sleeves, get ready to unleash your creativity, and let’s start making some gorgeous soy candles.
Advantages of Using Soy Wax for Candle Making
Soy wax has become a popular choice for candle making due to its numerous advantages over traditional paraffin wax. Here are some of the key benefits of using soy wax for your DIY candle making projects:
- Eco-friendly: Soy wax is made from soybeans, a renewable and sustainable resource, making it a more environmentally friendly option compared to paraffin wax which is derived from petroleum.
- Clean burning: Soy candles produce less soot and toxins when burned, resulting in a cleaner and healthier environment inside your home.
- Longer lasting: Soy candles typically have a longer burn time compared to paraffin candles, allowing you to enjoy them for a longer period of time.
In addition to these benefits, soy wax also provides better fragrance retention, meaning that it can hold more scent than other types of wax. This makes it an ideal choice for adding essential oils or fragrance oils to create beautifully scented candles.
The natural creaminess of soy wax also allows for easy clean-up with soap and water, making it convenient for DIY enthusiasts who want to experiment with different colors and scents. With these advantages in mind, it’s no wonder that more and more people are turning to soy wax for their homemade candle projects.
Necessary Materials and Tools for DIY Soy Candle Making
When it comes to making your own soy candles at home, there are a few essential materials and tools that you will need to get started. First and foremost, you will need soy wax, which is the main ingredient for your candles. Soy wax is an eco-friendly and sustainable option that produces a clean and long-lasting burn. You can easily find soy wax at craft stores or online retailers.
In addition to soy wax, you will also need wicks, which are the strings that create the burning flame in your candles. Be sure to select wicks that are appropriate for use with soy wax, as different types of waxes require different wick sizes. You will also need containers to hold your candles, such as glass jars or tins. These containers come in various shapes and sizes, allowing for creativity in your candle-making process.
Other necessary materials include a double boiler or melting pot for heating the soy wax, a thermometer to monitor the temperature of the wax, and a stirring utensil for mixing in colorants or fragrances. It’s also helpful to have a scale for measuring out precise amounts of soy wax and fragrance oils. With these materials and tools on hand, you’ll be well-equipped to begin your DIY soy candle making endeavors.
| Materials | Tools |
|---|---|
| Soy Wax | Double Boiler |
| Candle Wicks | Thermometer |
| Candle Containers | Stirring Utensil |
| Fragrance Oils (optional) | Scale |
Step-by-Step Instructions for Making Soy Candles at Home
Making soy candles at home can be a fun and rewarding DIY project. With the right materials and a little bit of patience, you can create beautiful and fragrant candles to enjoy or give as gifts to friends and family. Follow these step-by-step instructions for making soy candles in the comfort of your own home:
Step 1: Prepare Your Materials
- Soy wax flakes
- Candle wicks
- Candle containers
- Fragrance oils (optional)
- Candle dye (optional)
- Pouring pot or double boiler
- Thermometer
- Stirring utensil
Step 2: Melt the Soy Wax
Once you have gathered all your materials, it’s time to melt the soy wax. Place the soy wax flakes into a pouring pot or double boiler, and heat over medium-low heat until completely melted. Use a thermometer to ensure that the wax reaches around 185-190°F.
Step 3: Prepare the Candle Containers and Wicks
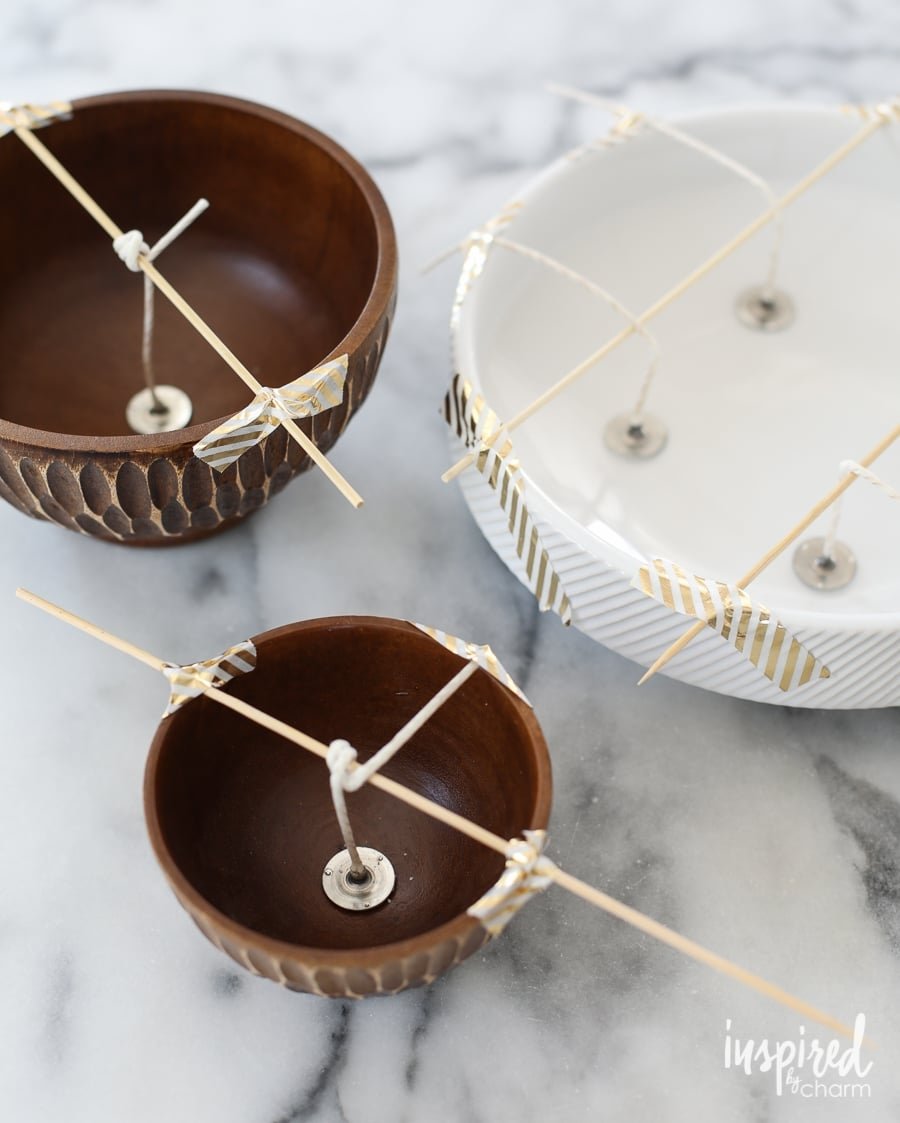
While the wax is melting, prepare your candle containers by securing the wicks in the center using a wick holder or by wrapping them around a pencil laid across the container’s opening. Make sure the wick is straight and centered to ensure an even burn.
By following these simple steps, you can create your own beautiful soy candles at home with ease. Experiment with different scents, colors, and container shapes to make unique and personalized candles for yourself or as thoughtful gifts for loved ones. Happy candle-making.
Tips and Tricks for Adding Color and Scent to Your Soy Candles
One of the fun parts of DIY soy candle making is adding color to your candles. You can use liquid dye, color blocks, or even natural materials like spices and herbs to achieve the perfect hue for your homemade candles. For a light, pastel color, start with just a drop or two of liquid dye, as soy wax can absorb color quite well.
For a deeper, more vibrant color, gradually add more drops until you reach your desired shade. If you’re using color blocks, simply shave off small pieces and add them to the melted soy wax until you achieve the right color.
Infusing Scent Into Your Soy Candles
Soy wax is known for its excellent scent throw, making it perfect for creating beautifully fragrant candles. When adding scent to your soy candles, always use fragrance oils specifically made for candle making. Start by adding a few drops at a time to your melted soy wax and then stir well.
Keep in mind that different scents have different strengths, so be sure to test a small amount first before committing to the full batch. Be creative with your scent combinations and remember that less is often more when it comes to achieving a balanced aroma in your soy candles.
Choosing Natural Additives for Color and Scent
If you prefer natural ingredients in your DIY soy candle making endeavors, consider using spices, herbs, or essential oils to add both color and scent to your candles. Turmeric can create a beautiful yellow hue while cinnamon can produce warm tones of brown and orange. Essential oils like lavender and eucalyptus offer delightful scents that are not only pleasing but also have potential aromatherapy benefits when the candles are burned.
By following these tips and tricks for adding color and scent to your soy candles, you can elevate your DIY candle-making experience and create personalized gifts or home decor items that reflect your unique style and preferences.
Safety Precautions When Working With Soy Wax
Protective Gear
When working with soy wax, it is important to wear the appropriate protective gear to prevent any accidents or injury. This includes wearing gloves to protect your hands from hot wax and using safety goggles to protect your eyes from splashes. Additionally, wearing an apron or old clothes can help protect your skin and clothing from any spills.
Working Environment
It is essential to create a safe and well-ventilated environment when working with soy wax. Choose a clean, flat surface to work on and ensure that it is away from any flammable materials. Keep a fire extinguisher nearby as a precaution. Proper ventilation is also important, so consider opening a window or using a fan to circulate air in the area where you will be melting the wax.
Handling Hot Wax
When working with hot soy wax, always use caution to avoid burns. Use a double boiler or melting pot specifically designed for candle making to melt the wax safely. Never leave melted wax unattended on heat sources, and be careful when pouring the hot liquid into containers or molds. Always handle hot wax with care and keep it away from children and pets.
By following these safety precautions, you can ensure that your DIY soy candle making experience is not only enjoyable but also safe. Remember that safety should always be a priority when working with any kind of crafting materials, especially those involving heat and hot liquids like soy wax.
Troubleshooting Common Issues in DIY Soy Candle Making
While making your own soy candles at home can be a fun and rewarding experience, it is not without its challenges. Many beginner candle makers often encounter common issues that can affect the quality and appearance of their homemade creations. Here are some tips for troubleshooting these issues to ensure that your DIY soy candles turn out just the way you want them.
One common problem that DIY soy candle makers may encounter is uneven melting and cooling of the wax, which can result in lumpy or uneven texture in the finished candle. To troubleshoot this issue, make sure that you are melting the wax at the correct temperature and stirring it thoroughly to ensure even distribution of heat. Additionally, allow the candles to cool in a draft-free area to prevent any uneven cooling.
Another issue that may arise is poor scent throw, where the fragrance in the candle does not adequately fill the room when burned. To troubleshoot this, consider using a higher concentration of fragrance oil in your soy wax or experimenting with different types of fragrance oils to find one that provides better scent throw when the candle is lit.
In addition, frosting or white spots on the surface of your soy candles can be a common problem. This is caused by temperature changes during cooling and is more common with natural waxes like soy. To troubleshoot this issue, try pouring your candles at a slightly higher temperature and allowing them to cool slowly to minimize the appearance of frosting.
| Issue | Troubleshooting Tip |
|---|---|
| Uneven melting and cooling | Ensure correct temperature, thorough stirring, and draft-free cooling area |
| Poor scent throw | Use higher concentration of fragrance oil or experiment with different types of fragrance oils |
| Frosting/white spots | Pour at slightly higher temperature and cool slowly to minimize frosting appearance |
By following these troubleshooting tips and being mindful of potential issues in your DIY soy candle making process, you can create high-quality candles that look and smell amazing every time. Don’t be discouraged if you encounter any hiccups along the way – part of the joy of DIY candle making is learning from mistakes and perfecting your craft.
Creative Ideas for Packaging and Decorating Your DIY Soy Candles
When it comes to DIY soy candle making, the presentation is just as important as the product itself. Creatively packaging and decorating your homemade soy candles can take them to the next level and make them even more appealing. Here are a few ideas to help you get started on making your candles look professional and stylish.
One creative idea for packaging your DIY soy candles is to use mason jars or recycled glass containers. Not only are these options environmentally friendly, but they also give your candles a rustic and charming look. You can further customize these containers by adding decorative labels, ribbons, or twine for a more personalized touch.
Another great way to decorate your DIY soy candles is by incorporating natural elements such as dried flowers, herbs, or even small pinecones. Simply tie these items around the candle with twine or place them inside the container before pouring the wax for an added visual appeal and fragrance.
If you want to take your packaging to the next level, consider creating custom gift boxes or bags for your soy candles. Add tissue paper, shredded paper filler, or even small trinkets to create a unique unboxing experience for whoever receives your homemade creation. Remember that presentation can make a huge difference in how your soy candles are perceived, so do not hesitate to get creative and have fun with it.
By taking the time to package and decorate your DIY soy candles thoughtfully, you can elevate them from simple homemade products to beautiful gifts that anyone would be thrilled to receive.
Conclusion
In conclusion, creating your own soy candles at home can be a satisfying and rewarding experience. Whether you are looking to add a personal touch to your home decor, create unique gifts for loved ones, or start a small business, the possibilities are endless with DIY soy candle making.
By following the step-by-step instructions provided in this article and taking necessary safety precautions, you can enjoy the process of crafting high-quality soy candles in the comfort of your own space.
Not only does DIY soy candle making allow you to customize the color and scent of your candles, but it also gives you complete control over the ingredients used. Soy wax is a popular choice for many candle makers due to its natural, renewable, and non-toxic properties. Additionally, by using essential oils or fragrance oils, you can create personalized aromas that cater to your preferences.
As you continue with your DIY soy candle making endeavors, don’t forget to explore creative packaging and decorating ideas to add an extra special touch to your creations. With practice and patience, you can master the art of crafting beautiful and eco-friendly soy candles that bring ambiance and warmth to any space. So go ahead and unleash your creativity as you embark on this fulfilling journey of DIY soy candle making.
Frequently Asked Questions
How Do You Make Soy Candles Step by Step?
Making soy candles is a straightforward process. First, melt the soy wax flakes in a double boiler. Then, add fragrance oil and dye if desired. Prepare the wicks by adhering them to the bottom of the container and pouring the wax carefully. Finally, let the candles cool and trim the wick before lighting.
What Are the Burning Instructions for Soy Candles?
When burning soy candles, it’s important to trim the wick to 1/4 inch each time before lighting it again. Also, allow the candle to create a full melt pool (liquid wax covering the entire top) to prevent tunneling. It’s best to burn soy candles for 3-4 hours at a time.
How Many Drops of Oil Do You Put in a Soy Candle?
The number of drops of oil you put in a soy candle depends on personal preference and the size of the candle. As a general guideline, 1 ounce of fragrance oil per pound of wax is often recommended, which translates to approximately 100-120 drops per pound of wax. Adjust according to scent strength desired.

Welcome to my candle making blog! In this blog, I will be sharing my tips and tricks for making candles. I will also be sharing some of my favorite recipes.


