Introduction
Tapered candles offer a beautiful look that can be used throughout the year for any occasion. In addition to being aesthetically pleasing, they are also very easy to make. By learning just a few basic candle-making techniques and following some simple instructions, you can quickly and easily create your own custom tapered candles.
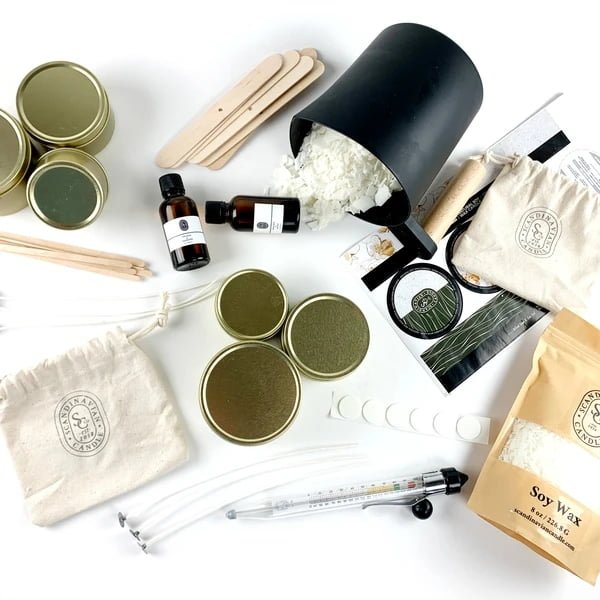
Using candle making tools such as wicks, wax pellets, melting pots, thermometers and mold tackers will all help to ensure that you make perfect candles every time. Before beginning to form your wax into a candle, it is important that you understand the type of wax that works best for your particular project. Some popular types of wax for making tapered candles include paraffin wax, natural beeswax and soy wax pellets. Each type of these waxes offers its own unique advantages in terms of burning performances and scent retention.
In order to create your beautiful tapered candles, it is essential to understand how much heat must be applied to melt the wax while avoiding scorching it. Adjusting the temperature accordingly will help keep your material from crystallizing or burning during the process. If your wax is too hot when poured into molds, it can become unusable or cause cracking during cooling. With this in mind, we recommended maintaining temperatures of up to 160 degrees Fahrenheit while melting and not exceeding 203 degrees Fahrenheit while pouring your material into molds.
Once the desired temperature has been reached, pre-wick each mold with one strand of wick fastened with a nail or equivalent object before adding the melted material. After a few minutes of cooling time in room temperature air once poured into molds, you can then trim off any excess wick sticking out from each side and let cool completely before handling further for optimal results when creating attractive tapered candles ideal for any special occasions or home decorating needs!
Preparing to Make Tapered Candles
To make tapered candles, you will need a few supplies in addition to wax and wick. Depending on your candle making method, you may not need all of these, but they are good to have on hand:
– A mold for the candles. This can be either a tin can or two pieces of plywood nailed together with the edges beveled down to the circumference of the desired candle (for a dipped candle).
– An old pot/pan and/or an electric melting pot just for use in candle making.
– Scissors and/or a utility knife for cutting wicks.
– A thermometer that is accurate up to 200 degrees Fahrenheit (93 Celsius).
– Pouring pitcher ” this can be any appropriately sized container made from metal or plastic; it is used to transfer melted wax from the melting pot into the molds.
You will also need some type of holder for your wick while pouring, such as wick bars, or a double boiler insert with hardware attached (a pencil works well). Additionally, depending on how you plan to decorate your candles, you may want various embellishments like dye chips, glitter, or ribbon/lace trim. Finally, don’t forget protective gear like goggles and gloves – it’s always best to practice safety when dealing with hot wax!
Setting the Perfect Heat Level
Getting the heat level of your wax mixture just right is essential for making smooth, professional-looking candles. If you heat your wax too high, you will end up with candles that are brittle and prone to cracking. But if you don’t heat the wax enough, you won’t get a consistent texture in your finished tapered candles. To set the perfect temperature for melting down and mixing your wax, it’s best to use a thermometer and monitor the temperature closely. For most paraffin or blended candle waxes, the ideal melting point is between 130° and 145°F (54° to 63°C). For soy waxes, meanwhile, it should be somewhere between 120°F and 160°F (48° to 71°C). Once the desired temperature has been reached, remove it from the heat and begin carefully pouring into molds. It’s important to keep stirring during this process as each batch in your candle will have different amounts of additives like color or scent”the stirring helps ensure that those ingredients are evenly dispersed throughout the melted down wax.
Unleashing Creativity
Making candles is a great way to let your creative side come alive! The beauty of easy tapered candle making–which means wicks that are already attached to their bases, along with pre-cut wax sheets–is the convenience of being able to explore different combinations of color and aroma.
When crafting the perfect combination of color and aroma for your tapered candles, you’ll want to start by considering the various kinds of waxes available. Soy wax is becoming increasingly more popular due to its eco-friendliness, vegetable wax blends have been gaining traction for their ability to stay lit for much longer than traditional paraffin wax candles, and paraffin itself still holds it’s spot as a top choice for candle makers due to its range of melting points and ability to hold a wide range of fragrances and colors.
Once you’ve settled on what kind of wax you’d like to use, select from a plethora of colorants that are specifically designed for candle making! From subtle shades like beige and light pink, all the way up-to bolder options like navy blue or dark green”there is a shade out there that will perfectly complement your design. For an added touch of luxury appeal choose metallic or pearl pigments or make use of glittery mica decorations.
Lastly, don’t forget about scent! There is no better way to elevate your project then by picking complementary scents for each shade. Not only will this add another layer of interest but it will also allow you create memories that are tied specifically to different events or occasions–for when you need some reminder of happy times down the line!
Reaching the Soot Line
When attempting to create a well-crafted, aesthetically pleasing tapered candle, the key ingredient is reaching the ideal flame height. To do so requires that your wick be cut to the right length and any excess tabbing removed. The amount of fuel (wax) will also influence how quickly the flame burns. Additionally, you need to consider your environment. If air currents are drawing away heat or sending it toward the candle too quickly, you’ll need to adjust accordingly. That way you can achieve what’s known as “soot line”.
The “soot line” occurs when the wick has been trimmed perfectly and its flame height is at an optimum level; where all of the cardboard from which it is made has been burned off cleanly without leaving an accumulation of black soot on the sides of your tapered candle. It’s important to note that for most traditional candles, a slightly higher flame than what would normally produce a good flicker is desired in order to contain the soot line effectively. This creates a smoother and more consistent burning process ” with only one burn off wave required before enjoying a long lasting tapered candle!
Crafting the Wick
Tapered candles are an essential part of candle making projects. As the name implies, tapered candles taper from one end to the other. It is important to remember that the success of crafting a tapered candle lies in using a wick with the correct tension. Without enough tension, you will not get a proper taper on your candle.
When designing wicks for tapered candles, you must use higher tensions than those for traditional cylindrical-shaped candles. Generally speaking, most commercial suppliers recommend adding 10% to 30% more tension to your chosen wick size when creating tapered candles compared to cylindrical ones. Tension levels within this range will give your desired slight tapering of the side walls and correct wicking along the edge of the candle.
It is important to understand as well that raising tension beyond this point may mean better looking side walls but slower burning speeds which can be disadvantageous at times. Therefore when choosing an appropriate level of tension for your tapers it is of utmost importance that you find the right balance between obtaining perfect tapering and maintaining optimal burning performance over time. With experience, you will become familiar with what works best for each individual type of wax or dye blend you choose to create with or any additonal additional ingredients added such as fragrance oils or herbs/flowers embellishments . Once mastered you should then be able to create consistently tapers each and every time without fail!
Finishing Touches
Once you have finished the process of making your candle, it’s time to give it a professional look. Before starting, make sure to allow the candle to cool for at least 24 hours after pouring wax into the container. Then, use a wick trimmer to cut off the top of the wick as close as possible to the surface of the candle. This will allow for an even burn later on. Next, you can use a file or card scraper to smoothen out any tough ridges and create a more unified look on the surface of the candle. If desired, dip the top surface of your candle in wax ” this is what gives tapered candles their unique shape and gives them an even more professional-looking finish. Finally, affix a wick sticker at one end of the candle and keep that centered while burning by using certain techniques like bridging or pinning down (respectively).
Conclusion
The art of making tapered candles has been an ongoing practice for centuries, long before consumer convenience made it easier. For many who explore this craft, the journey is more important than the outcome. It’s the experimenting with various types of wax and scent combinations that brings joy to the creative process. Plus, watching the candle grow as you add layer upon layer of wax can be a meditative experience.
Of course, there are always new tips and tricks to learn when making tapered candles at home. Whether one has just started enjoying the activity or has been doing it for years, there is much to discover in this engaging craft. From mastering wicking techniques and perfecting layering processes to exploring scents and colors and expanding your repertoire of designs, the possibilities are endless! And most importantly ” don’t forget the pleasure you get from admiring your painstakingly crafted masterpiece at the end of a successful adventure in tapered candle making!

Welcome to my candle making blog! In this blog, I will be sharing my tips and tricks for making candles. I will also be sharing some of my favorite recipes.


