Introduction
Making custom candles can be a fun and creative way to express your style and personality. Uniquely designed candles can create the perfect atmosphere for any event or occasion, or simply be enjoyed within the comfort of your own home. Not only will you get to enjoy the visual effects of having beautiful homemade wax decorations, but you will also get to experience the fulfilling feeling that comes along with knowing you personally crafted something beautiful. Additionally, when creating custom candles you’ll have complete control over every aspect from color and size to scent and shape – all of which helps ensure no two candles are identical. With just a few simple supplies, some creativity and patience – you’ll be well on your way to crafting beautifully personalized candle creations in no time!
Gather the Supplies
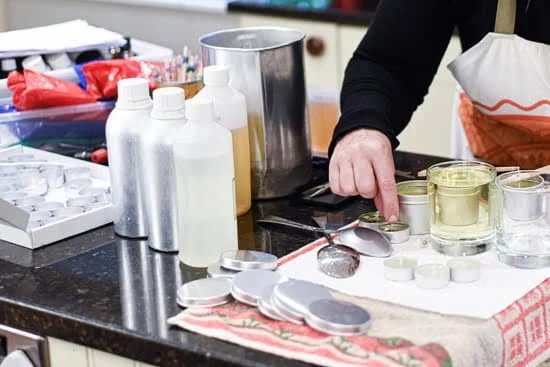
When it comes to candle-making materials, there are a variety of options available. Depending on what kind of candle you’re looking to make – such as a standard wax candle, a beeswax candle, or a soy wax candle – different materials may be best. For example, if you want to make a beeswax candle, the best option is to purchase pure 100% beeswax in bead form or block form. If you are looking to make a soy wax candle, the best choice is usually to purchase soy flakes or pre-made soy wax containers. Other supplies needed for candles include wicks and wick stickers, scent oils and dyes (if desired), thermometers, and melting pots or double boilers. If you want your finished product to be more decorative, consider beads, buttons and other decorations so that your custom candles will stand out!
Choosing the Color and Fragrances
When making custom candles, it is important to consider the color and fragrances you wish to use. If a particular scent or style triggers happy memories or represents a certain time of your life, then you should consider incorporating those factors into your creation.
The options for candle colors are almost endless and can be decided upon to express emotions such as happiness, sadness and even romance. Choosing hues that contrast or compliment each other can add an extra level of appeal and personalization when your candles are viewed. You could also explore possibilities such as glitter and paints to give your candles a unique look.
Fragrances for your candles are likewise highly subjective which can be used alone or studied together with color coordination to create specific decorative display pieces. Decide on scents based on natural flavors like rose, citrus, lavender or perhaps something like vanilla buttercream, hazelnut espresso or sugar pumpkin will do instead. Be creative; who knows what amazing combination of subtle deliciousness you could unleash?
Melting the Wax
Making custom candles is a fun and satisfying way to fill your home with beautiful, one-of-a-kind home décor. It’s easy to create candles in the perfect colour blend for any occasion by melting different colours of wax together. To melt wax, first assemble a pot filled with water over medium heat, then place a metal bowl on top of it. Do not let the bowl touch the bottom or sides of the pot. Add blocks or discs of wax pieces into the bowl and allow them to melt, stirring as necessary with a wooden spoon until all pieces are melted and blended together. Remove from heat once all pieces are completely melted, add fragrance or essential oils for scent if desired, then pour the coloured wax into your candle molds. When pouring candle molds, remember to pour slowly in order to reduce air bubbles and imperfections. Allow to cool before touching or handling and enjoy your custom made candle!
Pouring the Wax
Making custom candles can be an extremely satisfying and enjoyable activity. The first step to making unique, handmade creations is pouring the wax. To get started, gather your supplies”wax, wick, candle dye (if desired), scents (also optional), and a heat source such as an electric warmer or stovetop double boiler. If you’re using a double boiler system, make sure to fill the lower pot with a few inches of water before heating it. When all of your materials are ready to go, measure out the appropriate amount of wax for your vessels, usually about 29-32 fluid ounces for standard containers.
Once your wax is measured, prepare it for pouring by adding colors and fragrances as desired. Most liquid dyes designed for candles will come with specific directions for use; simply add according to the instructions on the bottle. Just like colorants, any scents you plan on using should be carefully incorporated into your melted wax according to manufacturer instructions; many recommend starting with 0.7 ounces of scent per pound of wax used.
Now that your wax is perfectly blended with colors and scents according to personal preference, it’s time to start pouring! Carefully pour the hot candle-making liquid into individual vessels while slowly guiding the wick along its center as each container fills; this will provide better stability and prevent a crooked or crisscrossed wick when finished. When complete, resist the urge to soon move or touch the candlesticks; making sure each vessel has cooled completely will help prevent crookedness later on.
Adding the Wick and Wicking
When making custom candles, the wick and wicking are key components when it comes to providing a pleasant flame. To create your custom candle correctly, you need to first make sure your wick is securely attached to the base of the container or mould. If you’re using a jar then this can be easily done by tying the top of the wick down with a piece of wire, or if you’re using a mould, then you should use adhesive. This will ensure that when you pour in your wax, the heat does not allow the wick to get wrecked. Additionally, so that your wick stands up properly for an unencumbered flame, consider surrounding it with table salt prior to pouring in the wax ” this helps by stiffening and supporting it in place as well as keeps it from smoldering. Finally, once your candle is firm and hardened, cutting off any burrs around the edge will maintain its neatness and charm as well as provide better combustion
When crafting custom candles at home its important that one takes into account all of steps necessary for optimal results. To ensure each step is done correctly one should begin by measuring out enough wicking to hang down 1/2 inch lower than alternative heights necessary (1 inch above the rim of votives or 2 inches above jar candles). It’s also sometimes useful to let it stand up while still within its spooled form before starting to install it into its designated area- this allows for greater accuracy when attaching it . After implementing all these factors into creating ones custom candles one should tighten down both sides of where their metal tab fittings have been placed; holding firmly in order to guarantee an adequate attachment. Finally now that everything has been taken care of one can take steps further for decoration purposes such as wrapping ribbons around midsections or adding additional embellishments like charms etc. To get even more creative one could even decide on mixing different colors together within layers shown which could create unique swirls / designs and match any aesthetic preferences!
Letting the Candle Set
Making custom candles is an art form. It requires attention to detail, patience, and practice since the process can take hours from start to finish. The most important step after wax ‘cooking’ is the delicate cooling process. If done correctly, this will ensure even color and scent of the candle.
To achieve a beautiful finished product, maintain a low temperature throughout the cooling process. When using a double boiler set up, never pour hot wax directly in a cold container-once again to maintain an even temperature throughout. During the cooling stage, stir occasionally using a chopstick or spoon handle with light pressure. This helps keep the wax in motion rather than settling at the bottom of your container-leading to uneven coloring and scenting during the burning process.
Always allow your candles enough time to cool completely before you move them or attempt to remove from their original vessels-typically this can take anywhere from one hour up until several days depending on size. If any ‘seas’ have formed (textured lines on the surface of your candle) , try lightly smoothing it out with your finger or stirring with light pressure once again with help from your chopstick or spoon handle . Once cooled all the way through ” trim wicks, package , label and enjoy!
For added texture in candle making like swirls or gradients , layering can help! This involves slowly pouring layers of different scents/colors into each other while still maintaining that low consistent temperature -as extreme variations will result in cracking of wax when poured over pre cooled depths. Also keep airflow consistent as steady ventilation such as by use of a fan will assist greatly once again as drastic changes may also cause signs of cool temperatures catching up too quickly resulting into cracking damage!
Finishing the Candle
When it comes to making custom candles, the final step is adding decoration. This can be as simple or complex as you desire and will make your candle unique and personalized. There are a few popular decoration ideas that create beautiful, one-of-a-kind designs for your custom candle:
Hanging Charms: Hanging charms on the surface of the candle is an appealing way to decorate. Charms such as small rings, hearts, stars and other shapes can be tied onto ribbons and then affixed to the candles with a warm glue gun. These give the candle a special touch and add a sparkling look that stands out among other decorations.
Natural Materials: Natural materials such as real flowers, leaves, stones or sticks create an elegant rustic feel when incorporated into the design of a custom candle. Such elements also have symbolism attached to them which can give the gift deeper meaning when presented to someone special.
Environmental Influences: Working with environmental influences such as sand or sea glass can really bring an inspiring piece of art to life in the candle. Mosaic tiling pieces fit perfectly in this category and won’t fail in capturing attention with their natural colors and aesthetic look.
Calligraphy: Calligraphic pieces are especially welcome choices in personalizing custom candles with delicate designs full of poetic beauty. Quotes, poems or names written across or around the surface achieve a meaningful effect while they also enhance its visual appeal at first glance!
Tips and Tricks for Crafting Custom Candles
Custom candles can add a spark of creativity and an air of elegance to your home. They make great gifts or keep-sakes and can be used to calm the atmosphere or express yourself. To get the most out of your candles, proper maintenance is key.
Before each burn session, inspect your candle for any cracks or dents that may have occurred since you last use it – these will interfere with the wax’ melting patterns and cause pooling. If you have noticed any surface irregularities such as crackling, excess dripping or imbalanced wicks, it’s best to re-mould or replace the candle- Wick trimming with scissors must occur prior to each lighting in order to prevent smoke production when lit.
Your candle burn time will depend on how much wax is left in the jar – a fuller jar equals longer burning times so try not to let your wick consume too much wax before extinguishing. Ensure that your wicks are standing upright at all times. It is important for safety reasons that continuously check after 15 minutes – sometimes flames become uncontrollable if left unattended and generally can be easily prevented when regularly monitored from start to finish. Burning a scented custom made candle should release minimal smoke as dry woodwick material does not require further additional fragrance oils to enhance scent but because of natural bleeds within woodwicking, smoke can occur overall due attention should be paid during ignition point.
By following these easy steps you can ensure that your custom made candle will continue to look beautiful all while providing soothing scents that fills up any room!
Conclusion
Making custom candles isn’t as difficult, or expensive, as you may have first thought. With the right items and knowledge you can create candles with amazing aesthetics. First, decide what type of wax you want to use; a popular option is soy wax which has become a favorite for many who make custom candles because it has some unique properties that other types of wax don’t have. Once you decide on your type of wax, next up are the candle molds and wicks for the finished product. Finally, it is time to start melting your wax and pour your chosen blend into the molds (this could also involve adding in dyes and fragrances). After waiting for it to harden, simply remove the finished candles from their molds and voila! You now own beautiful, personally crafted candles that can be given away or kept. Quality custom candles are easier to produce than we think – with quality supplies and just a bit of patience anyone can get started in candle making!

Welcome to my candle making blog! In this blog, I will be sharing my tips and tricks for making candles. I will also be sharing some of my favorite recipes.


