Introduction
Making your own candles is a great way to save money while creating beautiful and unique decorative pieces. Not only will you be able to create personalized designs, but you’ll also be able to enjoy the sweet smells of essential oils. Additionally, making your own candles can help reduce your carbon impact by avoiding harsh chemicals found in some store bought varieties. Plus, it’s fun! With the right materials and helpful tips, anyone can make their own candles easily and quickly.
Before You Begin:
Before you begin making your own candles, there are a few items that you need to have on hand for safety reasons. Make sure you have an appropriate space cleared out such as countertops or tables covered with newspaper or parchment paper. Gather protective gear such as heat-safe gloves and goggles, as well as long matches or a lighter for lighting your finished product. You will also need specific items for candle making including wax pastilles, containers or molds for holding the wax, wicks, some type of thermometer (ideally one that reaches 200°F). Lastly, collect whatever scents or colorings you wish to add in order to customize your candle design.
Step-by Step Instructions:
1) Prepare the Containers ” Place the wick into the bottom of each container/mold if it isn’t already attached and position it so that it stands upright in the center.?
2) Melt Wax ” Measure out 1 part beeswax perilts (small wax beads) and 4 parts soy wax flakes into a double boiler then heat until melted.?
3) Temperatures” Check temperatures with a thermometer add make sure they don’t exceed 180″200°F (82″93°C).?
4) Add Color/Scent” Stir in colorant until fully mixed then add 2-5 drops of oil-based scent (or more if desired).?
5) Pour Wax ” Slowly pour melted wax into containers being careful not to overfill and ensure that wicks remain straight.?
6) Cooling ” Allow candle to cool at room temperature (do not put them in refrigerator).?
7) Trim Wicks -Once cooled trim wick down to 1/4 inch above surface of wax.? 8) Enjoy ” Light your handmade creation!
Essential Materials
When making your own candles, you need to choose the right wax and wick type to ensure the best results. The most common types of wax are beeswax, paraffin, and soy. Each type of wax has different characteristics, so it’s important to get the right one for your candle project. Beeswax is all-natural and provides a stable form with a slow burn rate and pleasant scent. Paraffin is derived from petroleum and has a much quick burn rate that produces more consistent results ” though it has no natural scent. Soy is eco-friendly, cost effective, and produces a slow burn rate with subtle scents.
The types of wicks you use also play an important role in candle creation. There are three common categories: paper-core (eadible), zinc-core (inedible), and cotton flat braids. Paper core wicks are ideal for vessels like cups or bowls since they provide larger flames desired for these shapes ” however they produce a lot of smoke when burning which need to be monitored carefully. Zinc core wicks have superior burning characteristics but are not safe for edible projects due to the toxin released when melted. Lastly, cotton flat braid wicks can provide fantastic results for harder waxes since their unique construction allows them to easily contain molten wax within its core.
Preparing the Candle Mould
Before you can begin the process of making your own candles, you need to make sure that the candle mould is properly accessories. Firstly, apply a thin layer of petroleum jelly on the mold’s interior so that it prevents the wax from sticking onto the surface.
Secondly, ensure that all exterior portions of the candle mould remain clean, free from wax and other debris. Wipe down with a damp cloth if necessary in order to keep the edges free from any residues that might prevent a smooth varnished coating.
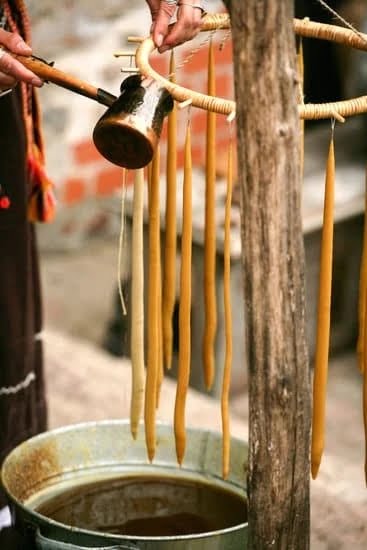
Thirdly, make sure to securely fit a wick into place before pouring in any hot wax. This will help create an even burn as you may need to adjust its positioning throughout the course of creating your candle. Finally, when everything is properly prepared and ready for use, hold onto one end of the wick and dip it into hot melted wax gently for about 5-10 seconds before releasing it evenly across the centre of your mould and allowing the wax to cool completely before removing it from its mould.
Pouring the Wax
Making your own candles can be both cost-effective and fun. To get started, you will need all the necessary materials such as wax, wicks, a melting pot, pouring container, and scents or colors (if desired). After gathering everything together, it’s time to start the candlemaking process.
When it comes to pouring wax for candle making, proper technique is extremely important for reducing air bubbles which can ruin the look of a candle. Preparing the wax by cutting it into small pieces and melting it slowly in the melting pot over low heat is the first step. Once melted, it should be stirred gently so that the mix is uniform before being carefully poured into a mold or container with a pouring spout. During this step you want to ensure that any air bubbles are agitated out of the liquid wax by rocking or swishing the pouring container ever-so-gently while sitting on a flat surface so there is as little movement as possible. Then wait until the wax has cooled slightly before rotating or tapping gently at each end of the mold/container to release any remaining air bubbles which may have surfaced during this process. Finally top off with more melted wax if needed to create your desired height for your candle.
Customizing the Scent
By mixing fragrances and oils, you can make a unique scent for your own candles. You will need several fragrances as well as essential oils in order to mix the scents. Start by picking out two or three fragrances you want to combine; one fragrance should be dominant and the others more complementary. For example, a combination of orange, jasmine, and lavender may work together nicely.
Once your initial scents are chosen, blend them together until you have a mixture that has the desired intensity. Make sure to take into account that some ingredients will be stronger than others when combining multiple fragrances. With essential oils, start with small measurements and add more if necessary. It’s also important to consider how long each scent holds up within the blend – otherwise it may turn rancid over time.
If possible, allow your blended candle scents to mature by covering them with cloth or paper and leaving them undisturbed for a few days before creating your candles so that you can really detect how the scent changes over time. When creating candles, always test small batches first to confirm that your blend won’t cause discoloration in wax or create any burning issues once finished pouring. Once you’ve perfected the combination of fragrances through experimentation, creating high-quality lasting candles tailored to your own personal scent preferences is only a few steps away!
Adding Color
Candles are a great way to create beautiful and unique décor in any room. Making your own candles is a fun and budget-friendly way to customize them for any occasion. To ensure you have the best candles possible, color is an important factor that must be considered when making your own candles. Here are a few helpful tips for adding color to candles safely:
1. Understand Candle Wax Properties: Learn how the wax will react to heat with different dyes and pigments such as oil-based, liquid or wax-based dyes. This can help you figure out what type of dye you need to use in order to achieve the desired effect with your candle. Additionally, certain types of water-soluble dyes can cause problems with pitting or cracking which is why it’s important to read the label on each product before using it.
2. Test Colors First: Before you add any colorant into a candle batch, test out small amounts on scraps of excess wax from previous batches first so that you get an idea of how it will look when finished. That way, if the result isn’t what you expected, you can adjust and make the necessary changes before continuing on with the full batch of candles.
3. Apply Proper Supports: Colorants and fragrances must be properly dispersed throughout the final product in order for them to be effective without causing issues like fading or scorching otherwise known as “bloom” or “mottling.” To avoid this issue, stir slowly while introducing additional ingredients into the heated wax base in order to fully incorporate the dye or fragrance oils until blended thoroughly. In addition, use steady low heat during this step since higher temperatures may result in melting or burning some components that could taint or discolor your final product.
4. Avoid Hot Pours: strive not just by coating wicks but also by avoiding hot pours that could burn off sensitive elements such as fragrances resulting in a less aromatic end product compared to what was intended”if enough undissolved pigment remains visible after completion”it can also stain darker colored walls and clothes if touched by hand (or spilled). Therefore it’s recommended just keep pouring rate slow so all ingredients evenly disseminate!.
Finishing the Candle
When the candle wax has cooled and has hardened sufficiently, it is time to release it from the mould. To do this, you will need to submerge the candle in a bowl of warm water. This will loosen the wax from the sides of the mould and cause it to expand slightly so that it can be removed more easily. Once the wax has loosened around the sides of the mold, take hold of each side gently and wiggle and jiggle until it separates from one another. Carefully remove it by pulling each end away at exactly the same rate so as not to break or damage your newly made candle. Additionally, if you’re having trouble sliding out your candle, you can try placing a cool compress on top of your mould for a few minutes in order to contract it slightly. Place your newly formed candles onto some parchment paper or felt blankets until they have cooled completely. Congratulations- you now have beautiful handcrafted candles perfect for any occasion!
Finishing Touches
Making your own candles adds a personal touch to any space in your home. With the right materials and techniques you can easily create beautiful customized candles that are sure to impress your guests. Once you’ve made a few primitive designs, such as plain colored candles or layered candles, you can try spicing them up with decorative-focused details. Here are some of the techniques you can use to give your candles that extra touch of individuality:
1. Adding texture ” You can increase the visual interest of your candles by adding texture. Consider marbling different colored waxes together or rolling the melted wax in crushed herbs or spices like cinnamon or lavender.
2. Non-traditional wicks ” Get creative with your wicks! Wooden wicks (which look like matches) make small crackling sounds when they burn and metal core wicks provide large pools of wax to melt while still providing even burning. You can also use molds to shape wooden pieces into fun shapes like stars and hearts as well as use metallic necklaces for a gleaming effect.
3. Find fragrant oils ” Infusing scented oils into candle wax is an easy way to make candles with pleasing aromas. Many candle makers swear by using essential oils derived from plants such as lavender and tea tree oil, but other delightful scents such as coffee bean oil and peppermint essential oil are available and create unique smells when burned together.
4. Create attractive labels ” Finish off each candle with a label featuring information about the ingredients used, scent name, what the candle was made for (e.g., a birthday gift), instructions on how to properly care for the product, etc. This is especially important if you plan on selling them; customers will appreciate having this information before buying one of your products!
Storing and Displaying
Creating a beautiful candle display can be an enjoyable experience. By carefully selecting the location, positioning of the candles, and other décor you can turn any location into a gorgeous space.
First, consider where you will place your candle display. Look for an area that gets adequate natural light but is away from direct sunlight. This will help prevent heat damage to the wax or containers. Once you have a spot picked out, choose how you will lay out the candles and accessories. Grouping like types of products together such as all tapers at one end or jars in one corner can bring a visual cohesion to your display. You may also want to think about creating spaces within the arrangement to prevent looking due cluttered or disorganized.
To further enhance your candle display add extras such as decorative elements like plants, art pieces, stone obelisks and more are just some ideas that can really bring your space together. Placing these items ever so lightly is crucial to pulling off an elegant look without looking overstuffed. When placing these extra little touches consider height differences between accents and scale relative to other pieces throughout the display to ensure a visually appealing finish product.
Lastly, pick out your favorite design scents or colors and incorporate them into the centerpiece of your candle display. Be careful not to overwhelm by adding too many different colors or scents as this might detract from the intended theme of your candle display. Adding soft lighting via tea lights or string lights can also bring life to your woody workspace while accentuating every aspect within it – making sure each piece looks clear throughout day and night! Enjoy crafting up something special with candles that’s all yours!
Troubleshooting
If you’re a candle aficionado or just attempting to make your own for the first time, it’s important to pay attention to potential problems that can arise when crafting and pouring your candles. Here are some of the common issues that come up with home-made candles and possible solutions.
Tunneling – This is common in candles that don’t get enough consistent heat across the entire top surface. To prevent tunneling, ensure that wicks are properly centered when pouring and trim them after initial burning session. Additionally, consider using a larger container size than recommended as this encourages more even wax melting/pouring; try burning multiple times within one cycle (and let cool before relighting) as this gives hot wax more opportunity to reach the edge; use a draft-free area so that the flame isn’t disrupted by wind or air currents; make sure you’re pouring at temperatures in between 60°C-90°C or 140°F-194°F.
Soot – Soot is caused by an inadequate wick size for the container that’s too large for it; start with sizing down the wick size, making sure not to go smaller than half its original size. Also keep in mind the temperature range mentioned earlier when pouring and be careful not to pour too hot as this can create carbon build up on wicks which could lead to excess soot production; try changing what type of fragrances you use if you’ve recently switched brands as differences in quality could play a role here.
In addition, trim your wicks every time after burning your candles for four hours or less otherwise carbon particles will transfer from your wick over time building up in increased amounts until such time as there’s an excess of smoke produced from burnt particles accumulating on top of molten wax (causing ‘tunneling’ where most of wax melts down but sides stay level dueto heat trapped underneath). Taking care of these few simple steps will help reduce any ‘sooting’ issue drastically.
Conclusion
Making your own candles at home is actually a relatively easy task. Provided you have the right equipment and materials, it’s a great way to create beautiful and unique homemade gifts or just add something special to your home décor.
To make your own candles, you should start by gathering the supplies that are needed, including wax, wicks, containers, and any fragrance or dye you might want to use. Get started by melting the wax slowly in a double boiler. During this step, you can dye the wax with colored wax chips or crayons and add fragrance oils for additional aroma if desired. Be sure to always work in an area with plenty of ventilation.
Next, suspend the prepped wick in a container filled with melted wax and hold it in place until set for about 10 minutes. Once cooled and set, continue to pour additional wax around the wick until almost full before allowing the candle to cool during another 10 minutes for optimal burning results. Finish off by trimming the wick before displaying your creation!
To recap, making your very own candles is incredibly easy when working with simple instructions like those provided above. With just a few steps such as gathering supplies like waxes or dyes, melting wax in a double boiler, suspending the prepped wick into the melted wax and holding it there until cooled before pouring more melted wax on top of it repeatably; once cooled again Trimmed-off excess wick; you’ll be able to get creative and have endless possibilities with homemade candles! Enjoy experimenting on new scents and colors each time – there’s truly no limit!

Welcome to my candle making blog! In this blog, I will be sharing my tips and tricks for making candles. I will also be sharing some of my favorite recipes.


