Introduction
Making soy candles is a fun, economical way to make your own personal candles at home. Not only are these homemade candles an exercise in creative expression and a great way to save money, but they also offer several excellent benefits when compared to traditional paraffin wax or beeswax candels. Soy candles burn much cleaner than either of those alternatives, with virtually no black soot or smoke emitted into the air when burned. Furthermore, soy wax typically costs less than other waxes, making it both eco-friendly and budget-friendly!
Soy candle making has been around since the mid-1990’s and is becoming more popular as time passes. The history of its origin involves the natural component of soybean oil – a renewable energy source that didn’t previously have too many applications besides being used in food products or biofuels. However, an entrepreneur in Indiana had a unique solution – to use the soybeans to create burning products rather than edible products or fuel. Since then, numerous companies across the world joined in this endeavor, creating millions of soy candles for everyone from average consumers to upscale boutiques.
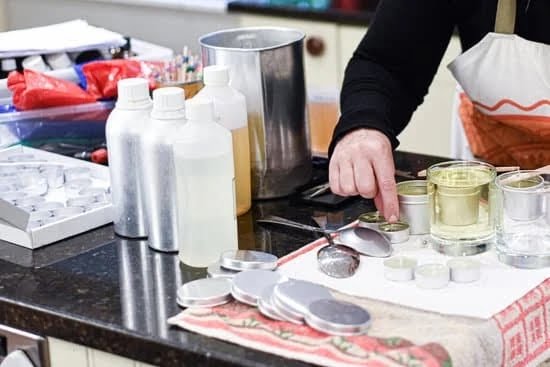
What You’ll Need to Make Soy Candles
– Soy wax flakes: These are necessary for the main material for making a soy candle. They are very easy to measure and have a long burn time.
– Wax melting pot: This will be used to heat the wax flakes, so that they melt properly.
– Candle wick: This is what will allow the flame to travel up the length of the candle and keep it burning in an even way.
– Fragrance oils/essential oils: These will give your candle a pleasant aroma when lit.
– Candle containers: An opaque or separate colored glass container fits best so that the light of your candle will shine beautifully through it. Make sure it can hold enough wax for the size candle you want to make.
– Wick tabs: These flat discs with holes in them will help hold your wick in place at the bottom of your container and help keep it straight while pouring hot wax into your molds.
– Thermometer: Using a thermometer accurately monitor the temperature and cooling rate of your poured candles.
Step-by-Step Guide for Making Soy Candles
Step 1: Gather Supplies
Soy wax, wick, double boiler or microwave-safe bowl for melting the wax, a plastic container for the candle, scent and dye (for scented and/or colored candles).
Step 2: Choose Wick
Total length of wick should be two times the circumference of your mold/container plus an extra 10 cm. Cut to size and attach to the bottom of your container by using a small piece of hot glue or a metal washer. Make sure that the wick is centered in the container so that it doesn’t lean over when you pour in the melted wax.
Step 3: Melt Wax
In a typical double boiler, 100g of soy wax can take between 20-30 minutes to melt completely over low to medium heat. After melting add desired colour and scents if desired and stir until evenly blended. Don’t forget to cool down your scorched wax before adding scent and dyes if any.
Step 4: Pour in Container
Carefully pour melted wax into your container with attached wick. Wait at least 10-15 minutes for it to harden different degrees before moving on to next step. Do not disturb it too much during this time as this will cause air bubbles which means that you lose heat from where the bubble is created leading to an uneven burn pool later on.
Step 5: Trim Wick
Once hardened cut off top of wack by using scissors (leave about 0.5 cm on top), also make sure that you don’t pull out hot glue holding wick in place (if used). This might damage integrity of your candle structure especially if you opted for glass containers instead plastic ones mentioned earlier in step one. Finally enjoy your handmade soy candles!
Tips for Decorating Soy Candles
Making soy candles can be a great way to create beautiful, natural decorations for your home. Here are a few tips to keep in mind when decorating your soy candles:
1. Use seasonal items like decorative snowflakes, leaves, acorns or pine cones for rustic charm. Lay these items around the outside of the candle with glue in order to give it texture and interest.
2. Incorporate personal items like photos, pressed flowers or hand-stitched fabrics into your design; this will make your candle even more special and meaningful to you.
3. Decorate with fabric scraps such as lace or burlap ribbon – you can use natural jute twine as well. Tie it around the outside of the candle in an attractive bow for added charm.
4. Paint directly onto the candle in stripes or swirls for a shabby chic look; draw hearts or other playful shapes on the surface with Sharpie markers in bright colors for a fun and unique effect.
5. Top off your candle design with some colorful beads strung around the middle; this is also an easy way to jazz up your regular white tapers as well as larger pillars!
Know the Rules for Making Soy Candles Safely
Making soy candles safely requires strict adherence to certain rules. The most important precaution is to give your workspace some extra space so that the hot wax and flames won’t have anything near them that could catch fire. Also, always make sure there’s enough ventilation and open windows in your workspace. This will avoid any smoke from building up.
When it comes to temperature, it is best to only heat the wax in a double boiler or special electric melting pot, as to not overheat the wax and create a fire hazard. You should never leave the wax unattended and be very vigilant when heating it – any type of open flame can be dangerous if not handled properly or left alone for too long.
Also, make sure there aren’t any flammable materials near your workspace as well. Things like clothing, curtains, paper and even furniture can accidentally catch on fire if they are too close while you’re working with heat or an open flame.
How to Store Soy Candles Properly
When it comes to storing and maintaining soy candles, there are a few things you should keep in mind. The environment in which you store your candles can have a significant impact on their quality and longevity. To get the most out of your candles, here are some tips for storing them properly:
1) Store the candles away from UV light – strong sunlight or artificial lights like fluorescent bulbs can have negative effects on wax. It’s best to store soy candles in a cool, dry place that is also out of direct sunlight.
2) Protect candles from dust and dirt – Covering each candle with its lid or packaging can go a long way towards preventing dust particles from settling into the wax of the candle and potentially disrupting it burning process.
3) Keep away moisture – In an area with high humidity, like bathrooms, it may be beneficial to keep soy candles stored in airtight bags or containers to protect them from the moist air.
4) Don’t stack too many candles – Storing too many soy candles together in one corner can impair air flow, making it difficult for the wick to properly burn down the wax evenly. It’s best small batches rather than an entire stack when storing your soy candles.
With proper storage techniques and general care practices, you can ensure that your soy candle will last through its full burn time with optimal quality!
Conclusion
Making soy candles can be an incredibly rewarding craft. Not only are you creating something unique and aesthetically pleasing, but you’re doing it with natural ingredients that won’t damage the environment. Soy candle wax is much cleaner burning than traditional paraffin wax, meaning that there is less smoke and soot being released into the air whenever you burn them. These clean-burning candles are longer lasting too, producing fewer emissions in return for more hours of burn time.
In addition to these environmental benefits, soy candle making allows for vast creative possibilities. Different colors, scents and vessels can be used to make beautiful works of art out of your wax! Use your creativity to turn any space into a calming oasis with the perfect scent or surprise loved ones with personalized candles made just for them. You may even wish to explore further options like multi-wick or floating candles as exciting new projects!

Welcome to my candle making blog! In this blog, I will be sharing my tips and tricks for making candles. I will also be sharing some of my favorite recipes.


