Introduction
Making your own candle wick gives you more control over the a dramatic effect on the finished candle. Producing a custom-fitted wick will allow you to create a larger, longer-burning candle with even melting and a steady burn time. You can tailor your wicks to achieve specific desired effects. For example, if you prefer a slow-burning candle, you can use fewer plies for the wick which will result in slower burning properties. Additionally, by making your own wicks, you have full control of the materials used; for instance, opting for natural fiber rather than paper or synthetic fibers. Natural fiber candles produce less smoke when burning and are also considered more eco-friendly than other varieties of wicks.
Materials Needed
Materials Needed: candle wicking (cotton or hemp), scissors, waxed thread, lighter, candlewick clamps, wick centering tool and a ruler or measuring tape.
Choosing Wax and Fiber
There are two main components to consider when making your own wick: wax and fiber. Wax is responsible for the heat that will be used in the burning of the candle, while the fiber ensures the proper flow of the flame. Each type of wax and fiber has its own unique properties which will affect the performance of your wick.
Paraffin wax is a classic option as it is easy to work with and burns at a high temperature. This can cause larger flames and greater amounts of heat which can help produce a more pronounced scent from your candle. However, too much heat can cause a sooty film on the inside of your jar or votive, so try to choose paraffin with lower melting points such as soft or ultra-soft varieties.
Soy wax is becoming increasingly popular due to its natural origins. It provides better scent throw and healthier burning than paraffin but its softer consistency means that it needs an extra support in order for it to perform properly. Consider pairing soy wax with round braided cotton for maximum strength.
Beeswax is another natural option that brings great benefits such as improved hardness, increased burning time, excellent scent throw and greater control over visibility of your flame. To take advantage of all these qualities look out for wicks made from beeswax blended fibers like kevlar or hank twisted paper cores – ideal for creating strong candles with minimal effort!
Dipping the Wick
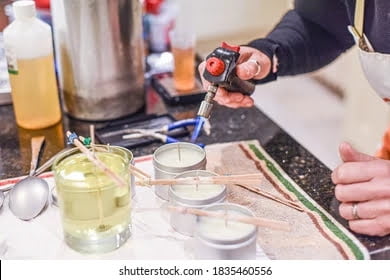
When dipping a wick in wax to make your own candle wick, it is very important to remove any excess wax from the wick after each dip. This will help ensure a good quality and strong burn for the candle. To do this, try using metal tongs, chopsticks, or tweezers to hold the hot wax-covered wick firmly until the wax stops dripping. Once the wax has stopped dripping, you can carefully move it away from the melted wax and set it aside over a sheet of paper or some cardboard to cool down until it is hard. If there is still excess wax on your wick after you have dipped it in hot melted wax, use an old toothbrush or an old rag with some light detergent and brush away cleanly. This will prevent any blockages which can cause uneven burning or potentially stop your candle from igniting.
Cutting and Shaping the Wick
There are several types of wick clamps available on the market, but the most popular is a metal wick holder. This type of clamp will hold your wick securely in place while making sure that the melted wax can travel up the length of the wick. When choosing a size for your wick holder, it’s important to pay attention to the container that your candle is going to be sitting in. For example, if you are making tea lights, use a 1/4 inch diameter (6mm) wick holder in order to prevent your tiny container from becoming too engulfed in heat and flame. If you are planning on making jar candles or even votives, choose thicker holders like 3/8 inches (1cm). These will ensure that your candles burn as long as possible and provide an even burn throughout.
Testing the Wick
Testing the Wick: To determine if a wick will work in a particular candle formulation, it should be tested in the proposed environment. It is important to give the wick an adequate amount of time to burn, usually between 5-15 minutes. Make sure that the environment has consistent amounts of heat and minimal air disruption. This will also help you identify clean burning characteristics like correct flame height and general smoke output. If after testing, there are any issues with sooting or tunneling observed in the candles, then try another wicking option that can accommodate heavier waxes or a bigger flame height.
Troubleshooting
Curls and Twisted Wicks: Curled candle wicks are usually caused by an excessive amount of wax being poured into the container. You can correct this issue by simply re-tapping your wick, keeping it taut with the help of a wick holder, or clippers to cut off any excess.
Short Wick Experiences: If you find that your wick is too short because it burned away before the wax was melted evenly, sometimes one trick is to add an extra layer of wax to protect the remaining wick from burning out. But this might only be effective if you catch the problem early enough. Another option is to remove whatever remains of the old flame and start fresh with a new candle wick.
Conclusion
When making your own candle wick, there are lots of different options when it comes to scent and color combinations. You can use essential oils to create a calming and inviting scent, or cocoa butter for a more luxurious feel. Adding dyes is also an option for creating custom colors. Some popular color combinations include light pink and lavender for a soft, romantic vibe, and bright blue and yellow for something more vibrant. Having the right combinations can not only produce aesthetically pleasing creations, but also ones that evoke particular feelings from viewers.
Labeling your candle wicks is also key. This should include information such as the type of wax used (beeswax, soy wax etc.), scent combination, dye combination, approximate burn time and any relevant safety information. This ensures all customers know what they are getting before buying the product. Proper labeling is essential for accurate identification of your products.

Welcome to my candle making blog! In this blog, I will be sharing my tips and tricks for making candles. I will also be sharing some of my favorite recipes.


