Candle making is a popular craft that allows individuals to create beautiful, personalized candles for their homes or as gifts. One crucial step in the candle making process is melting the wax. Melting candle wax is an essential step because it transforms the solid wax into a liquid state, making it easier to work with and mold into the desired shape.
In this article, we will guide you through the art of melting candle wax for candle making. We will provide you with detailed instructions on how to properly melt different types of wax, including tips for achieving optimal temperature control. From understanding the different types of candle wax to troubleshooting common issues, we have got you covered.
By delving into this topic, you will gain a deeper understanding of why melting candle wax is such a vital step in creating high-quality homemade candles. So whether you are new to candle making or looking to improve your skills, let’s get started on this exciting journey towards creating your own unique and beautifully scented candles.
Understanding the Different Types of Candle Wax
Candle making involves the use of various types of wax, each with its own unique characteristics and melting points. Understanding these differences is essential for achieving the desired results in candle making. Here is a brief overview of the different types of candle wax commonly used and their melting points:
- Paraffin Wax: Paraffin wax is one of the most popular choices for candle making due to its affordability and availability. It has a relatively low melting point ranging from 120°F to 150°F (49°C to 66°C), depending on the specific grade and formulation.
- Soy Wax: Soy wax is a natural alternative to paraffin wax, made from soybean oil. It has gained popularity in recent years due to its renewable and eco-friendly properties. Soy wax generally melts at a lower temperature, around 110°F to 130°F (43°C to 54°C).
- Beeswax: Beeswax is a natural byproduct of bees that offers a unique and delightful scent when used in candles. It has a high melting point between 145°F and 147°F (63°C to 64°C) which makes it suitable for longer burning candles.
- Palm Wax: Palm wax is derived from palm tree oil, offering another sustainable option for candle making. It has a higher melting point compared to other waxes, typically ranging from 130°F to 145°F (54°C to 63°C).
- Gel Wax: Gel wax is distinct from other waxes as it is transparent and allows for creative designs using embeds or other decorative elements. It requires higher temperatures between 160°F and 200°F (71°C to 93°C) for proper melting.
- Blended Waxes: Candle makers often combine different types of waxes or additives to achieve desired characteristics such as improved burn time or scent throw. Blended waxes can have varying melting points depending on the composition.
Understanding the melting points of different candle waxes is crucial for successful and safe candle making. It ensures that the wax is melted to its optimal temperature, allowing for better fragrance integration and smooth pouring into containers or molds.
Gathering the Necessary Supplies
When it comes to melting candle wax for candle making, having the right supplies is crucial. Gathering all the necessary materials before you begin will ensure a smooth and successful melting process. Here is a comprehensive list of supplies you will need:
Double Boiler
A double boiler is an essential tool for melting candle wax safely. It consists of two pots, with one fitting inside the other. The bottom pot holds boiling water, while the top one contains the wax. This indirect heat method helps to prevent scorching or overheating of the wax.
Thermometer
A thermometer is a must-have tool for monitoring the temperature of the wax during the melting process. Different types of waxes have specific melting points, and it is important to stay within those ranges for optimal results. A candy or digital thermometer that can measure high temperatures accurately is recommended.
3. Wax Pouring Pitcher
A wax pouring pitcher, also known as a melting pitcher or a pouring pot, is specifically designed for easy and controlled pouring of melted wax into molds or containers. It typically has a handle and a spout that allows for precise pouring without spilling or dripping.
In addition to these three essential items, there are several other supplies you’ll need to gather:
- Candle Wax: Choose the type of wax based on your personal preference and the intended use of your candles (e.g., soy wax, beeswax, paraffin). Remember to consider their respective melting points.
- Candle Fragrance Oils: If you want scented candles, you will need fragrance oils specifically formulated for candle making.
- Candle Dye or Color Blocks: To add color to your candles, you can use liquid dye specifically made for candles or color blocks that can be melted with the wax.
- Stirring Utensils: Have heat-resistant utensils like silicone or stainless steel spoons or spatulas for mixing the wax and incorporating fragrance and color.
- Heat Source: Depending on the method you choose to melt your wax, you will need a heat source such as a stove, microwave, or hot plate.
By gathering all these supplies beforehand, you will be well-prepared for the candle making process and ensure that melting the candle wax is a seamless step in creating your own homemade candles.
Preparing the Candle Wax
Before you begin the process of melting candle wax for your homemade candles, it is important to properly prepare the wax to ensure a smooth and efficient melting process. This section will provide you with step-by-step instructions on how to prepare the wax for melting, including chopping it into small chunks for faster and more even melting.
To start, gather all the necessary supplies such as a sharp knife or wax cutting tool, a cutting board, and your chosen type of wax. It is recommended to use a knife or tool specifically designed for candle making to ensure safe and precise cutting.
Place the cutting board on a flat and stable surface, then carefully unwrap your wax block or slab. Begin by slicing the wax into large chunks using long, downward motions with your knife. Start with larger pieces that are easy to handle and gradually work towards smaller pieces.
Once you have created several large chunks of wax, continue to chop them into smaller pieces. Aim for uniformity in size so that they can melt at an even rate. Smaller chunks will also allow for faster melting times.
It is important to note that some types of candle waxes may be more brittle than others. If you find that your wax is crumbling or breaking apart too easily while chopping, you can try refrigerating it beforehand to make it firmer and easier to handle.
By following these step-by-step instructions on preparing your candle wax for melting, you will be one step closer to creating high-quality homemade candles. Chopping the wax into small chunks not only helps facilitate faster melting but also ensures an even consistency throughout the melted wax. With your prepared wax ready, it’s time to move on to the next section where we explore different methods of melting candle wax.
Melting Candle Wax
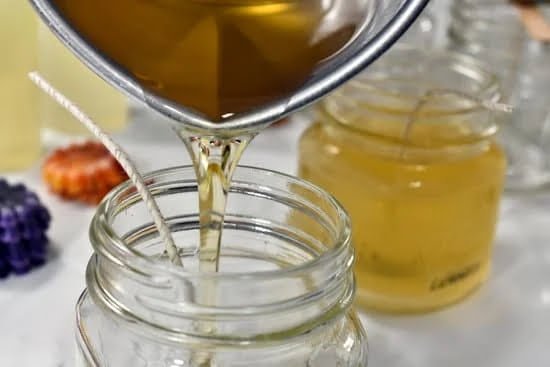
Melting candle wax is a crucial step in candle making, as it helps to transform solid wax into a liquid form that can be poured into molds or containers. There are different methods that can be used to melt candle wax, each with its own advantages and considerations. In this section, we will explore two common methods: using a double boiler and utilizing a microwave.
Method 1: Double Boiler
Using a double boiler is a popular method for melting candle wax because it provides consistent heat and helps prevent the risk of burning or overheating the wax. Here’s how to do it:
- Fill the bottom pot of the double boiler with water, ensuring that it is not filled more than halfway.
- Place the top pot on the stove and add your desired amount of candle wax into it.
- Turn on the heat to medium-low and let the water in the bottom pot simmer.
- Stir occasionally with a heat-resistant utensil to ensure even melting.
- Continue heating until the wax reaches its specific melting point, which depends on the type of wax being used.
Method 2: Microwave
Using a microwave can be a quicker method for melting smaller quantities of candle wax. However, it requires extra caution to avoid overheating or causing hot spots in the wax. Follow these steps for microwaving candle wax safely:
- Cut your candle wax into small chunks or cubes for faster and more even melting.
- Place the chunks in a microwave-safe container specifically designated for candle making purposes.
- Microwave on high for short intervals, such as 30 seconds or one minute at a time, depending on your microwave’s power level.
- After each interval, carefully remove the container from the microwave and stir the wax well to distribute the heat evenly.
- Repeat the process until the wax is completely melted, taking care not to exceed the melting point of your specific wax type.
Remember to use oven mitts or heat-resistant gloves when handling hot containers or surfaces. Additionally, be cautious of steam and hot wax splatters during both melting methods.
By understanding and utilizing these different methods for melting candle wax, you can choose the technique that best suits your needs and preferences. Whether you prefer a slower and more controlled melting process with a double boiler or a quicker method using a microwave, properly melted candle wax is essential for creating beautiful homemade candles.
Maintaining the Optimal Temperature
When melting candle wax for candle making, it is crucial to maintain the optimal temperature throughout the entire process. This ensures that the wax melts evenly and achieves a smooth consistency, which in turn contributes to high-quality candles. Here are some tips and tricks to help you maintain the ideal temperature range:
Use a Double Boiler
One of the most common methods for melting candle wax is by using a double boiler. This involves placing a container filled with wax into another larger pot filled with water. The water in the larger pot helps distribute heat more evenly, preventing the wax from overheating or burning.
To maintain the optimal temperature when using a double boiler, it’s important to monitor both the water temperature as well as the wax temperature. Keep a thermometer in each container and regularly check them to ensure they stay within the recommended range.
Avoid Direct Heat
Using direct heat sources such as stovetops or open flames can easily lead to overheating and scorching of your wax. It is best to avoid these methods when melting candle wax.
Instead, opt for indirect heat sources like electric warmers specifically designed for candle making or hot plates. These provide gentle heat that allows for better control over temperature.
Stir Constantly
Once your wax starts melting, it’s important to stir it constantly throughout the process. This helps distribute heat evenly and prevents any areas from becoming too hot or cooling too quickly.
Use a heat-resistant spoon or spatula to stir the wax gently but consistently. Be mindful not to introduce air bubbles into the mixture while stirring, as this can affect its overall finish.
By following these tips and tricks, you can effectively maintain an optimal temperature during the wax melting process for your homemade candles. This will result in a smooth and even consistency, ensuring that your candles turn out beautifully.
Adding Fragrance and Color
When it comes to making candles, adding fragrance and color is a crucial step in creating unique and personalized creations. Fragrance oils and color dyes can enhance the aesthetic appeal and aromatic experience of your homemade candles. In this section, we will explore how to incorporate fragrance oils and color dyes into the melted wax, discussing recommended ratios and techniques for achieving desired results.
To add fragrance to your melted wax, you have several options. One method is to use fragrance oils specifically designed for candle making. These oils are formulated to withstand the high temperatures of melted wax without losing their scent. To incorporate fragrance oils, follow these steps:
- Determine the desired scent strength: The recommended ratio of fragrance oil to wax is typically 1 ounce of fragrance oil per 1 pound of wax. However, you can adjust this ratio based on personal preference.
- Calculate the amount needed: Measure the weight of your melted wax and multiply it by the desired ratio to determine the amount of fragrance oil needed.
- Add the fragrance oil: Once your wax has reached the desired temperature (usually around 180-185°F), carefully pour in the calculated amount of fragrance oil. Stir gently but thoroughly to ensure even distribution.
In addition to fragrances, you may also want to add color dyes to your melted wax for visual appeal. There are various types of color dyes available, such as liquid dyes or dye chips, each with its own application method and recommended usage rate. Here’s how you can incorporate color dyes into your melted wax:
- Choose a suitable color dye: Select a dye that is specifically designed for candle making and compatible with your chosen type of wax.
- Determine the desired color intensity: The recommended usage rate for most liquid dyes is typically 1-2 drops per pound of wax, while dye chips may require 1 chip per pound depending on the desired shade.
- Add the color dye: Once your wax has reached the desired temperature, add the chosen color dye gradually. Start with a small amount and stir well to assess the color saturation. You can always add more dye if needed.
Remember to experiment and test different combinations of fragrance oils and color dyes to achieve your desired results. Keep in mind that certain fragrances may affect the performance of your candle, such as scent throw, so it is important to follow the manufacturer’s guidelines for each specific fragrance oil.
By adding fragrance and color in the correct ratios and using appropriate techniques, you can create beautifully scented and visually stunning candles that are a reflection of your personal style and creativity.
Handling Safety Precautions
When working with hot wax in the candle making process, it is crucial to prioritize safety to prevent accidents and injuries. Here are some important safety guidelines to follow:
- Always work in a well-ventilated area: Adequate ventilation is essential when melting candle wax. This helps to prevent the buildup of fumes which can be harmful if inhaled excessively. Ensure that the area you are working in has good airflow, whether it’s a well-ventilated room or near an open window.
- Use proper protective gear: When handling hot wax, protect yourself by wearing heat-resistant gloves and long-sleeved clothing. This will help prevent burns in case of accidental spills or splashes. Additionally, wearing safety goggles can protect your eyes from any potential hazards.
- Never leave the melting wax unattended: It is important to continuously supervise the melting process and never leave it unattended. Wax can become extremely hot and pose a fire hazard if left on high heat for too long. Stay present and attentive throughout the entire melting process.
- Keep flammable materials away: Ensure that there are no flammable materials near your work area when melting candle wax. Avoid placing anything combustible close to your heat source, as this greatly reduces the risk of fire accidents.
- Properly store your equipment: After use, make sure to store all your equipment safely away from children and pets. Clean any leftover wax residue from your tools and store them securely to prevent accidents.
- Have a fire extinguisher nearby: In case of an emergency, always have a fire extinguisher readily available nearby. Familiarize yourself with its operation beforehand so you can react quickly if needed.
By following these safety precautions when melting candle wax, you can minimize risks and ensure a safe and enjoyable candle making experience. Remember, prioritizing safety not only protects yourself but also those around you. Stay vigilant and cautious throughout the entire process to create beautiful candles without any mishaps.
Troubleshooting Common Issues
Common issues can arise during the process of melting candle wax for candle making. These issues include overheating and uneven melting, which can affect the quality and appearance of the candles. This section will discuss these common problems and provide troubleshooting tips to help ensure a successful wax melting process.
- Overheating: Overheating the wax can lead to discoloration, loss of fragrance, and even potential fire hazards. To prevent this issue, it is important to closely monitor the temperature of the wax throughout the melting process. Using a thermometer is highly recommended to gauge the temperature accurately.
If the wax reaches its flash point (the temperature at which it can catch fire), remove it from the heat immediately. To avoid overheating, it may be necessary to adjust the heat source or lower the melting temperature. - Uneven Melting: Uneven melting of candle wax can result in uneven burning and an unattractive finished candle. This problem often occurs when using improper heating techniques or inadequate stirring.
To promote even melting, make sure to stir the wax frequently using a heat-resistant utensil, such as a wooden spoon or silicone spatula. Additionally, using a double boiler or microwaving in short intervals with thorough stirring between each cycle will help distribute heat evenly throughout the wax. - Wax Frosting: Another common issue that may occur during the cooling process is wax frosting, which appears as white spots or patches on the surface of the candle. This typically happens due to rapid cooling or exposure to drafts during setting. To prevent frosting, allow sufficient time for your candles to cool slowly without sudden changes in temperature or airflow.
- Sinkholes: Sinkholes are depressions that form in candles as they cool down and solidify around a wick after pouring into a container or mold pocket without enough space underneath it for proper adhesion. One way to prevent sinkholes is by gently tapping your containers on a solid surface after pouring to help release any air bubbles trapped within the wax.
Alternatively, you can pour your wax at a slightly higher temperature to increase adhesion to the container’s bottom.
By proactively addressing these common issues and following the troubleshooting tips provided, candle makers can minimize problems during the wax melting process and produce high-quality homemade candles. Additionally, it is important to remember that practice makes perfect, and experimenting with different techniques and materials will contribute to improving candle making skills over time.
| Common Issues | Troubleshooting Tips |
|---|---|
| Overheating | – Monitor wax temperature closely using a thermometer
|
| Uneven Melting | – Stir wax frequently with a heat-resistant utensil
between each cycle |
| Wax Frosting | – Allow sufficient time for candles to cool slowly without sudden temperaturechanges or airflow |
| Sinkholes | – Gently tap containers on a solid surface after pouring
|
Conclusion
In conclusion, properly melting candle wax is an essential step in the candle making process that greatly contributes to the quality and success of homemade candles. By understanding the different types of wax and their melting points, gathering the necessary supplies, and following the step-by-step instructions for preparing and melting the wax, you can ensure a smooth and even consistency.
Maintaining the optimal temperature throughout the process is crucial, as it helps achieve desired results when adding fragrance and color. Additionally, it is important to follow safety precautions to prevent any accidents or hazards.
Creating your own candles can be a rewarding and enjoyable experience. It allows you to customize scents, colors, and designs according to your preferences. By taking the time to properly melt candle wax, you are setting yourself up for success in producing high-quality homemade candles that will impress both yourself and others.
If you have been considering starting your candle making journey, now is the perfect time to dive in. Armed with the knowledge gained from this article on how to melt candle wax, you have all the tools necessary to create beautiful and fragrant candles. So go ahead and gather your supplies, follow the instructions carefully, and let your creativity shine through in each unique candle you make.
Enjoy this fulfilling craft as you transform ordinary wax into mesmerizing works of art that will bring warmth and ambiance to any space. Happy candle making.
Frequently Asked Questions
Will microwaving a candle melt the wax?
Microwaving a candle can indeed melt the wax. When you place a candle in the microwave, the heat generated from the microwave’s electromagnetic waves will cause the wax to heat up and eventually melt.
However, it is important to exercise caution when attempting this as microwaving candles can be dangerous if not done properly. The intense heat produced by microwaves can lead to overheating, boiling, or even ignition of the wax if left unattended for too long.
What can be used to melt wax?
Several methods can be used to melt wax safely. One common approach is to use a double boiler setup. This involves placing a container with the wax inside another larger pot filled with water.
As you heat the water, it indirectly transfers its heat to the smaller container with the wax, gently melting it without applying excessive direct heat that could lead to scorching or burning. Another option is using a dedicated electric wax melter or a melting pot specifically designed for candle-making purposes, which allows controlled heating of the wax without any potential hazards.
Is boiling water hot enough to melt candle wax?
Boiling water itself typically does not reach temperatures high enough to efficiently melt candle wax on its own. Generally, boiling water reaches around 100 degrees Celsius or 212 degrees Fahrenheit at sea level atmospheric pressure.
While this temperature is certainly hot enough to soften some types of waxes slightly, it may not be sufficient for completely melting them into a liquid state. It is more common to use direct heat sources like stovetops or specialized devices mentioned earlier when aiming to melt candle wax effectively and in a controlled manner.

Welcome to my candle making blog! In this blog, I will be sharing my tips and tricks for making candles. I will also be sharing some of my favorite recipes.


