Candle making is a beloved craft that allows individuals to create beautiful and fragrant creations for personal use or gifts. However, one common issue that many candle makers encounter is the formation of air bubbles.
These pesky bubbles can mar the overall quality and aesthetics of candles, leaving them with an unprofessional and less-than-desirable appearance. Whether you are a professional candle maker looking to elevate your craft or a DIY enthusiast hoping for perfect results, understanding how to prevent air bubbles is crucial.
Air bubbles not only affect the visual appeal of candles but can also impact their functionality. When air is trapped within the wax, it causes uneven burning and reduces the overall lifespan of the candle. Additionally, these bubbles can burst during burning, leading to potential safety hazards such as spattering wax or uneven flames. Therefore, it is essential for both professional and DIY candle makers to address this issue.
In order to prevent air bubbles, it is important to identify their common causes during the candle making process. This includes factors such as temperature fluctuations, improper pouring techniques, and even choice of ingredients. By carefully selecting appropriate materials and mastering certain techniques, it is possible to achieve perfectly smooth candles that are free from any unwanted air bubbles.
In this article, we will explore in detail various methods and tips for preventing air bubbles in candle making. We will discuss the significance of addressing this issue for both professionals aiming for high-quality products and DIY enthusiasts seeking flawless results.
From selecting the right materials to mastering pouring techniques and troubleshooting remedies, we will provide a comprehensive guide on achieving flawlessly smooth candles through effective air bubble prevention. Let’s delve into this art form together and create candles that are not only visually appealing but also functional and safe.
Common Causes of Air Bubbles in Candle Making
When it comes to candle making, air bubbles can be a frustrating issue that affects the overall quality and aesthetics of the final product. Understanding the common causes behind air bubble formation is essential for both professional and DIY candle makers.
One of the main reasons for air bubbles in candles is temperature fluctuations during the melting and pouring process. If the candle wax is not melted at the right temperature or if there are drastic temperature changes during pouring, it can lead to the entrapment of air bubbles. It is important to maintain a consistent temperature throughout the entire candle making process to minimize this issue.
Another cause of air bubbles in candles is improper pouring technique. Pouring the wax too quickly or forcefully can introduce air into the mixture, resulting in unwanted bubbles. It’s important to pour slowly and steadily, allowing the wax to fill the container evenly without trapping any air.
The choice of ingredients can also contribute to air bubble formation. Low-quality waxes or fragrance oils may contain impurities that create tiny air pockets within the candle. It’s crucial to select high-quality materials specifically designed for candle making in order to minimize the occurrence of air bubbles.
To address these causes and prevent air bubbles in candle making, it is recommended to maintain proper temperature control, master effective pouring techniques, and choose high-quality materials. Implementing these strategies will help ensure that your candles turn out smooth and bubble-free.
| Common Causes | Prevention Strategies |
|---|---|
| Temperature fluctuations | Maintaining consistent temperature throughout melting and pouring process |
| Improper pouring technique | Pouring slowly and steadily, avoiding forceful or quick pouring |
| Low-quality ingredients | Using high-quality waxes and fragrance oils specifically designed for candle making |
By understanding the common causes of air bubbles in candle making and implementing the appropriate prevention strategies, you can ensure that your candles are smooth, visually appealing, and of high quality.
Selecting the Right Materials for Air Bubble-Free Candle Making
When it comes to creating candles, selecting the right materials is crucial in minimizing air bubble formation and ensuring a smooth, professional finish. Choosing high-quality waxes, wicks, and fragrance oils can significantly improve your chances of achieving air bubble-free candles. In this section, we will guide you on how to select the appropriate materials for optimal results in your candle making process.
Choosing the Right Wax
One of the key factors in preventing air bubbles is selecting the right type of wax. Different types of waxes have different properties that can impact air bubble formation. Soy wax and coconut wax, for example, are known to have excellent burn qualities but are also prone to air bubbles if not handled properly. Beeswax, on the other hand, has a higher melting point which can help reduce the likelihood of air bubble formation.
It’s important to consider the melting point and composition of the waxes when choosing which one to use for your candles. Look for waxes that are specifically labeled as “air bubble-free” or “low shrinkage” as they are designed to minimize these imperfections during the cooling process.
Wick Selection
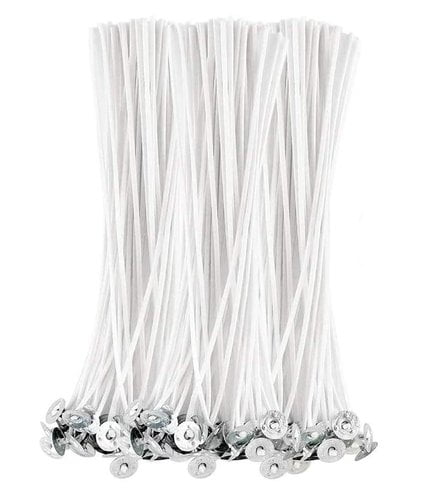
The choice of wick can also play a role in reducing air bubble formation. The size and material of the wick should be carefully considered based on the type and size of your candle. Using a wick that is too small may lead to poor burning quality and increase the chances of air bubbles forming due to incomplete combustion.
To choose an appropriate wick size, consider factors such as candle diameter, desired burn time, and fragrance load. It may take some experimentation to find the perfect match for your specific candle-making project.
Importance of High-Quality Fragrance Oils
Fragrance oils can affect both the scent throw and the quality of the finished candle. When selecting fragrance oils, opt for high-quality options specifically formulated for candle making. Poor-quality oils may contain impurities or additives that can contribute to air bubble formation.
Additionally, some fragrance oils are known to cause more air bubbles than others due to their chemical composition. Research reviews and seek recommendations from experienced candle makers to ensure you are using a fragrance oil that is less likely to result in air bubbles.
By choosing the right materials – wax, wicks, and fragrance oils – you can greatly enhance your chances of creating air bubble-free candles. Take the time to research and invest in high-quality materials specifically designed for optimal results. Combining these suitable materials with proper temperature control and pouring techniques will bring you closer to achieving perfectly smooth candles.
Proper Temperature Control
Temperature control plays a crucial role in preventing air bubbles during the candle making-kits-and-supplies/” target=”_blank” rel=”follow noopener”>making process. Maintaining the ideal temperature during both the melting and pouring stages is essential for achieving smooth and bubble-free candles. In this section, we will explore some tips and techniques to help you master temperature control and minimize air bubble formation.
Tips for Maintaining Ideal Temperatures
One of the primary causes of air bubbles in candles is improper temperature control. If the wax is too hot or too cold, it can lead to the formation of unsightly air pockets. Here are some tips to ensure you maintain optimal temperatures throughout the process:
- Melting Stage: It is essential to heat your wax slowly and evenly to avoid overheating or scorching. Use a double boiler or a dedicated melting pot with a thermometer to monitor the temperature accurately. The ideal melting temperature varies depending on the type of wax used, so refer to the manufacturer’s instructions for guidance.
- Pouring Stage: Once your wax has reached the desired melting temperature, allow it to cool slightly before pouring it into your candle containers. This cooling period helps minimize the risk of air bubbles forming during pouring. Aim for a pouring temperature around 10-15 degrees above the solidification point of your specific wax type.
The Impact of Temperature Fluctuations
Temperature fluctuations can have a significant impact on air bubble formation in candles. Rapid changes in temperatures can cause uneven cooling and result in trapped air bubbles within the candle structure. To prevent this, it’s important to avoid exposing your candles to extreme temperature changes during both the cooling and curing phases.
During cooling, make sure your candles are placed in an environment with stable temperatures without any drafts or sudden shifts in heat levels. Similarly, once poured, allow your candles to cure at room temperature away from direct sunlight or any sources of heat or cold. Maintaining a consistent temperature environment will help ensure the candles solidify evenly and minimize the risk of air bubble formation.
By properly controlling the temperature throughout the candle making process, you can significantly reduce the occurrence of air bubbles and achieve flawless, professional-looking candles. Next, we will explore another important aspect of preventing air bubbles – mastering the pouring technique.
Mastering the Pouring Technique
When it comes to preventing air bubbles in candle making, one of the most crucial steps is mastering the pouring technique. The way you pour the melted wax into the candle container greatly affects the formation of air bubbles. By following a few simple steps, you can minimize the presence of air bubbles and achieve a smooth, professional-looking finish.
Firstly, it is essential to ensure that the pouring process is slow and controlled. Rapid pouring can create turbulence, leading to the introduction of air into the wax and subsequent bubble formation. To avoid this, take your time when pouring the hot wax into your chosen container. It may be helpful to use a heat-resistant funnel or pitcher with a narrow spout for more precise pouring.
Additionally, pay attention to the height from which you pour the wax. Holding the pitcher too high above the container can cause splashing and increase the chances of trapping air bubbles in the wax. Instead, hold it closer to the container and aim for a gentle stream of wax flowing smoothly into place.
Furthermore, consider using a technique called “double-pouring.” This method involves initially pouring only a small amount of wax into each candle container and allowing it to cool and solidify slightly before adding another layer on top. By doing this, any initial air bubbles are more likely to rise up and escape before you pour another layer on top.
By mastering these techniques and taking extra care during the pouring process, you can significantly reduce air bubble formation in your homemade candles. Remember that practice makes perfect, so don’t be discouraged if you encounter some air bubbles at first – with time and experience, you will become more adept at achieving flawlessly smooth candles.
The Role of Stirring and Mixing in Air Bubble Prevention
Properly stirring and mixing your candle wax is essential in preventing air bubbles from forming. When it comes to air bubble prevention, gentle stirring techniques and avoiding excessive agitation are key. Here are some guidelines to follow when it comes to the role of stirring and mixing in air bubble prevention:
- Gentle Stirring: When melting your wax, use a gentle stirring motion rather than vigorous stirring. Vigorous stirring can introduce more air into the wax, leading to the formation of air bubbles. Instead, use a slow and steady circular motion with a wooden or silicone stirrer to ensure that the wax is evenly melted without introducing excess air.
- Avoiding Excessive Agitation: It’s important to avoid over-stirring or agitating the wax too much during the pouring process. Excessive agitation can cause air bubbles to form as well. To prevent this, stir the fragrance oils or additives into the melted wax using gentle up-and-down motions rather than aggressive stirring.
–
- Use a silicone spatula or spoon for mixing in fragrance oils.
–
- Avoid whisking or using an electric mixer as these can introduce more air into the mixture.
Timing is Key: One important aspect of proper stirring and mixing is timing. Make sure that you stir your wax until all ingredients are thoroughly mixed and incorporated before pouring it into your candle moulds. This ensures that there are no pockets of unmixed ingredients that could lead to uneven burning or air bubble formation in your finished candles.
By following these guidelines for stirring and mixing during the candle making process, you can minimize the occurrence of air bubbles in your candles and achieve a smooth and professional-looking final product.
Remember, practice makes perfect, so don’t get discouraged if you encounter some air bubbles at first. Keep experimenting with different techniques until you find what works best for you in preventing those pesky air bubbles from ruining your beautiful candles.
Advanced Techniques for Air Bubble-Free Candle Making
When it comes to creating candles without any air bubbles, professional candle makers often utilize advanced methods and tools that can greatly aid in preventing the formation of these unwanted imperfections. While these techniques may require some additional effort and investment, they can ultimately result in flawless and professional-looking candles. Here are a few advanced techniques that can help you achieve air bubble-free candle making:
- Vacuum Chambers: One effective way to eliminate air bubbles from your melted wax is by using a vacuum chamber. This technique involves placing the container with the melted wax inside a vacuum chamber and removing the air pressure within the chamber. As the pressure decreases, any trapped air bubbles within the wax will rise to the surface and escape, leaving you with smooth and bubble-free wax to pour into your candle molds.
- Preheating Techniques: Another useful method to prevent air bubbles is by preheating your containers before pouring in the melted wax. This can be done using a heat gun or by placing them in a warm oven for a short period of time. Preheating helps to reduce temperature differences between the container and the hot wax, minimizing the chances of air getting trapped and creating bubbles during the pouring process.
- Using Release Agents: For more complex candle designs or containers with intricate shapes, using release agents can help ensure an even distribution of melted wax without any air bubbles. A release agent is applied to the inside of the mold or container before pouring in the wax, creating a barrier that prevents adhesion between the wax and mold surface. This allows for easy removal of the finished candle while also reducing air bubble formation.
While these advanced techniques may not be necessary for every candle making project, they can be valuable assets for those seeking professional-quality results or working on more challenging designs. Experimenting with these methods can provide unique opportunities for creativity while also achieving flawlessly smooth candles free from unsightly air bubbles.
Troubleshooting
Despite taking preventative measures, air bubbles can still occur in candles. However, there are several techniques and remedies that can help you remove air bubbles and achieve flawless candles.
One common method to remove air bubbles is using a heat source, such as a hairdryer or a heat gun. Gently heat the surface of the candle, focusing on the areas where air bubbles are present. As the wax melts slightly, the air bubbles should rise to the surface and disappear. Be careful not to overheat the candle as it can cause other issues like distortion or discolouration.
Another technique is to use a small needle or pin to release the trapped air inside the bubble. Carefully insert the needle into the center of the bubble and gently push down until you feel resistance. Slowly retract the needle while maintaining pressure on the bubble, allowing any trapped air to escape. This method requires precision and patience to avoid damaging your candle.
If you prefer an all-natural approach, you can try melting a small amount of additional wax that matches your candle’s color and pouring it over the area with air bubbles. The melted wax will fill in any gaps and smooth out imperfections, including air bubbles. Use a gentle touch when pouring to ensure an even distribution of wax.
| Technique | Description |
|---|---|
| Heat Source | Using a hairdryer or heat gun to gently melt surface of candle and allow air bubbles to rise |
| Needle/Pin Method | Inserting a small needle into center of bubble and applying pressure to release trapped air |
| Melting Additional Wax | Pouring melted wax over area with air bubbles to fill in gaps and smooth out imperfections |
Conclusion
In conclusion, air bubble prevention is an essential aspect of candle making that greatly impacts the overall quality and aesthetics of the final product. Addressing this issue is crucial for both professional candle makers and DIY enthusiasts looking to create beautiful candles. By understanding the common causes of air bubbles and implementing proper techniques, it is possible to achieve perfectly smooth candles.
One key factor in preventing air bubbles is selecting the right materials. Choosing high-quality waxes, wicks, and fragrance oils can significantly minimize the formation of air bubbles during the candle making process. Additionally, maintaining proper temperature control throughout the melting and pouring stages is crucial. Temperature fluctuations can lead to air bubble formation, so it is important to follow tips and techniques for maintaining a consistent temperature.
Mastering the pouring technique also plays a vital role in minimizing air bubbles. Slow, controlled pouring allows for proper distribution of wax and reduces the chances of trapped air forming bubbles. Furthermore, gentle stirring and mixing methods should be employed to limit excessive agitation that can introduce more air into the mixture.
For those looking to take their candle making skills to an advanced level, there are additional tools and techniques available such as vacuum chambers and preheating methods which aid in eliminating air bubbles entirely. Lastly, if troubleshooting becomes necessary due to the occurrence of air bubbles in finished candles, there are solutions available to resolve this issue.
Frequently Asked Questions
Why am I getting air bubbles in my candles?
Air bubbles in candles can occur due to various reasons. One common cause is the presence of air pockets within the wax itself, which may result from improper pouring techniques or inadequate stirring of the melted wax during preparation.
These air bubbles can then rise to the surface as the candle sets and hardens. Another possible reason is that the candle wax temperature when poured was too high, causing trapped air to expand and create bubbles.
What causes air bubbles in soy wax?
In soy wax, air bubbles can be caused by a few different factors. One significant factor is the presence of impurities or contaminants in the wax, such as dust or moisture.
When these impurities are heated and mixed with the melted soy wax, they can generate air bubbles that become trapped as the wax solidifies. Additionally, if the soy wax is not warmed evenly or stirred sufficiently while melting, it can also lead to air bubble formation.
How do you fix bubbles on top of candles?
There are several ways to fix bubbles on top of candles. One method is to use a heat gun or hairdryer to gently warm and melt the surface of the candle where bubbles are present. By applying heat, you can encourage the trapped air within the bubbles to escape and release from the candle’s surface.
Another option is to carefully prick each bubble using a needle or pin before reheating with a heat source so that any remaining air can escape during this process. It’s important to proceed with caution while doing this step to avoid damaging or deforming your candle’s appearance. Finally, prevention is key – ensuring proper stirring techniques during candle making and minimizing impurities in your wax can help reduce bubble formation on future candles.

Welcome to my candle making blog! In this blog, I will be sharing my tips and tricks for making candles. I will also be sharing some of my favorite recipes.

