Making a strong scented candle has numerous benefits – having your own candle provides the ambience you want to create, you can personalise it with rich scents and aromatic oils, and you have complete control over the ingredients going into it. Crafting homemade candles is a creative activity that can be both enjoyable and rewarding. You don’t need to rush out to an expensive store when making a strong scented candle is so easy.
Essential Items To make a strongly scented candle from home, one of the most important items to take into consideration is the right type of wax. Choosing a wax that melts at a certain temperature naturally results in stronger scent throw when burning the finished product.
Beeswax, coconut wax, and soy wax are all great options for making a strong scented candle as they offer reliable strength in scent throw without requiring additional additives or fragrance increasers. Beyond just the wax, there are other essential elements necessary for crafting vigorously fragrant candles such as wicking material, moulds or containers for your candles, wick sustainers, fragrances or essential oils and more.
Fragrance Making a strong scented candle means understanding how different fragrances interact together: how to support them without overpowering one another and with enough strength so that they carry through the room when lit. Using 4-6 drops of essential oil per 100gm of melted wax should be sufficient enough to pack a level of olfactory punch without being too overwhelming.
It’s always recommended that one select high quality fragrance oils for the best possible result when making a strongly scented candle as this will ensure maximum fragrance release once the item has finished burning away. Additionally, adjusting the scent levels up accordingly for larger containers like pillars or larger jars would help ensuring their suitability for their respective environments as well.
Setting Up Your Workspace
When making scented candles, having the right environment makes all the difference. From selecting a comfortable workspace to ensuring you have plenty of safety equipment and ingredients, your work area has an important role to play. To create a strong scent from your candles, having a well-thought-out and organized workspace is essential.
For starters, it’s important to choose a safe place where you can comfortably work on your projects without fear of fire or other potential hazards. Setting up in an open area such as near open windows and away from flammable items is always best practice.
It’s also important to take stock of nearby tools and materials that might be needed as part of the process such as wax melters, thermometers, pouring vessels, wicks and clamps or anchors for centering wicks in candles. For those new to candle making who may not have all the supplies yet, these items can typically be found online at specialized retail websites or purchased locally at craft stores or other retailers.
Finally, one of the most crucial elements for successfully making scented candles with a strong aroma is having enough fragrance oil readily available so that thorough scenting can be achieved. This means researching different types of oils prior to starting any project-some are specifically designed for use with traditional paraffin wax while others are formulated for use with soy wax-and creating a list of brands and scents that will be needed.
The combination of all these elements being present together-safely-will help ensure that beautiful candle creations with lasting aromas can come together without issue in no time at all.
Essential Tools and Supplies
Making a strong scented candle is an enjoyable craft activity that will reward you with beautiful, homemade candles, each with their own custom aroma. To make high-quality candles with long-lasting scent and glowing colors, you will need a few essential tools and supplies.
- Heat-safe container such as a double boiler or an old pan.
- Candle wax such as beeswax, paraffin wax or soy wax
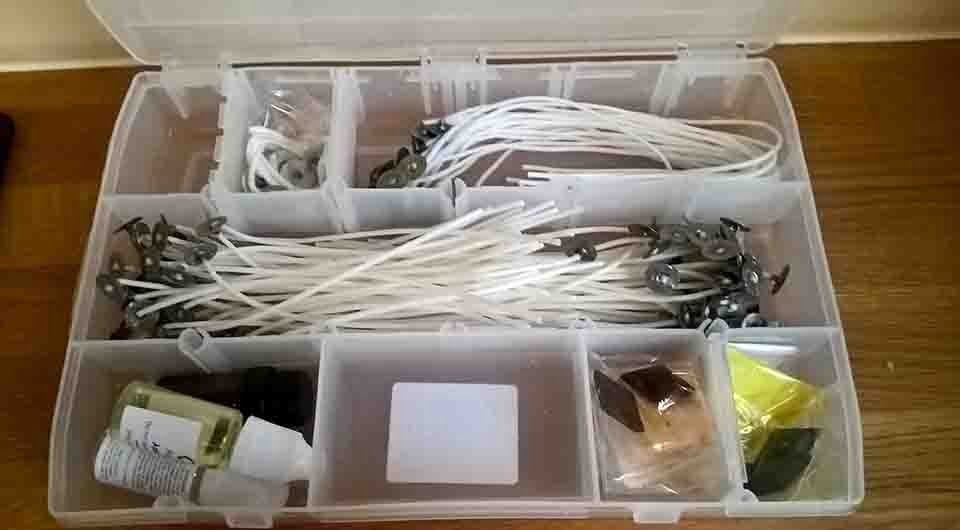
- Wick tab
- Cotton wicks braided in a thick core
>The Container style=>To heat the wax without it burning or sticking to the walls of the container, you will need something that is heat safe. It can be something like candle wax melting plate but for those who do not have one available, an old pan or double boiler to act as a makeshift melting pot would work fine.
Metals are ideal materials for this method since they tend to retain and distribute heat evenly. >Candle Wax style=>Once you’ve got the saucepan for melting the wax, the next step is picking out what type of wax you want to use. There are various kinds of readily available candle making waxes such as beeswax, paraffin wax or soy wax; each having their own unique characteristics.
For example, beeswax provides powerful aroma due to its natural honey properties whereas soy is more preferred by many because it burns cooler and produces much less smoke than paraffin. > Wicks style=>After deciding on your desired kind of candle wax, its time to select the right wick for your project.
The best choice here are cotton wicks braided in a thick core so that they don’t melt easily when exposed to heat while also ensuring that they stay upright in your candles.
Avoid using leaded wicks because these contain dangerous toxins that should not be burned indoors.
Choosing Wax
The type of wax used for making scented candles is an important factor in achieving the desired look, smell, and burn quality. Different kinds of wax each have their own unique characteristics which makes them more suitable for specific projects than others. Here are some of the pros and cons of the most common types of wax used in candle-making:
Beeswax
Pros: Beeswax has a beautiful natural color and aroma that provides a unique aesthetic to your candles. It is also known to be hypoallergenic and non-toxic which make it a popular choice in aromatherapy products. Because beeswax has such a low melting temperature, it remains liquid even at cooler temperatures before hardening again.
Paraffin wax
Pros: Paraffin wax is one of the most affordable waxes available on the market. Its easy availability makes it easily accessible for any project size. Additionally, paraffin helps to create sturdy candles with longer burning times than other compounds.
Soy Wax
Pros: Soy wax has great scent holding abilities since it can easily absorb fragrance oils. This makes it great for creating scented candles that will last long after they are lit up. Additionally, soy wax holds burning properties that are similar to beeswax while having lower melting temperatures which provides stability during temperature changes.
Choosing a Fragrance
As you begin to plan the process of making your own scented candle, a key step is choosing the fragrance that you will be using. The best part of adding scent to a candle is that it can really enhance the atmosphere of any room, and if done right, can make a good gift or pick-me-up for anyone who steps foot inside.
In order to do this successfully, here are some pointers in selecting the perfect fragrance for your project:
Selecting Fragrance Type
The first decision you have to make is what kind of fragrance you would like. Generally speaking, candle fragrances fall into two categories: essential oils or synthetic materials called “fragrance oils.” Essential oils are natural compounds taken from plants or flowers while fragrance oils are man made and often much more cost effective. Whichever type of oil you choose should depend ultimately on your price range and personal preference.
Choosing Intensity
Once you decide which type of oil to use, the next step is finding one with an intensity that is both pleasing and appropriate for its setting; a bedroom won’t always need as strong a scent as say a living or dining room. When considering intensity levels, it’s important to keep in mind that too little scent will make your candle feel lackluster while too much could overwhelm guests-Strike the right balance.
Picking Your Notes
When buying store bought candles, picking notes usually isn’t something we give much thought about but when making your own candles, this can be considered an art form in itself.
Common notes consist of but not limited to floral such as jasmine and lavender; citrusy like lemon and orange; aquatic like eucalyptus or bergamot; woody like sandalwood; oriental such as vanilla oud; gourmand like gingerbread and caramel; green such rosemary and almond; earthy like patchouli or musketcThis list doesn’t even scratch the surface but should give you some ideas on where to start.
Keep in mind that combination of different notes will produce unique variation with each mix so experimenting don’t be afraid to experiment.
- Choose between essential and synthetic oils
- Pick appropriately intensity for setting
- Explore common note options (floral/citrusy/aquatic etc)
- Combine different notes for unique variations
Adding Color and Design
Candles can be made fun and creative using different shapes, sizes, colors, fragrances, and decorations. To make a strong scented candle, it is important to add a high concentration of fragrance oil so that the scent fills the room when the candle is lit. For added creativity and flair, you can also add decorative elements such as glitter or wax designs.
Using Glitter
Glitter adds sparkle and colour to a candle which can be aesthetically pleasing for any room or occasion. The perfect way to add glitter is to sprinkle it into each layer of wax as it cools. Doing this will ensure that the sparkles are distributed evenly throughout the candle. You may want to consider investing in a specialist glitter powder spray that evenly distributes various sizes of particles onto your candles for an even finish.
Adding Dip Dyes
Dip dyeing is a great way to add color to your candles in layers without having to worry about dyes mixing with other colors accidentally. You simply melt new batches of wax in separate containers with different levels of dye intensity before pouring each layer into the mould successively until you achieve the desired level of color depth overall; taking care not to fill past the pre-determined fill line as you go along.
This technique also offers flexibility for experimentation with numerous possibilities of color combinations and intensities with just two basic ingredients – wax and dye.
Incorporating Other Decorative Elements
If you want some extra decoration on your candles, there are many supplies available online such as mica glitter glitter pigment powders, wax flakes, beads glues glue sticks, color pastes flavourings, wicks crayons or melted wax decorations. These embellishments add visual appeal without compromising on quality or strength as they are designed specifically for use with candles.
For unique multi-dimensional effects, try placing small items like leaves floral sprigs or dried herbs into the base before pouring in hot wax. As long as they have been treated correctly they will retain their definition while adding another level of texture visual interest.
Adding the Wick
When making a homemade scented candle, a wick is needed to absorb the melted wax and enable it to burn without the need for an open flame. Wick selection and wick placement are both important in ensuring that the candle will burn correctly and effectively.
- Selecting the Right Wick: A wick’s performance is determined by its diameter and type of core material. The size of wick should theoretically match the diameter of candle from which it will be burning.
- Finding a Suitable Core Material: There are different types of cores available in the market namely, cotton, paper or zinc. All have their advantages; cotton has a good track record of low sooting and clean burning but it may not attract enough to create an even pool of melted wax across the diameter.
- Placement of Wick: When placing the wick in your scented candle there is one major rule to remember: ensure that all parts of the wick make direct contact with both sides as well as portions where additional liquid wax may run down freely.
Attaching a base support or weight with tape or glue is essential once deciding on an appropriate location for optimal performance. An unstructured core like bamboo will require some extra support otherwise it may easily bend over due to its material property.
Additionally, making sure you double up on layers around areas where more melted wax could run can help counter this problem’s effect on stability. These pieces should be affixed firmly so that once heated, they do not shift during pouring and prevent early failure while still maintaining uniformity in terms of stability.
Once everything else is taken care of, you also need to consider how much height you want your finished candle to reach when lit. This will determine how much melt pool depth you want which again depends upon personal preference offering various design options when working on customized candles.
Excessive amounts can lead to incomplete burning, smoke created ranging from normal whitish smoke up-to more visible blackish smoke or heavy staining around jar walls until they shatter so take into consideration what suits best for desired outcome before continuing further along with preparation stages instead just understanding basics about materials used.
Finishing Touches
Presentation is key when gifting a homemade scented candle. The box that the product comes in can make it more special than the average gift wrap, and give a more personal touch. Small, craft-style boxes are a popular choice for gifting candles as it gives an unpredictable sense of surprise to them. Utilizing a tasteful box that compliments your colors and scents is vital to ensuring that your candle makes an impression on your recipient.
Other creative gifts include “candle kits” you have put together for special occasions such as birthdays or anniversaries. It’s these types of things that people really appreciate and remember. You could include a large container candle with all of its elements such as tins, wick holders, wax chips, scent oils, and even stirring sticks or other accessories if you wish. The possibilities are endless when it comes to packaging creative ideas with your signature candles.
Another promotion option to increase interest in both your scented candles and business is creating handmade gift baskets filled with complimentary products related to their use. These might include bath salts or cleaning products made from natural products just like the candle itself, along with equally fragrant incense sticks or even hand-painted votive holders.
When done right this will be memorable for both the gifted and the giver – making sure recipients feel like a royal after receiving one of your wonderful presents.
Conclusion
Conclusion: Pro Tips for Making a Perfect Candle, Burning Tips and Where to Buy Resources Making a homemade candle may seem intimidating at first, but with the right information, it can be an enjoyable experience. Plus, you’ll end up with a unique candle that smells amazing and looks perfect in your home.
To make sure everyone has a great time making candles, here are a few pro tips. First of all, make sure to measure your ingredients properly and stick to the recommended ratios to ensure that your wax will burn evenly and slowly.
Secondly, be sure to let the wax cool completely before removing it from the mold or containers. This will help keep your candles looking professional. Finally, adding one drop of essential oil per tablespoon of melted wax will allow plenty of room for strong scents.
Regarding burning protocol, there’s no one-size fits all approach when it comes to how many hours should be lit each session or for how long you should let the wax melt in its container before relighting it again – these variables depend on the size of your specific candle as well as what type of wax and fragrance were used during its making process.
However there are some basic guidelines that apply to any candle such as never leaving a lit candle unattended, keep away from children or pets and never light near anything flammable.
Letting the wax pool reach over halfway down each side is usually sufficient; this helps evenly distribute both fragrance and heat as you extinguish and relight the wick multiple times throughout its duration.
There are many resources available online where you can purchase supplies to make homemade candles such as waxes products like soy or beeswax pellets, essential oils for scented candles, wicks and even molds for specialized shapes or sizes – so shoppers should always take their time comparing prices between suppliers before selecting their favorites. This allows people to find exactly what they need without spending too much money in unnecessary products along the way.

Welcome to my candle making blog! In this blog, I will be sharing my tips and tricks for making candles. I will also be sharing some of my favorite recipes.


