Introduction
Making candles can be a fun and relaxing craft to get involved in. From picking the wax, melting it down and choosing the best scent, it is an art form that you can explore with endless creativity. The history of handmade candles dates back to thousands of years ago when they were used as vessels for light.
Today, making candles is gaining popularity again, with people using them to express their individual style and evoke their own pleasant scents. This guide will provide you with tips for getting started on your journey of making candles.
Melting Wax: Before melting the wax, shred or cut it into smaller bits so that it melts evenly and quickly. Use both a double boiler or heat gun to melt the wax depending on what type of wax you are working with. If using a double boiler make sure to leave enough room at the top so that water and hot wax do not mix; if using a heat gun, be sure to keep it moving and start at a low setting before increasing its temperature as needed.
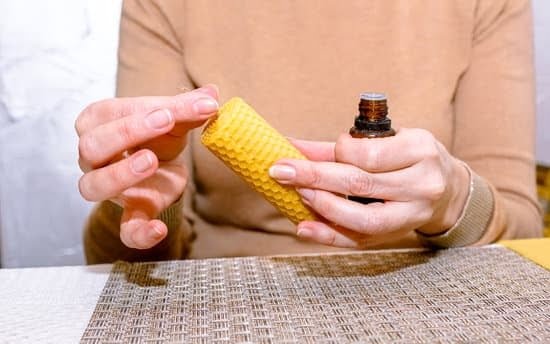
Adding Fragrances: Pick out fragrances that best fit the mood or purpose of the candle. Mix in essential oils or beads into melted wax before pouring the molten liquid into molds, jars, or tins depending on your desired shape. Some types of essential oils have higher flash points, meaning they stay in liquid form longer than other types; this can be useful when making pillars or votives since they require more time for cooling down.
Wick Selection: Select a wick size that corresponds to the container’s diameter size for optimal burn performance such as square braid cotton wick for containers measuring between 3-4 inches in diameter; pine core wick is better suited for wider waisted containers measuring from 4-6 inches in diameter; hemp core wicks are great for extra wide containers measuring 6+ inches in diameter. Additionally coat wicks with vegetable stearin prior to positioning them into molds or containers in order for them to stand up straight during the cooling period before use.
Adding Color: Brighten up your candles by adding color! You can achieve vibrant hues by dispersing concentrated mica powder or dyes directly into melted wax prior to pouring into molds, tins, bottles”any appropriate vessel really! Just be aware some colorants don’t work well with certain types of fragrance oils due to reactivation properties found within essential oils versus synthetic fragrances which might cause discoloration during burning time depending on their intensity level and flavors within them (e.g., spices).
Equipment and Materials
When making candles, you will need the appropriate equipment and materials to begin the process. First, you should purchase a wax melter. This will be used to melt the raw wax into a liquid that can be poured into your molds. You should be able to find one online or in specialty candle-making stores. Additionally, you will need wax for your candles. You can usually buy this in bulk or in individual bricks at craft stores or candle-making supply centers.
In addition to the basics, most candle makers like to decorate their creations with embellishments such as scented oils, colors, glitter and embossing powder. Many stores sell these items as well as wicks and containers specifically designed for candle-making. Finally, make sure you have some rubber gloves and an eye protection mask on hand as some of the ingredients may irritate skin and eyes if they come into direct contact with them!
Preparing and Safety
Prior to beginning any candle-making project, it is essential to prepare a safe and clean working space. As candle making involves burning flammable materials, forgo the kitchen and head to the garage or backyard instead. Make sure your space is free from clutter and anything combustible. If you will be using wax or other ingredients that need to be melted on an open flame, it’s best to do this outdoors where wind won’t blow debris into the flame nor lead you to accidentally burn something. Always keep a fire extinguisher or a bucket of water nearby in case of a put out a fire.
Always wear protective clothing when making candles – like heat resistant gloves, eyewear, and long sleeved clothing – so if hot wax splashes onto your skin it won’t cause any serious harm. Additionally, never look directly at the melting wax as sparks may fly off the burner due to too much heat exposure which can harm your eyes. Furthermore, refrain from handling containers after they’ve been filled with hot wax as they can easily cause severe burns! Lastly, make sure all children are supervised!!
Melting and Pouring Wax
When dealing with wax, it’s important to take safety precautions. Always wear gloves and safety glasses when handling hot wax. Additionally, be sure to wear old clothing in case of spills and splashes. Wax can also stick to wood and plastic surfaces, so you should cover your work area with newspaper or plastic sheeting as a precautionary measure.
Before melting wax, be sure that the proper container is being used. A double boiler (a pot of boiling water in which you place a smaller bowl filled with wax) is recommended for melting any type of wax. This will prevent direct contact between the heat source and the wax and ensure an even temperature across the surface of the wax as it melts. It’s important to ensure that the outer pot does not run out of water during the melting process as this can cause extreme damage to the equipment being used. Once all of concerns are taken care of, turn on low heat and stir until all of the solid particles have fully melted into liquid form.
The melted wax needs to then be strained through a mesh sieve to remove any debris or unpleasant odors afterwards before pouring into containers. An eye dropper should also be used if there is any need for coloring additives at this stage, since adding too much color can ruin an otherwise successful project! Lastly, get creative by using molds or different types of materials such as seashells or pine cones as containers for pouring your candles into; these will make your project unique!
Enhancing Your Candles
When making candles, adding colorant and fragrance can really elevate the overall look and smell of a candle. Colorant helps to give the candle its aesthetic and can be added in either liquid or powder form. Liquid colorants are great for a variety of colors, but can dilute the wax which affects the burning quality””best for beginners. Powder colorants offer a more saturated color and allows for you to customize your hue””great for experienced candle makers. Fragrance oils come in narrow neck bottles with various sizes that you add directly into the melted wax mixture before pouring into your molds. They can vary in cost depending on their size and purpose as some are specifically meant for candles while others are formulated for use in other products like diffusers or room sprays. Be sure to adhere to the recommended amounts given by most of the suppliers when adding fragrance oil or else it will result in a poor burning quality due to overloading the wax with fragrance.
Finishing Touches
When it comes to aesthetics, candle makers should take into consideration the form and size of the container they use. For example, the shape and style of the container may affect how easily the wax melts, how quickly a flame can be lit, and how long the candle will last. The material used to make a container and even its colour can greatly influence how your customer perceives your product.
The packaging of candles is another important factor for creating an aesthetically pleasing product. Candle makers should choose durable packaging that suits their brand’s aesthetic but also protects their candles from damage during shipping or selling at retail locations. Labels should be professional-looking, providing customers with all relevant information about the product such as scent description, burn time estimates, safety warnings etc. Candles can also be made more aesthetically pleasing by including decorative elements such as jewels, pearls or ribbons on top of each candle or tying strings around jar lids before sealing them in with wax.
Troubleshooting
Troubleshooting common candle-making issues can help you perfect your craft and create stunning candles. If the wax is not melting evenly, the most likely cause is incorrect pour temperature or a damaged wick ” use a thermometer to make sure you are using the correct temperature for your wax and check that the wick is straight and centered. If your container isn’t filling up as much as it should, confirm that your wick choice is correct for the size of your container ” consider switching to a larger diameter if needed. Another issue could be that your pour temperature was too cool, leading to an incomplete melt pool. To prevent an overly deep melt pool from forming, use your thermometer to make sure you have an accurate pour temperature. Finally, if there are lumps or bumps occurring when pouring cooled wax in layers, this may be due to variations in temperatures between subsequent pours ” ensure all pours are done within 5°F of each other for best results. By troubleshooting these common issues, you can ensure that every time you craft a candle it will turn out perfectly!
Conclusion
Making candles is an enjoyable activity that can be a great creative outlet. Candles also make excellent gifts, both homemade and store bought. By following the tips outlined in this article, you will be able to craft beautiful, professional looking candles to bring light and warmth into your home or give as presents. Making candles can be a fun way to indulge your creative side while celebrating the gift of making something special for someone else. With a little practice, you could even learn to create unique and intricate designs that will have everyone talking about your artisanal masterpieces!

Welcome to my candle making blog! In this blog, I will be sharing my tips and tricks for making candles. I will also be sharing some of my favorite recipes.


