Introduction
Dipped beeswax candles are a type of handcrafted natural candles made by melting wax and dipping it one wick at a time. The wicks used for dipped beeswax candles are usually made of cotton, linen or hemp twine. Beeswax naturally produces a beautiful golden hue when burned and is one of the longest burning candle waxes available. The natural property of long burning makes beeswax perfect for making super long candles such as wedding tapers – no extra scent that might distract the attention of hall guests during a ceremony or dinner. Additionally, the scent produced upon burning is sweet and mellow with a subtle hint of honey. Making dipped beeswax candles offers an opportunity to explore creativity in candle-making as multiple fragrances or coloring options can be incorporated into the melted wax before it is poured onto each wick during dipping. Plus, making them at home can be both a fun and calming experience.
To make dipped beeswax candles at home requires few materials such as: wax (of course), proper melting equipment (double boiler, crockpot, electric hotplate etc.), wicks, holders for the wicks (cardboard boxes), essential oils for fragrance if desired and food coloring for color if desired.
First step in making dipped beeswax candles at home is melting the wax in an appropriate melting equipment such double boiler or crockpot set over low heat until melted completely. Next step requires choosing between two options; either dyeing and/or scenting the melted wax prior to pouring on to each wick or pouring it without color or fragrance ” let’s have a look at these separately:
For coloring; add desired amount of colored dyes then stir until fully dissolved into melted wax using suitable stirring instrument (wooden spoon will do). To achieve nice light hue opt for 2-3 drops dye per 32oz (1kg) wax batch but increase/decrease amount depending on strength of color required ” experiment according to your preference! For scenting; add 5-7 drops essential oil per 3lbs (1kg) wax batch then stir until fully dissolved but do keep in mind that some essential oils are stronger than others so rather start with smaller amounts then experiment till you find desired strength yet subtleness for the scent level preferred in senses – again, this varies from person to person!
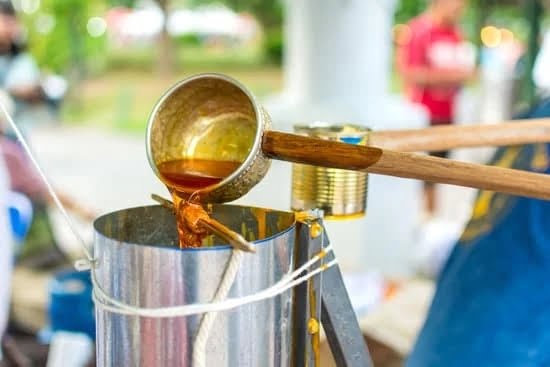
Final step is pouring liquid wax on to each pre-wick afterwards letting them dried out overnight prior usage: Place pre-dyed/scented melted liquid wax container near chopping board which contains cardboard boxes setup with enough number of prepared wicks protruding from top lids – attach one end of single inserted cord covered candlewick around any medium size object close by e.g pencil before immersing remaining portion inside molten liquefied cup followed by gradually lifting out each alternate section few centimeters above surface allowing molten area turn solidified taking shape predetermined individual taper – repeat process all around cup’s circumference while turning accordingly till first completed taper removed ready second immerse! Make certain leave enough room given diameter final product ultimately determine burn length since thicker means slighter slower hence take more refine decision upon selection necessary measurements produce quality outcome those give DIY approach effortless professional appeal end result!
What You Need To Get Started
Making dipped beeswax candles at home is a fun and gratifying activity. To get started, you’ll need a few basic supplies such as beeswax, some straight wooden dowels, a plastic or metal container to melt the wax in, pencils or sticks to hold the wicks in place while they are being dipped and a cutting board to work on. It’s also helpful to have scissors, tweezers and baking parchment close by. You can find most of these supplies online or at craft stores.
To make your candles look extra special you will need candle dye if you want to add colour as well as essential oils for scent. Additionally for finished touches such as ribbons and labels you can use decorative items that fit with your desired design aesthetic. If you don’t have access to any of these things or have limited resources due to lockdown restrictions, don’t worry! You can still create beautiful beeswax candles using just the basics – it only requires good old fashioned elbow grease!
Step-by-Step Instructions To Easily Create Your Perfect Candle
1) Spend time selecting the perfect type beeswax for your candle. Different types of beeswax are available, ranging from light-colored to darker colored, depending on the type of wax and the region where it is sourced. You’ll also need wicks, molds (to shape your candles), and any decorations that you want to add such as herbs, fruits or spices.
2) After selecting your materials, prepare them by cutting the wax according to size. Measure how much you need in order to fit into your molds. Remember that beeswax shrinks when heated so leave some room in order not to overfill the mold.
3) Heat up a pot filled with water and slowly place your cut wax pieces into it, stirring occasionally until all of the wax is melted and blended together. Use different colors and scents if desired at this stage for a unique combination of aromas throughout your candle.
4) Dip each wick into the melted wax mixture until completely covered; this will help hold it steady once in mold later on during assembly.
5) Place each individual wick inside its corresponding mold, then pour in enough of the melted beeswax so that it completely fills up the space within the mold ” about ¼ inch below top edges. Make sure not to pour too much wax as this may result in overflow and waste of material as well as potential mess when taking out from mold afterward!
6) Allow cooled candles to rest for 30 minutes before demolding onto a lined baking sheet or countertop surface by carefully pushing out from their individual cavities using two thumbs while pressing down gently onto top portion with fingers. Any excess material should come off easily at this point without having to tear away at delicate edges or misshape them during removal process; bonus points if air bubbles were avoided beforehand!
7) Ready? Your Beeswax Candles can now be decorated however desired with herbs/spices/dried flowers before finally placing inside glass containers which will act as holders/protectors against dust, humidity and other elements that might damage them over time while still keeping them close enough so their beautiful light radiates outward!
Adding dimension and flair
Trying to spruce up your homemade dipped beeswax candles? It doesn’t take a lot of effort to turn your basic wax cylinders into beautiful works of art. With just a few simple decorative techniques, you can add texture, color, and a unique personality to each of your creations. Here are a few tried-and-true options you may want to experiment with:
Distressing: A great way to give an aged look to your candles is with distressing. All you have to do is scrape away layers of paint with steel wool or sandpaper. This technique works well when trying to mimic the classic “vintage” style or when using muted or earth tones; it won’t really be visible when painting with brighter colors of dye.
Crackle-finish: Achieving this distinct look is easy as pie – just mix wax and clear lacquer together and apply over your colored bases. As it dries, the top layer will form small cracks that run along the surface scenery, giving it an intriguing texture reminiscent of fine art paintings.
Embellishments: Take those beauties up a notch by adorning them with decorations like ribbon, plastic jewels, pressed flowers, etc. For extra security and aesthetics, dip these elements in sealing varnish before glueing them onto the candle’s exterior. Hexpert tip: mock beads make excellent wick covers if looking for an even more meaningful touch.
Overall, decorating your own beeswax candles is an imaginative endeavor that allows you express yourself through craftsmanship while being creative and having fun at the same time! Just make sure not forget that practice makes perfect – so grab those materials & begin experimenting right away!
Safety Precautions To Keep in Mind When Making Candles
It is important to pay close attention to safety when making dipped beeswax candles at home. Wear safety goggles and protective gloves as heavy wax can easily cause burns. Additionally, it may be helpful to create a dedicated workspace for candle making away from pets and children. Place the workspace on a heat-resistant surface, such a ceramic tile, and cover all combustible materials in the vicinity with protective material. Candles should never be left unsupervised while burning, and one should maintain a 5cm gap between burning candles. At all times be mindful of having a fire extinguisher nearby; or if possible two ” one for grease and fats, and another for electrical equipment or paper material fires. Remember to practice good ventilation by keeping windows open when working with melted wax as it releases fumes that are harmful if inhaled too often. Lastly, use caution when disposing of used wicks and leftover wax – always wait until the material is cooled before handling it or discarding it in an appropriately marked bin
FAQs and Troubleshooting Advice
Making your own dipped beeswax candles at home can be an incredibly rewarding experience. With a little time, patience and some simple materials, you too can have unique candles that make great gifts and decor. Here are some FAQs to help get you started on this fun project as well as troubleshooting advice in case something goes wrong.
FAQs:
Q: What do I need to make my own dipped beeswax candles?
A: Common materials needed include beeswax (blended or 100% pure), wicks, a double boiler or paraffin wax melter, dipping container, tweezers, dye blocks or chips (optional). Additional items such as molds or accessories like ribbons can also be used for further customization.
Q: How long will the process take?
A: Depending on the complexity of the design, it should generally take around 2-4 hours from start to finish. This includes melting the wax, cutting and dipping the wicks of your desired length into the wax and affixing accessories.
Q: Where can I buy raw beeswax?
A: Raw beeswax is available at many stores that sell crafts supplies such as Michaels and Joann Fabrics as well as online retailers like Amazon and Etsy.
Q: Is there anything else I need to know before I begin making my dipped beeawx candles?
A: It is important to keep safety in mind when dealing with hot wax so that no accidents occur during any part of the project. Read up on safety information related to working with melted wax prior to starting this project and be sure to wear protective clothing such as long sleeves and oven mitts while handling molten wax. Also make sure that whatever containers you use for melting are heat-resistant as traditional pots used for cooking on a stovetop may not be suitable for hot waxes over extended periods of time. Additionally heat guns are often used around this process in order to keep large amounts of dipped wick cool at once before manipulation to ensure they maintain their shape without over softening due to high temperatures offered by paraffin melters such as melting pans etc..
Troubleshooting Advice
If you notice any odd discolorations in your candles after trying this project out, chances are that there have been irregularities during temperatures associated with melting points experienced during melting processes – either overheating which can cause browning or underheating which can lead to white spots appearing throughout finished candles. To ensure that your colors remain uniformly bright throughout your work refrain from making sudden temperature changes when tempering down melted wax in dips etc… Be mindful of any possible drafts nearby when submerging your wicks into cooling down temperatures from possible wind currents aiming at open melted trays full of translucently colored wax material during or after a cooling down period prior too affixed detailing works such adornment evergreens etc… available within particular motifs being done within candle decorizing admixtures for consumer market appeal ensuring satisfaction with piece itself
Closing Thoughts
Making dipped beeswax candles at home can be fun and creative. Experimenting with wick sizes, colors, scents, and shapes can give you a truly unique experience every time. Do not be afraid to try new things and definitely don’t expect perfection the first time around. As with anything, it takes practice to become skilled enough to make a quality candle. Have fun trying different techniques until you find what works best for you. There are many resources online that delve into ideas that may never have occurred to you before giving you the opportunity to customize your projects truly like no other candle-maker has ever done before! Be sure to share your experiences with others by uploading photos of your candles on social media or gifting them as presents for friends and family. Not only will it make for great gifts but it also allows others to see all the hard work and creativity that goes into making these special candles from scratch!

Welcome to my candle making blog! In this blog, I will be sharing my tips and tricks for making candles. I will also be sharing some of my favorite recipes.


