Introduction
Paraffin container candles are an easy and enjoyable way to create your own scented candles. With just a few materials, you can craft beautiful, unique containers that burn evenly and smell great. Making container candles requires no complicated equipment, and they make a great gift or decoration in any home.
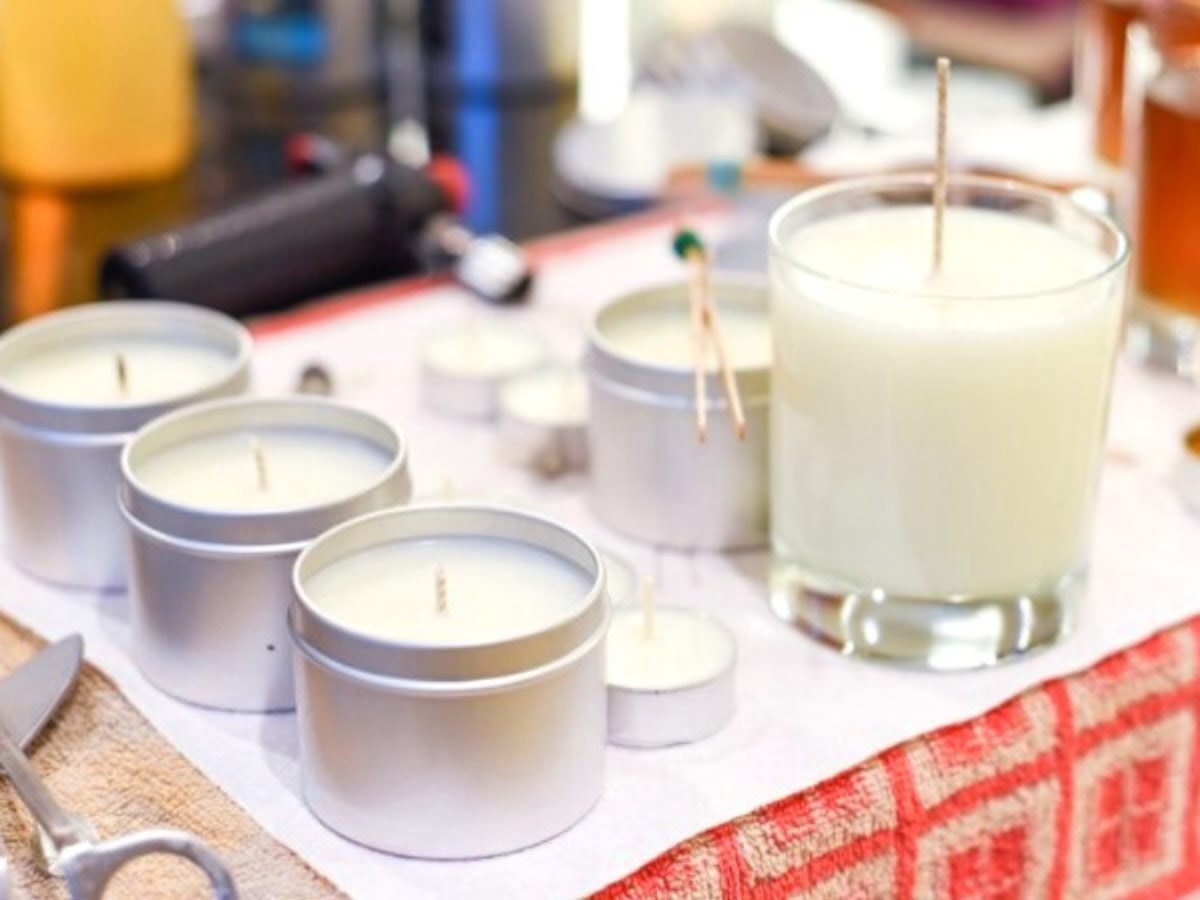
To begin making paraffin container candles, start by gathering the necessary supplies. You will need wax flakes, wicks, containers (ceramic, glass or metal) essential oils to scent your candles, a thermometer to monitor the melting temperature of the wax and wick sustainers to hold the wicks in place as they burn.
Once all supplies have been gathered, begin with melting the paraffin wax in a double boiler over low heat. Once melted, use the thermometer to check that it is at between 120-160 degrees Fahrenheit then add your desired amount of fragrance or essential oil into the wax mixture. Making sure not to exceed 200 degrees Fahrenheit when adding fragrances as burning temperatures this high can damage or destroy some compounds found in fragrances and essential oils.
Next cut wicks based on measurements for your containers with extra length for trimming later if needed and secure them in place with wick sustainers before pouring the hot wax mixture into each container with care not to overfill them . Once cooled down completely trim your wicks once more if necessary and then you have finished making custom scented Paraffin Container Candles!
By following this guide you now have custom crafted candles perfect for gifts or decorations. To ensure safe use never leave candles unattended while burning and always be mindful of their locations; away from flammable objects curtains fabrics etcetera ending distances vary according to size of candle so be sure all safety measures are taken! Enjoy!
Gather Your Supplies
Before beginning any craft or home project, it is important to gather the right supplies. Making paraffin container candles requires a few specific items. Wax flakes, wicks, and dyes can all be found at your local craft store. For containers, reuse glass jars or plastic cans that come with specialty foods or sauces you may have around the house. Not only do reused containers add character to each candle, but they are often already decorated in attractive ways that can add to your design ideas. Additionally, if you plan on adding fragrance to your paraffin candles, pick out an essential oil of your choice. It’s important to find a quality oil that will last throughout the entire burning process of the candle. With all of these items collected and ready for use, you are then prepared to make beautiful container candles!
Melting the Wax
Paraffin wax is a common type of wax used to make container candles. It’s soft and comes in blocks or granules that can be melted down quickly and easily. When melting paraffin wax for container candles, use a double broiler pot or wax melter. This allows for an even temperature distribution so that all the wax melts at the same rate. To ensure the best results, use only the lowest heat setting and allow ample time for the wax to reach its melting point (typically between 120° F and 140° F).
For added scent or color, you can add different types of additives when you melt paraffin wax. Different pre-made scented or colored paraffin blends are widely available, although some people prefer to create their own custom combinations using separate fragrance oil and dye chips. Additionally, if you want your finished candle to burn longer, you could add a bit of stearic acid to decrease the melting point of your wax. Lastly, if your candle is smokey after burning due to lack of air supply, it may indicate that too much fuel (i.e., additives) has been added during melt-down; in which case, consider reducing the amount of fuel being used by 10 – 20%.
Preparing the Container
Choosing the correct container is key to making paraffin container candles. The container should be heat-resistant and non-combustible, such as glass or ceramics. It’s important to select a container deep enough so that the wax can submerge the wick at least 1/2 inch deep. Metal containers are not recommended since they may release toxic substances when burning.
Once the right container has been found, it’s time to pick the wax. Paraffin wax comes in various blends, each one with its own unique characteristics that affect performance characteristics such as burn time and hot throw (or scent). Blending different types of paraffin will alter melting points, produce desired colors and improve performanc characteristics. Candle makers often use a block of stearic acid or beeswax for their finished projects for better permeation of scents. To make sure the heat of burning candles is distributed throughout the container evenly and without risk of wax reaching too high temperatures, most candle makers blend soft paraffin with harder paraffin supplied with more than 120°F melting point. This way lower temperatures are reached within the wax layer rendering safer melted oils retention.
Creating the Wicks
When making paraffin container candles, having the proper length of wicks is one of the most important steps in the candle-making process. To calculate the correct wick size for each container, you will need to take into consideration the size and shape of the container as well as how much wax you are using. First, consider if the container is round or square and if it is short and wide or tall and narrow. If it is round and short, shorter wicks should be used, while longer wicks should be used for tall and narrow containers. Additionally, if you are using a large volume of wax in your containers then you will likely need longer wicks to ensure that they burn correctly. The size of your wicks can also be determined by following general rules like using a minimum 6mm diameter for votives, 8mm for most sizes jars, 10mm for large jars or hurricane glasses and 12mm for extra large jars and glasses. Once you have determined this information, you can then buy pre-made wicks from a craft store or make your own from cotton rope of various sizes dipped in candle wax.
Adding Fragrance and Color
There are many different ways to make beautiful and fragrant paraffin candles, but the basics are almost always the same. To make these types of candles all you will need is some wax, a wick, an appropriate container, essential oils or fragrance oil and dye chips, if desired. Once you have assembled your supplies, the process of making paraffin container candles can begin.
Before melting your wax in a double boiler method, consider what type of look you want for each candle. The perfect combination of colors and scents will help create unique and visually appealing paraffin candles that can light up any room. The scent of your candle should be balanced with just enough color to add character without overwhelming it. The ratio of scent to color should also be taken into account. Generally speaking, it’s best when around 2-4 drops of essential oil is used for every one cup of melted wax; however this ratio may vary depending on the type and strength of your wax.
When you’ve determined how much essential oil or fragrance oil to use choose different colors based on the scent itself rather than what looks aesthetically pleasing in a container; this way you can make sure that both combine nicely together. If you chose food-grade dyes like WD40®, use one teaspoon per pound or 10 pumps per gallon of wax as a starting point then experiment until you have achieved the desired effect.
Lastly, once both scent and color have been added allow your melted paraffin to cool down slightly before pouring it into containers holding the appropriate length wick; this is especially important for when adding fragrances as intense heat could compromise their strength or quality over time. With precision temperatures met during each step, attaining the perfect look with an ideal combination of fragrance and visible beauty with paraffin candles should ultimately be achievable.
Finishing Touches
The final stage of making paraffin container candles involves the “finishing touches”. These are the steps taken to ensure that your candle is perfectly constructed and ready to be lit and enjoyed. The first step is to trim the wick. For best performance, it should be cut to roughly 1/4″ above the surface of the wax. To prevent excessive smoke, make sure the wick remains centered when burning. Once your wick has been trimmed, add any desired scents, colors, or materials such as glitter or dried flower petals. After these decorative touches have been added, quickly pour your cooled wax into the prepared container. Tap on a flat surface several times to eliminate air bubbles and help settle the wax in place. Finally, place your newly made paraffin container candle in a cool place for 24 hours before lighting it for full enjoyment!
Troubleshooting Common Issues
Dripping Wax/ Poor Wax Adhesion:
Poor wax adhesion and dripping can be caused by an incorrect wick size or an incorrect wick placement. Check to make sure that you are using the correct wick size for your wax and container, as different types of waxes require different sized wicks. Also check the placement of the wick in the center of the container, having it too close to either side of the wall can cause more molten wax to flow, leading to dripping and poor adhesion. Make sure to also let your candle fully cool before moving it as this will help avoid any issues with dripping or poor adhesion.
Webs/Mushrooming:
Webs or mushrooming can occur when there is too much moisture or humidity present while cooling your candles which causes a film to form over the surface of your candle. To avoid these issues try creating a draft-free environment when pouring and cooling your candles. Keep any air coming into the space at a minimum while they cool and avoid direct sunlight hitting them to reduce condensation. Additionally, use high quality paraffin without additives such as Stearic Acid or other softeners to ensure a nice burn and reduce webbing.
Storing Your Candles
When storing paraffin container candles, it is important to ensure that the wax remains in a cool, dark place away from any direct sunlight. This will help to preserve the color and scent of your candle. It is also important to store your container candles in an area with minimal exposure to air, as this could allow moisture into the wax, which would cause it to melt and potentially ruin your candles. As many paraffin waxes are quite soft compared to other candle types, keeping them at room temperature should be sufficient for storage as long as it is kept out of direct sunlight. In cold temperatures, the wax may become too firm such that it becomes difficult to light the wick properly.
It is also beneficial to keep your container candles away from any strong smells or odors that can be absorbed into the wax. Lastly, since containers often come with lids or other protective covering, always make sure these are closed completely when not in use to keep dust particles out of the wax while they are stored.
Conclusion
Creating paraffin container candles begins with a clear understanding of the materials and processes required. To begin, a wick should be cut that is longer than the desired length of the candle and wax that is cured for 2 to 3 weeks at room temperature should be melted slowly in an indirect heat source such as a double boiler. Once the wax has melted, it can be poured slowly into the container, leaving a few inches of space between the top of the candle and its lid or rim. Following this, place the pre-cut wick in the center of the wax and use metal weights to ensure that it stays in place. Finally, wait for approximately 24 hours for the candle to cool before gently turning it over to remove any air pockets that may have formed. With these steps complete, your beautiful paraffin container candles are ready for gifting or display.

Welcome to my candle making blog! In this blog, I will be sharing my tips and tricks for making candles. I will also be sharing some of my favorite recipes.


