Introduction to Making Scented Candles in Jars
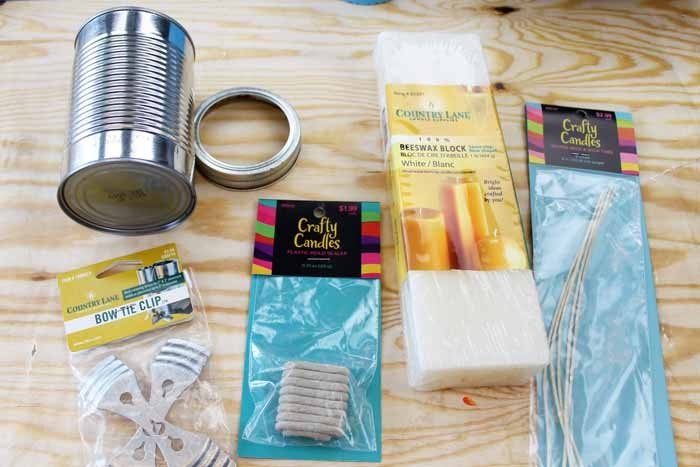
Making scented candles in jars is a fun and easy DIY project for anyone who loves to craft. The materials needed are relatively inexpensive and the process only takes about an hour or so, allowing even novice crafters to get up and running quickly. To make your scented candles, you’ll need wax flakes, candle dye, scent, wicks, jars and melting pots.
When making your scented candles in jars it’s important to use safety equipment such as heat-resistant gloves and protective eyewear. Additionally, ensure that you have a well-ventilated space that can be cleared of any flammable items before melting the wax.
To start your candle making project begin by weighing out the wax flakes according to the instructions provided with your purchase. Then heat the wax in one of the double-boilers until all of it has entirely melted. Take care not to overheat or leave unattended as broken vessels pose a risk of serious injury from molten hot liquid wax spilling onto skin and other surfaces.
If using candle dye add this while the wax is being heated, mixing thoroughly using a spoon or stir stick until evenly dispersed before adding any fragrances you may be using as well. When ready pour the melted mixture into your respective containers then add pre-cut wick bases if chosen beforehand before leaving aside to cool down completely.
Once cooled trim off any wicks sticking up above desired jar level with scissors then reattach the base including metal clamp at end if necessary while subsequent burning of the candle will prevent further cutting later on. Finally give these newly made candles one last inspection prior to offering these as gifts or displaying around home or décor settings.
Prepping Your Jars
Prepping your jars is an important step when making scented candles in jars. The type of jar and wick you use will drastically affect the overall look and quality of the candle, so it’s important to choose wisely.
Two of the most common types of jars used for making candles are glass and metal. Glass is a popular choice because it looks attractive but can be fragile if items or people bump into it. Metal jars, on the other hand, are much sturdier but can affect scent throw due to its breathability.
Wick selection will also make a big difference in your finished product. If you opt for a zinc or lead core wick, it may work better for wider containers but could potentially cause off-gassing when burning which would release toxins into your home. For those reasons many professionals suggest using cotton core wicks that are designed specifically for soy or other vegetable waxes as they don’t contain any lead or zinc and tend to burn more evenly than their metal counterparts.
The spacing between your wicks is another element that you must consider before pouring wax into your jars. It’s important to remember that too little space between wicks may cause tunneling while too much space may lead to pooling effects around the edges of the candles. Generally speaking, you should usually place at least one inch of space between each wick depending on the size of your container
Gathering Scent Materials
There are many different types of essential oils, colognes, soaps and waxes that can be used when making scented candles in jars. It is important to choose the right ingredients to ensure that the most fragrant and high quality candles are created.
Essential oils provide a variety of scent options for candles. They come in natural plant oils like lavender, lemongrass, ylang-ylang, tea tree oil and others. They can also be found in synthetic versions like citrus or fruit scents. Essential oils are highly aromatic – just a few drops are enough to scent a jar full of melted wax. Colognes bring an fragrance like musk or spice to candles while soap fragrances such as rosemary or peppermint can also add a pleasant aromatic touch.
When it comes to selecting waxes, there are many options available depending on what type of candle is being made. Soy wax, beeswax and paraffin wax all have differing melting points which will determine how quickly they liquefy when heated up to make the candle base. The type of wax used can also affect the amount of time it takes for the candle to harden once poured into a jar mold.
Finally, creating unique aromatic combinations from combining essential oils or colognes with herbs and spices is a great way to make distinctively scented candles in jars. For example one could combine bergamot essential oil with dried lavender buds for an uplifting floral aroma or eucalyptus essential oil with bay leaves for an invigorating scent profile. Every combination will create something truly unique!
Melting Wax and Creating the Fragrance Combination
When making scented candles in jars, it is important to use the right tools. Depending on the type of wax used, you will need either a double boiler, melting pot or microwave to melt your wax. When melting wax, it is important to keep in mind that wax temperatures get very hot and should be handled with care. Hot wax can cause severe burns if not appropriately handled.
When creating scented candles, one must also create a fragrance combination to pour into the melted wax that will ultimately make the candle extra special. Most candle makers use a combination of essential oils and fragrances combinations that can be purchased from online stores as well as craft stores and even grocery stores. Many candle makers opt for natural essential oils which offer different health benefits as well as many options for scent creations from sweet orange to calming lavender and jasmine – just to name a few.
Once the combination has been made and poured into the melted wax, it is crucial to allow for the mixture to cool down for at least 5-10 minutes before pouring into jars so that the fragrance does not evaporate during this process. Once cooled down, pour slowly into jars and let rest until fully set – usually 24 hours – then enjoy your brand new scented candles!
Properly Pouring the Wax into Your Containers
Step 1: Gather your supplies. You will need a double boiler, wax chips or wax flake, wick with metal clip, fragrance or essential oil, votive candle holders or mason jars, thermometer and pot holders.
Step 2: Place the double boiler over medium-low heat and add the wax flakes in the top portion. Allow the mixture to reach around 185 degrees Fahrenheit before adding scent and dye to give it extra color. To ensure an even pour when filling your containers, raise the temperature of your wax around 200 degrees only if needed; be sure to stir as you do so.
Step 3: When adding scent, add 1 teaspoon of fragrance or essential oil for every pound of wax being used and mix into melted wax until it is incorporated fully.
Step 4: Pour the scented wax very slowly into your votive candle holder or mason jar while still wearing pot holders. Be careful not to pour too fast as this will displace air bubbles which can cause pits in surface of candle once dried. When pouring your holders full make sure that any excess wax is equal on all sides and top off any low spots near bottom edge tightly and nicely with a toothpick before setting aside to cool.
Step 5: Insert your wick with metal clip once cooled by pushing the middle of wick down into bubbled area formed where bottom rim meets side wall at center point using pair tongs and lift up slightly making sure it straightened out. If needed cut tip off top of wick so it sit no more than 1/8” above surface but also check often during entire burn time just in case later adjustments are necessary upon burning down past certain point but remain same size throughout life cycle of candle so flame remains consistent height and maximum light output while also maintaining recognizable shape remaining flat acrossed along the bottom tray area showing all parts healthy forever!
Choosing the Desired Candle Color
Scented candles in jars add a beautiful, peaceful ambience to any room. The key to making great-looking and smelling candles is selecting the right colors and scents for the desired effect. When it comes to candle colors, there are several options, from traditional solid colors and transparent tints to more creative solutions like layering or blending two or three colors for a custom effect.
When selecting pigments for your candles, the best choice depends on what kind of look you’re going for. Many crafters use dyes or colorants that are specifically made for candle-making; these are available in powder form at most craft stores. You can mix several types of dye to adjust the hue and intensity until you get just the color you want. For deeper and richer hues, some people combine both liquid dyes with pigment pastes of the same color—for example 3 parts blue liquid dye with 1 part blue pigment paste (warm) will give a deep cobalt color.
Another popular way to create unique layered effects is by using combination blocks that come pre-made with two gradient colors swirled together in one block; these also provide interesting designs from surface swirls to “confetti” effects when melted down. You could even experiment with different fragrances inside each layer of wax for a scented rainbow surprise when burned!
Finally, many experienced candle makers recommend avoiding adding too much pigment as it can smoke heavily when lit, which is not good for air quality or breathing. Stick to smaller amounts until you see how intense your desired shade looks once melted—using 0.2–0.3 grams per pound of wax is usually enough for standard tints and shades—and try blending two complementary values together such as rose red/golden yellow or velvet blue/opaque black to create warmer tones that won’t be too overpowering while lit!
Adding Embellishments to Decorate Your Candles
Adding Embellishments to your scented candles in jars can be a fun way to make your candles stand out and look extra special. There are many different types of embellishment options that you can choose from and use to decorate your candles. Some popular options include using fabric ribbons, dried flowers, glitter, beads, sequins and other decorative items such as charms or pendants. You can also purchase pre-made embellishments such as stencils, press on designs and stickers with various images that you can apply directly to the surface of the candle jar. When deciding how to decorate your scented candles in jars, you could consider creating an aesthetically pleasing design with various colors and shapes that works with the overall theme of the scent itself. Utilizing contrast between light and dark shades will help draw attention to certain areas within the design. Remember not to overload the design as this could detract from the overall look of it once finished. The possibilities for decorating your scented candles are endless and limited only by your own creative imagination!
Labeling or Writing a Personalized Message
When making scented candles in jars, one of the most fun elements can be labeling or writing a personalized message. Your label or message can be placed on the side of the jar. It’s a great way to add a personal touch to your candle, making it even more special and unique.
When labeling or writing your own message, try to include something meaningful for you and your recipient such as a quote about friendship, an inside joke between you two, or even their name! Some people like to crop images so that they are able to show off their favorite photo with their loved one on the label as well.
There are different embellishment options you could use when making a label for your candle– from puffy stickers and silk appliqués, decorative button pins and charms, ribbons and embroidery floss– let your creativity run wild! When you’re ready– simply attach them onto the side of your jar! You now have your very own custom made scented candle in a jar!
Tips for Safely Lighting Your Scented Candles
When using any type of scented candles in jars ensure you follow some very important safety guidelines for proper care and lightening.
To begin, you must always make sure the area around the jar is free of anything that may catch fire, such as fabric, paper, or wood. Always keep your scented candle in a sturdy holder that can contain a full jar of wax and wick should it spill during burning. Glass jars are particularly prone to becoming extremely hot while lit and require extra caution. To prevent injury or damage due to extreme jar temperature, never move a lit candle while it is burning. This can cause wax to drip onto your hands or furniture thereby causing a painful burn hazard.
Make sure to trim the wick of the scented candle before lighting and at regular intervals during use to ensure proper burning. This will ensure that your candle does not create too much smoke or put off an excess amount of heat which can cause your delicate glass container to break from overheating.
When you are done using your scented candle in a jar, never blow it out! Instead, carefully dip the wick into the melted wax before extinguishing it with a snuffer tool or spoon thereby preventing smoke from entering the room.
Ways to Enjoy the Sensory Pleasure of Scented Candles
Making scented candles in jars is a fun and pleasurable way to add a touch of warmth and whimsy to your home. Depending on the aroma chosen, scented candles can evoke a mood that may be calming or energizing, cozy or romantic. These delightful fragrances can brighten up a room while also having health benefits such as cleansing the air and reducing stress.
There are many different ways to enjoy the sensory pleasure of scented candles. Ideas for different uses include creating an aromatherapy spa experience, creating a special ambience when entertaining guests, placing them near windows and balconies which bring in natural daylight into a space, and even for relaxation time at home alone. Scented candles can also be used seasonally such as around Christmastime or during winter months when people tend to spend more time indoors. On holidays like New Years’, Valentines’ Day, or Mothers’ Day, giving creative and unique scented candle gifts can make it extra meaningful for the recipient. Additionally, there are decorative ways to place candles in jars that give off an inviting look with layers of candle wax dyed any color imaginable!
Conclusion
Making scented candles in jars is a simple and fun craft project. It is relatively inexpensive, requires few supplies, and only takes about an hour to complete. Whether you decide to make your jar candle for yourself or as a gift for someone special, it is sure to bring beauty and comfort wherever it may be placed.
By following this tutorial, you now have the knowledge of how to create a unique, scented candle in your own home. As the process is extremely simple and low-cost, we highly encourage creativity and experimentation with different types of waxes, wicks, containers, and color combinations. Keep in mind that the length of time a candle burns depends on the type of wax used, so always make sure to use a suitable wax/wick combination according to manufacturers’ instructions. To enhance the idea further, consider adding decorative trinkets or charms into the jar before pouring the hot wax in for extra personalization.
In conclusion at its core making scented candles just takes patience commitment and adherence to safety protocols such as carefully monitoring temperature when melting materials and supervision during burning time. Through this tutorial we hope you found success in creating your very own scented candles in jars while also inspiring creativity towards future crafting projects with new styles such as dipping or rolling techniques. Nonetheless remember that this can be adapted according to design choices with regards to fragrance ingredients decorations accessories etc!

Welcome to my candle making blog! In this blog, I will be sharing my tips and tricks for making candles. I will also be sharing some of my favorite recipes.


