Making scented candles in teacups is a delightful and unique DIY project that brings joy and relaxation. This therapeutic activity not only allows you to create beautiful and personalized candles but also enhances your well-being through the calming process of candle-making. With a wide variety of teacups available, you can choose the perfect ones that match your style and create a charming aesthetic for your candles.
The act of candle-making has been known to have therapeutic benefits, as it provides an opportunity for mindfulness and self-expression. As you immerse yourself in the process, you can find peace and tranquility, allowing any stress or worries to melt away. The soothing aroma emitted by scented candles can further enhance your mood and create a warm ambiance in your space.
When it comes to choosing teacups for your scented candles, the options are endless. You can explore vintage shops or estate sales to find unique and one-of-a-kind teacups that add character to your creations. Whether you prefer delicate floral patterns or bold colors, there is a teacup out there waiting to be transformed into a beautiful candle container.
In the following sections of this article, we will guide you through the entire process of making scented candles in teacups. From selecting the perfect fragrance oils to decorating and personalizing your candles, we will provide step-by-step instructions and creative ideas to help you unleash your creativity. So grab some tea, prepare to dive into this delightful endeavor, and let’s explore the joy of making scented candles in teacups together.
Choosing the Perfect Teacups for Your Scented Candles
When it comes to making scented candles in teacups, choosing the perfect teacups is an essential step in creating a beautiful and unique finished product. The type of teacup you select will not only serve as a container for your candle but can also greatly contribute to the overall aesthetic and charm of your creation. There are various types of teacups available, each with its own potential as a candle container.
One popular choice for teacup candles is vintage teacups. These cups have a timeless appeal and can add a touch of nostalgia to your candle-making project. When searching for vintage teacups, consider visiting thrift stores, flea markets, or antique shops.
Not only will you likely find one-of-a-kind options, but they often come at affordable prices too. Keep in mind that vintage teacups may have small imperfections or delicate features that give them character but may require extra care during the candle-making process.
If you prefer a more modern and minimalist look, consider using plain white teacups or ones with simple designs. These cups provide a clean canvas for showcasing the colors and patterns of your candles while maintaining an elegant and understated aesthetic. Additionally, colored or patterned teacups can be a great choice if you want to create themed candles or coordinate with specific seasons or events.
To create a truly charming and personalized set of tea cup candles, mix and match different styles and sizes. Experiment with combining vintage cups with modern ones or try pairing complementary colors and patterns together. By mixing up the designs and shapes of your teacup candles, you can create visually interesting displays that catch the eye.
Essential Supplies and Ingredients
When it comes to making scented candles in teacups, having the right supplies and ingredients is essential. This section will provide a comprehensive list of what you’ll need for this DIY project and recommend some brands and suppliers for quality materials.
List of Necessary Supplies
To get started, here’s a list of essential supplies you’ll need for making scented candles in teacups:
- Wicks: Opt for pre-tabbed wicks that are specifically designed for container candles. Make sure they are the appropriate size based on the diameter of your teacup.
- Wax: There are various types of wax available, such as soy wax, beeswax, or paraffin wax. Each has its own unique qualities, so choose one that suits your preferences.
- Fragrance Oils: Select high-quality fragrance oils that are suitable for candle-making. Consider scents that complement the teacup aesthetic and evoke desired moods or ambiances.
- Containers: The main container for your scented candle will be the teacup itself. You can also choose other decorative containers to hold the melted wax while creating the candles.
- Tools: Gather essential tools like a double boiler or a heat-resistant melting pitcher to melt the wax, a thermometer to monitor temperature, a pouring pot with a spout for easy pouring, and stir sticks or utensils to mix in fragrance oils.
Recommended Brands and Suppliers
Finding reliable brands and suppliers can ensure you get high-quality materials for your scented candles in teacups:
- Candle Supply Companies: Look for reputable candle supply companies online that offer a wide range of supplies specifically designed for candle-making projects. Some popular options include Candle Science, Nature’s Garden, and Rustic Escentuals.
- Local Craft Stores: Check out craft stores in your area that have dedicated sections for candle-making supplies. Here, you can see and feel the materials in person before making a purchase.
- Online Marketplaces: Websites like Etsy provide a platform for independent candle makers who sell their own supplies and ingredients. You may find unique fragrance oil blends or vintage teacups to add an extra touch of charm to your candles.
Remember to consider reviews and ratings from other DIY enthusiasts when choosing brands or suppliers. Quality materials will not only enhance the final product but also ensure safety during the candle-making process.
By gathering all the necessary supplies and knowing where to source them, you’re well on your way to creating beautiful and fragrant candles in teacups that will bring joy and relaxation into your space.
Preparing Teacups for Candle-Making
When it comes to making scented candles in teacups, proper preparation is essential to ensure a successful and enjoyable candle-making experience. Preparing the teacups not only ensures that they are clean and ready for use but also helps remove any existing wax residue or stains that may affect the quality of your candles. In this section, we will provide step-by-step instructions on cleaning and prepping your teacups, as well as tips for removing any stubborn residue.
Cleaning Teacups
Before using teacups as candle containers, it’s important to thoroughly clean them to remove any dust, dirt, or debris that could affect the final appearance of your candles. Start by rinsing the cups with warm water and mild dish soap, using a soft sponge or cloth to gently scrub away any grime. Be careful not to scrub too vigorously to avoid damaging delicate designs or patterns on the cups.
After rinsing off the soap, inspect the teacups for any leftover residue. If there are still stubborn stains or residue present, you can try soaking them in a mixture of warm water and baking soda for about 30 minutes. The baking soda acts as a natural cleanser and can help lift off any stuck-on wax or stains without damaging the cups. After soaking, rinse thoroughly with warm water again.
Removing Wax Residue
If you are repurposing vintage teacups or ones that have been previously used for candles, there may be residual wax inside that needs to be removed before adding new wax. To remove existing wax residue from your teacups, follow these simple steps:
- Place the teacup in a freezer bag and seal it securely.
- Place the bagged cup in the freezer for a few hours until the remaining wax becomes brittle.
- Once frozen, take out the teacup and use a dull knife or your fingers to gently scrape away the wax. Be careful not to scratch or damage the cup during this process.
- If there are still small traces of wax, you can use a hairdryer on low setting to heat up the remaining wax and wipe it away with a paper towel.
By properly cleaning and preparing your teacups for candle-making, you ensure that your candles will look their best and perform at their highest quality. This attention to detail not only enhances your candles aesthetically but also guarantees a clean burn and enjoyment of the chosen fragrance. So take the time to prepare your teacups carefully, and get ready to create beautiful scented candles that will bring joy and relaxation into your life.
Selecting the Perfect Fragrances for Your Teacup Candles
When it comes to making scented candles in teacups, selecting the perfect fragrances is a crucial step in ensuring that your candles not only look beautiful but also smell delightful. The right fragrance can enhance the overall experience of burning the candle and create a soothing ambiance in your space. In this section, we will guide you through the process of choosing fragrance oils that complement the teacup aesthetic and provide tips for creating unique and personalized scent combinations.
When selecting fragrance oils for your teacup candles, it’s important to consider the overall theme or mood you want to create. If you prefer a fresh and clean aroma, scents like lavender, citrus, or ocean breeze are excellent choices. For a cozy and warm atmosphere, opt for fragrances like vanilla, cinnamon, or spiced apple. Floral scents such as rose or jasmine can add a touch of elegance to your teacup candles.
To create unique and personalized scents, don’t be afraid to experiment with blending different fragrance oils together. You can mix floral scents with fruity or woody notes to find combinations that resonate with your personal preferences. Keep in mind that some fragrances may overpower others, so it’s important to test small amounts before committing to a larger batch.
It’s also worth considering how the scent will interact with the materials of the teacup itself. Porcelain or ceramic teacups may retain aromas better than glass or metal ones, so take this into account when choosing your fragrance oils. Ultimately, trust your sense of smell and select fragrances that bring you joy and relaxation.
By carefully selecting fragrances that complement both the aesthetic of your teacups and your personal preferences, you can create truly enchanting scented candles. So let your imagination run wild and explore different combinations until you find the perfect scent for your teacup candles.
The Candle-Making Process in Teacups
Once you have chosen the perfect teacups and gathered all the necessary supplies, it’s time to dive into the candle-making process. Making scented candles in teacups is a creative and enjoyable activity that allows you to customize both the fragrance and aesthetic of your candles. Here, we provide detailed instructions for each step of the candle-making process in teacups.
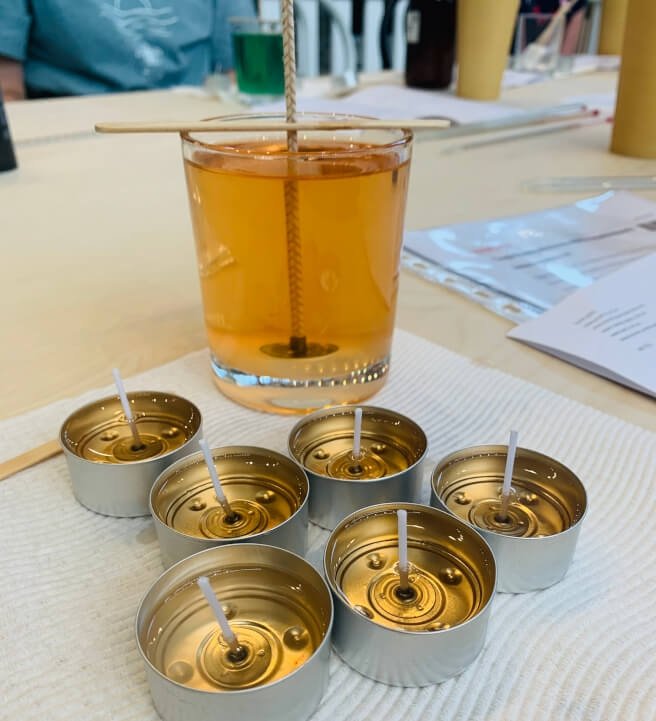
1. Melting Wax: Start by melting your wax according to the manufacturer’s instructions. Whether you choose soy wax, beeswax, or paraffin wax, it’s important to use a double boiler or a heat-resistant container placed in a pot of simmering water to melt the wax gently and evenly. Avoid direct heat as it can lead to overheating and potential hazards.
2. Adding Fragrance Oils: Once the wax has melted completely, remove it from the heat source and allow it to cool slightly. This is the perfect time to add your chosen fragrance oil. Be sure to follow the recommended fragrance load for your specific type of wax, as adding too much can affect both the scent throw and burn quality of your candles.
3. Pouring Wax into Teacups: Before pouring the melted wax into your teacup containers, make sure they are placed on a heat-resistant surface or lined with parchment paper to protect them from any potential spills or wax stains. Slowly pour the melted wax into each teacup, leaving about half an inch of space from the rim.
4. Inserting Wicks Correctly: While the wax is still warm and liquid but starting to solidify around the edges, insert your pre-tabbed wick into each teacup by placing it in the center of the candle’s bottom surface. Use a wick sticker or a drop of melted wax at the base of each wick to secure them in place and keep them centered as they dry and solidify.
| Step | Description |
|---|---|
| Melting Wax | Use a double boiler or heat-resistant container to melt the wax gently. |
| Adding Fragrance Oils | Add your chosen fragrance oil to the melted wax, following recommended guidelines. |
| Pouring Wax into Teacups | Safely pour the melted wax into each teacup, leaving space from the rim. |
| Inserting Wicks Correctly | Place pre-tabbed wicks in the center of each teacup, securing them with a wick sticker or melted wax. |
Remember to let your teacup candles cool and solidify completely before moving them. This can take several hours or even overnight. Once they have hardened, trim the wicks to approximately a quarter-inch length before lighting them for the first time. Enjoy the satisfaction of seeing your beautifully scented teacup candles come to life and fill your space with a pleasant aroma.
Decorating and Personalizing Your Teacup Candles
Once you have created your scented candles in teacups, it’s time to unleash your creativity and make them even more beautiful and personalized. Decorating your teacup candles not only adds visual appeal but also allows you to incorporate your own unique style and flair. Here are some creative ideas for enhancing the beauty of your teacup candles:
- Adding decorative elements: Take your teacup candles to the next level by adding decorative elements such as dried flowers, herbs, or glitter. You can sprinkle dried rose petals on top of the melted wax before it solidifies, creating a stunning visual effect when the candle is lit. Alternatively, you can place a small bundle of dried lavender or chamomile on the side of the teacup for a delightful aroma.
- Using ribbons or bows: Wrap a colorful ribbon around the handle of the teacup or tie a bow around it to give an elegant touch. Satin ribbons work well for a luxurious look, while rustic jute twine can add a charming farmhouse vibe.
- Applying decoupage techniques: If you have any paper napkins or tissue papers with captivating designs, you can apply them to the outside of the teacup using decoupage glue. This technique allows you to achieve intricate patterns or images on your candle containers.
- Painting or decorating the cup: If you’re feeling artistic, why not paint or decorate the actual teacup? You can use ceramic paints or markers specifically designed for heat resistance to create intricate designs directly onto the cup’s surface.
Remember that when adding decorations to your teacup candles, safety should always be a priority. Make sure that any decorative elements are non-flammable and positioned in such a way that they won’t interfere with lighting or extinguishing the candle.
As with any DIY project, experimentation is key. Feel free to mix and match different techniques and materials until you find a decorating style that truly reflects your personality. With a little imagination, your teacup candles can become stunning pieces of art that bring both visual pleasure and delightful aromas to any space.
Aftercare and Maintenance of Teacup Candles
Once you have created your beautiful teacup candles, it’s important to know how to properly care for and maintain them to ensure their longevity. With the right care, your teacup candles can continue to fill your space with delightful scents for hours on end. Here are some tips and guidelines for aftercare and maintenance of teacup candles:
- Trimming the Wick: After every use, it is essential to trim the wick of your teacup candle. This helps prevent excessive soot and ensures a clean burn for future uses. Use a pair of sharp scissors or a wick trimmer to trim the wick down to about ¼ inch before relighting the candle.
- Proper Storage: When not in use, make sure to store your teacup candles in a cool, dry place away from direct sunlight. Extreme temperatures can cause the wax to melt or warp the teacup, so it’s crucial to avoid exposing them to heat sources.
- Avoid Drafts: When burning your teacup candle, be mindful of drafts from open windows or fans. Strong air currents can cause uneven burns and may result in tunneling, where only a small portion of the wax melts while leaving excess wax on the sides.
- Extinguishing Safely: Always responsibly extinguish your teacup candles by using a snuffer or gently blowing out the flame. Avoid extinguishing with water as this can cause hot wax splatters or cracking of the teacup.
- Cleaning Your Teacups: Over time, candle residue may accumulate in your teacups, affecting their appearance and scent when reused for future projects. To clean them, let any remaining wax harden before gently scraping it off with a spoon or butter knife. Then wash with warm soapy water and dry thoroughly before reuse.
By following these aftercare and maintenance tips, you can enjoy your teacup candles for an extended period. Remember, proper care not only extends their lifespan but also ensures the best experience each time you light them. With a little love and attention, your teacup candles will continue to bring warmth, ambiance, and enchanting aromas to your space for many hours of relaxation and enjoyment.
Showcase of Teacup Candle Designs and Arrangements
Teacup candles not only provide a soothing ambiance and delightful aroma but also serve as exquisite decor pieces. By showcasing your teacup candle designs and arrangements, you can infuse your living spaces with elegance and create a unique focal point in any room.
To inspire your creativity, here are some stunning teacup candle designs and arrangements:
1. Tiered Teacup Candle Display: Arrange teacup candles of varying sizes on a tiered cake stand for a visually appealing centerpiece or mantelpiece display. Mix and match different patterns, colors, and heights to add dimension and interest to the arrangement.
2. Floral Teacup Candle Garden: Create a miniature garden by placing teacup candles amidst real or artificial flowers. Use floral foam at the bottom of the teacups to secure the candles in place. This arrangement adds a romantic touch to weddings, bridal showers, or intimate dinners.
3. Vintage Teacup Collection: Collect vintage teacups in various shapes and designs for an eclectic display. Place individual candles in each teacup or group them together on a decorative tray for an eye-catching centerpiece. This arrangement adds charm and nostalgia to any setting.
4. Seasonal Themes: Incorporate seasonal elements into your teacup candle arrangements for a festive touch all year round. Surround the candles with small pinecones during winter or seashells in summer for a whimsical display that reflects the changing seasons.
Remember to position your teacup candle designs and arrangements strategically – on coffee tables, shelves, or windowsills – so they can be appreciated from different angles in the room.
By showcasing your creativity through these beautiful tea cup candle displays, you invite others to admire your craftsmanship while adding warmth and charm to your home décor. Let your imagination take flight as you explore different design possibilities with these versatile DIY creations.
Conclusion
Making scented candles in teacups is a unique and delightful DIY project that offers a multitude of benefits. Not only does the therapeutic act of candle-making enhance your well-being, but it also allows you to get creative and personalize your space with beautiful and aromatic teacup candles. Throughout this article, we have explored the various aspects of creating these charming pieces and hopefully inspired you to embark on your own candle-making journey.
By choosing the perfect teacups for your scented candles, you can create a visually appealing aesthetic that adds character to any room. Whether you opt for vintage or modern teacups, there are endless possibilities for finding unique containers that reflect your personal style. Additionally, we have provided you with a comprehensive list of essential supplies and recommended brands to ensure top-quality materials for your candle-making endeavors.
The process of making teacup candles involves cleaning and preparing the cups, selecting fragrances that complement the aesthetic, melting wax, pouring it into the cup, adding wicks correctly, and finally decorating them to reflect your personal taste. Each step allows you to tap into your creativity and embrace the joy of crafting something beautiful with your own hands.
As you begin this journey of making scented candles in teacups, remember to embrace your creativity and enjoy every moment. The satisfaction and fulfillment gained from this DIY endeavor will not only provide you with beautiful home decor but also empower you to explore further candle-making projects. Unleash your imagination and continue experimenting with different fragrances, designs, and arrangements.
The possibilities are limitless when it comes to creating stunning teacup candle displays that bring joy to both yourself and those around you. So go ahead, light up those teacup candles and let their soothing glow transport you into a world of tranquility and beauty.

Welcome to my candle making blog! In this blog, I will be sharing my tips and tricks for making candles. I will also be sharing some of my favorite recipes.


