Introduction to Scented Soy Candles
Making scented soy candles at home is a fun and creative hobby that can offer many benefits. Not only does homemade candle-making allow for the experimentation with different types of waxes, fun scents, and decorative elements, but it has a few other unique advantages to explore as well. Aside from being cost-effective and environmentally friendly, making your own scented soy candles at home can provide meditative creativity as well as aromatherapy benefits.
One of the best aspects of handmade soy candles is that they are renewable. Because they are made using natural waxes such as soy or beeswax, there is no need to worry about mining and burning petroleum to create them. Also, scented soy candles are much less likely to produce soot while burning in comparison to their paraffin counterparts. Not only does this reduce indoor air pollution but it also aids in reducing household dust levels as well.
In addition to the above two benefits, making lighted scented soy candles can also be an enjoyable activity for both novice and experienced candle makers alike ” allowing one to explore more complicated techniques such as layering fragrances or gradient glazing with ease. Candle crafting has been known by some to be a source of therapeutic relaxation ” enabling people to think more clearly and rid themselves from stress after a long day’s work. This is due in part to the fact that burnable aromas such as essential oils are often added into the mixture ” providing beneficial aromatherapy effects with each use. Finally, although not necessarily therapeutic, homemade crafted soy candles make wonderful gifts that both friends and family can enjoy long after creation!
Gather the Supplies Needed to Make Soy Candles At Home
To make scented soy candles at home, you’ll need a few materials. These include wax, wicks, glass containers, melting tins and thermometers, candle dyes and fragrances, gloves (to protect your hands from the hot wax) and an oven mitt to hold your hot wax containers. Before you start making your candles, make sure to prepare a safe space such as a counter or table with absorbent material like newspaper. It’s also important that you use heat-resistant glasses for your soy candle jars. For example, Mason jars are great choices because they’re heat resistant.
Once you have all of the necessary supplies, it is time to start making the candles. Begin by measuring how much wax is needed for each individual container; this will vary based on the size of the container and what type of wax is being used. For example, beeswax would require more than paraffin wax ” so be sure to measure out an appropriate amount for each jar.
Next, melt down the wax in a melting tin over low heat until it reaches 200°F/95°C. After that has been achieved, carefully pour a small amount of wax into each container to create an adhesive layer or “melt pool” on the bottom which can later help keep the wick in place when poured in later steps. Allow this layer to cool completely before moving onto adding dyes and fragrance oils to your melted down wax in its respective tin ” stirring each one together vigorously so that there are no clumps or bubbles created during pouring stage; this may take up some extra time but will pay off nicely once your candles are complete. Lastly, pour in remaining liquid mixture into glass containers and allow them too cool before trimming down wick lengths with scissors accordingly before burning.
Pre-Waxing Steps to Prepare Your Candle Vessel
Before you pour in any wax, there are a few pre-waxing steps you should take to prepare your candle vessel:
1. Make sure that the inside of your candle jar is completely clean and free of dust and residue, as this will allow the candle to burn properly. Wipe down the jars with rubbing alcohol or rubbing alcohol wipes before pouring in your wax.
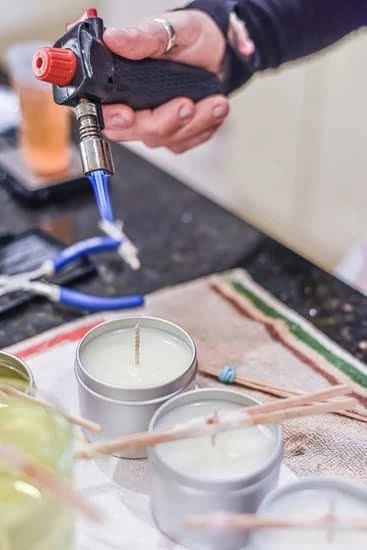
2. Consider priming your wicks by melting a small amount of wax on the end of each wick before placing it into the jar. This will make it easier for the flame to catch when you light it and also ensure that your wick is securely attached to the bottom of the jar.
3. Place several pieces of adhesive tape across the top edge of your jar, making sure the ends go over onto its sides (this will act as a barrier during pour). This step is important to keep from having any overflowed wax spilling down onto items beneath your workspace.
4. Fit your wick into each container so that it lays flat against its interior surface and stays securely in place during pouring (start on one side, cross over to the other side and adhere). If needed, use extra adhesives or staples for added support if necessary.
How To Measure and Melt Your Soy Wax
Before you begin making your scented soy candles at home, it is important to measure and melt your soy wax. You will need to gather the appropriate equipment including a double boiler or melting pot, thermometers, scales, an old newspaper, and some containers to hold the wax when it is finished melting.
The first step in measuring and melting your soy wax is to calculate how much wax you need for your project. To do this, consider both the size of the container you will be using as well as any decorations that may protrude from the sides of it. Take into account any wicks or embellishments too! After calculating how much wax you need per candle, weigh out equal amounts of soy wax flakes and place them in your melting pot.
Next, place your melting pot on low heat on the stove until all of the flakes dissolve completely. Be sure to keep an eye on the temperature throughout this process ” it should not exceed 121 degrees Celsius (250F). If it does, turn down the flame and allow it to cool slightly before proceeding. Once all of the pieces have melted together thoroughly stop stirring and remove them from heat. Allow the wax to cool off for ten minutes before pouring into separate containers for use in making your scented soy candles at home.
Adding Fragrance to Your Candle
Adding fragrance to your homemade scented soy candles can be a fun and rewarding experience. There are several methods you can use, depending on your desired outcome. One of the easiest and most cost-effective ways is to add essential oils. Essential oils can be found at most health food stores or online. You’ll need to know how much fragrance oil to add per pound of wax; the amount used varies depending on the type of scent you want and how strong the fragrance should be once finished. Generally, it’s recommended to start with about an ounce for every pound of wax (about 8 drops of such oil for a four-ounce candle). For stronger scents, up to two ounces per pound may be used. However, it may take some trial and error to find what works best for your needs as each scent needs specific amounts for that perfect aroma!
Another method involves encapsulating natural fragrances using beeswax pellets. This requires a bit more effort as you will have to experiment with different ratios until you get just the right combination that works in your homemade candles. You’ll also need some special equipment such as a double boiler or melting pot in order to melt the mixture together at low temperatures without burning off any of its aromatic properties. Finally, you can use all-naturaledible ingredients like citrus peels or lavender flowers if desired; simply infuse them into melted soy wax by simmering together but make sure not overheat it! By following these directions, you’ll be able to create beautiful aromas in all your homemade scented soy candles!
Wicking Your Candle and Setting Up the Wick
As soon as you have gotten the wax and wicks for your candles, you should set up the wick. To do this correctly, you will need to get a holder such as a candle stick or wooden skewer. Tie the end of the wick around the holder at one end creating part of a loop. Place the free end in another container filled with wax. This ensures that your wick stays put in the middle of your candle container when you pour in the melted soy wax. Once this is done, make sure there are no twists or knots inside the loop so that when it hardens it does not cause an uneven burning pattern. You can also use hot glue on each side of the wick to keep it secure and straight in your candle jar. Finally, clip any parts of the wick that reach above the top of your jar with sharp scissors prior to pouring in your melted soy wax.
Preventing Common Candle Issues
Creating your own therapeutic, beautiful candles can be rewarding, with some guidance and understanding of best practices for candle making. It is important to prevent some common issues such as mold or an uneven wax pool formation. To help prevent these issues from happening you should always work in clean and dust free area. Make sure that the environment is ideal before beginning your project by making sure the temperature of the room is not too hot or cold. Additionally, make sure that all materials and equipment used are kept clean and free from debris before starting to melt your wax.
From there, it’s time to start measuring out the amount of wax required for your project. Weighing out the exact amount of wax needed ensures a successful end result without having excess material left over after curing. Working with a double boiler set up is essential to prevent burning or overheating which may cause air bubbles that will appear in your finished product. Making consistent temperatures throughout the melting process will support an even final appearance as both soy and paraffin waxes are very sensitive to changes in temperature. Setting applications aside until they reach desired temperatures helps reduce further excessive air bubbles from forming during cooling down process as well. When adding any color dyes or fragrances, it’s important to do so correctly so that quantity does not change the crude state of wax too much otherwise this could weaken pillar strength once hardened over time.
Finally when pouring soy wax into a container, ensure it is done smoothly yet quickly so air pockets do not form around its edges due to prolonged contact with heating device while avoiding spillage at same time towards completion of the process; then steadily place previously prepared wick into center using either a sticking tool or tweezers while being careful not let them stretch too tightly across its diameter when held securely on place. Keeping up with these steps will allow you enjoy lovely scented candles without worry of becoming a victim of any of those common issues!
Finishing Touches
Once the candles have cooled and solidified, you can add the finishing touches to make them look even more special! You’ll want to ensure they are completely dry before doing this.
One simple way to decorate your candles is to tie embellishments around their base, like a ribbon or piece of twine. This will add a decorative touch and bring attention to something unique about each candle, like color or design. You can also glue charms and leftover beads onto the sides of the candle holders for an eye-catching embellishment that can be personalized for the recipient.
Another way to personalize your scented soy candles is through etching and engraving. Place a stencil design onto each candle holder and carefully use an etching tool or craft knife to trace and cut out your desired shape. The effect adds texture and can serve as beautiful reminders of meaningful words, messages, initials, or dates for a very thoughtful gift!
Conclusion
Making soy candles at home is not only a fun and inexpensive activity, but also a rewarding one. Not only can you enjoy the comforting scent of your handmade creations while they’re burning through the wick, but you have control over the scent within these candles, making them personalized and special. If regular paraffin candles are often known to emit unhealthy fumes that are potentially harmful on the body, then soy wax candles provide a safe and eco-friendly alternative to these harmful substances. Soy candle wax is biodegradable and non-toxic, so no nasty harsh chemicals will be entering into your lungs when it comes time for some candle-burning relaxation. The process of making scented soy candles is quite simple, requiring just a few ingredients to get started; providing relatively quick results with simple techniques such as melting soy wax flakes in a double boiler or microwave. Thus crafty artisans alike can create an individualized product that not only smells wonderful but also has aesthetic appeal. Therefore making scented soy candles at home is both fun and rewarding!

Welcome to my candle making blog! In this blog, I will be sharing my tips and tricks for making candles. I will also be sharing some of my favorite recipes.


