Are you looking to delve into the world of candle making? This article will provide you with valuable tips and tricks for candle making, whether you are a beginner or an experienced crafter. Candle making is a creative and fulfilling hobby that allows you to customize your own scented creations to enjoy or gift to others.
When it comes to candle making, there are several key factors to consider such as the types of wax, essential tools and equipment needed, selecting fragrances, troubleshooting common issues, creating unique designs, safety precautions, and packaging ideas. These aspects will be covered in detail throughout this article to help you become a skilled candle maker.
With the right guidance and knowledge, you can transform simple ingredients into beautiful candles that bring warmth and ambiance to any space. Whether you prefer classic scents or want to experiment with new fragrances, learning the art of candle making can be a rewarding experience. So let’s dive in and explore the wonderful world of creating your own handcrafted candles.
Types of Wax for Candle Making
When it comes to candle making, choosing the right type of wax is essential for creating high-quality candles. There are several different types of wax options available, each with its own unique characteristics and benefits. One of the most popular choices for candle making is soy wax, known for its clean-burning properties and ability to hold fragrance well. Another common option is paraffin wax, which is often less expensive and results in a glossy finish on candles.
In addition to soy and paraffin wax, other popular choices include beeswax, palm wax, and coconut wax. Beeswax is known for its natural aroma and air-purifying properties, while palm wax has a unique crystal-like appearance once set. Coconut wax is a sustainable option that burns slowly and cleanly. Each type of wax offers different melting points, textures, and burn times, so it’s important to choose the one that best suits your preferences and needs.
For those new to candle making or looking to experiment with different waxes, it’s recommended to start with small batches using a variety of waxes to see which one you prefer working with. Remember that each type of wax may require different temperatures for melting and pouring, so be sure to follow specific guidelines for the wax you choose in order to achieve the best results.
| Types of Wax | Main Characteristics |
|---|---|
| Soy Wax | Clean-burning properties; holds fragrance well |
| Paraffin Wax | Less expensive; glossy finish on candles |
| Beeswax | Natural aroma; air-purifying properties |
| Palm Wax | Crystal-like appearance once set |
Essential Tools and Equipment Needed
When it comes to candle making, having the right tools and equipment is essential to create high-quality candles. Whether you are a beginner or an experienced candle maker, having the proper supplies will make the process easier and more enjoyable. Here are some essential tools and equipment you will need to get started:
- Double boiler or microwave-safe container: A double boiler is ideal for melting wax gently, but if you don’t have one, a microwave-safe container can also be used for smaller batches of candles.
- Thermometer: A thermometer is necessary to monitor the temperature of the melted wax accurately. This ensures that the wax is at the correct temperature when adding fragrance oils or pouring into containers.
- Candle molds or containers: Depending on the type of candles you want to make, you will need molds or containers to pour the melted wax into. There are various shapes and sizes available for different candle styles.
Additionally, here are a few more tools and equipment that are essential for successful candle making:
- Wick trimmer: To keep your wicks trimmed to the ideal length (around 1/4 inch) for clean burning.
- Stirring utensil: A dedicated spoon or stirring stick for mixing in fragrance oils and dyes into the melted wax.
- Scale: To measure out precise amounts of wax, fragrance oils, and additives for consistent results in your candles.
With these essential tools and equipment in hand, you’ll be well-equipped to start creating your own beautiful homemade candles. Remember that investing in quality supplies can make a significant difference in the final outcome of your candles.
Choosing the Right Fragrances for Your Candles
When it comes to candle making, choosing the right fragrances is a crucial step in creating beautiful and enticing candles. The scent of a candle can evoke emotions and memories, making it an essential aspect of the overall experience. Here are some tips and tricks for selecting the perfect fragrances for your homemade candles:
- Consider the mood or atmosphere you want to create with your candles. Are you looking for a calming scent for relaxation, or a fresh and invigorating fragrance for energy? Think about the purpose of your candles and choose scents that align with that intention.
- Experiment with different fragrance combinations to create unique and interesting blends. Mixing two or more scents can result in a complex and layered aroma that can set your candles apart from store-bought options.
- Take into account seasonal preferences when selecting fragrances. For example, choose warm and cozy scents like cinnamon and vanilla for fall and winter months, while opting for floral or citrusy scents during spring and summer.
The quality of the fragrance oil used in candle making also plays a significant role in the outcome of your candles. Investing in high-quality oils will ensure that your candles have a strong and long-lasting scent throw. Additionally, pay attention to the recommended usage rates provided by the fragrance supplier to avoid overpowering or underwhelming scents in your candles.
Incorporating essential oils into your candle making process is another way to add natural scents to your creations. Essential oils not only provide beautiful aromas but also offer potential therapeutic benefits depending on the oils used. Research different essential oil options and their properties to create candles that not only smell amazing but also promote wellness and relaxation.
Step-by-Step Guide to Candle Making
Gather Your Materials
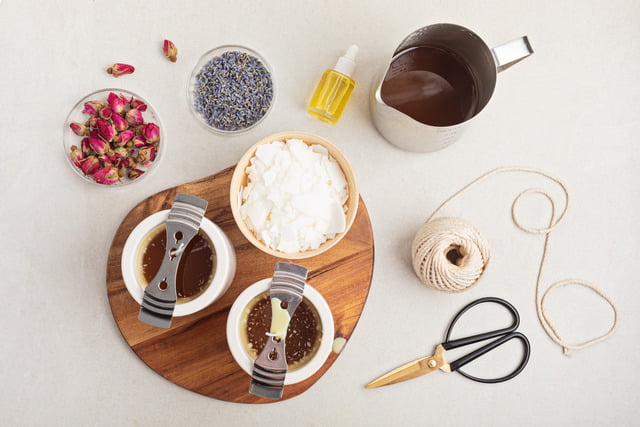
Before you begin making your own candles, it’s essential to gather all the necessary materials and tools. This includes wax, wicks, fragrance oils, a double boiler or microwave-safe container for melting the wax, a thermometer, a stirring utensil, and a container for pouring the melted wax. Make sure to also have a workspace that is well-ventilated and free of any flammable objects.
Melt the Wax
The first step in candle making is to melt your chosen wax. This can be done using a double boiler on the stove or by microwaving it in short increments until completely melted. It’s crucial to monitor the temperature of the wax using a thermometer to prevent overheating, which can affect the quality of your candles. Once your wax is fully melted, you can add in any desired colorants or dyes.
Pouring and Setting Your Candles
After adding fragrances or dye to your melted wax, it’s time to carefully pour it into your chosen containers with pre-tabbed wicks already placed inside. Be sure to leave some space at the top of the container to allow for proper burning.
Allow your candles to cool and set completely before trimming the wick and lighting them up. Enjoy the process of experimenting with different colors, scents, and container shapes to create unique candles that reflect your personal style.
By following these step-by-step guidelines coupled with essential tips and tricks for candle making mentioned earlier on this article, you will be well-equipped to embark on your candle making journey confidently. With practice and patience, you’ll master the art of candle making and produce beautiful homemade candles that make lovely gifts or accents for your home décor.
Troubleshooting Common Candle Making Issues
Wick Related Problems
One common issue that candle makers often face is wick-related problems. If your candle is not burning properly, it could be due to the wick being too long or too short. A wick that is too long can cause the flame to be too large and flicker, while a wick that is too short may result in tunneling, where only a small portion of the wax melts.
To ensure your wick burns correctly, trim it to the appropriate length before each use. Additionally, using a wick trimmer can help maintain the proper length for optimal burning.
Sinkholes and Cracks
Another common problem when making candles is the formation of sinkholes or cracks in the wax. This can happen if the wax cools too quickly or if there are air bubbles trapped within the candle as it sets.
To prevent sinkholes and cracks, try pouring your wax at a slightly higher temperature and gently tapping the container to release any air bubbles. You can also try using a heat gun to smooth out any imperfections on the surface of your candle.
Frosting and Discoloration
Frosting and discoloration are other issues that candle makers may encounter during the process. Frosting happens when tiny crystals form on the surface of soy candles, giving them a frosted appearance. To reduce frosting, try pouring your wax at a lower temperature and storing your finished candles in cool environments.
Discoloration can occur due to exposure to sunlight or certain fragrance oils reacting with the wax. To avoid discoloration, store your candles in opaque containers away from direct sunlight and be mindful of which fragrances you use in your creations.
Tips for Creating Unique and Eye-Catching Candle Designs
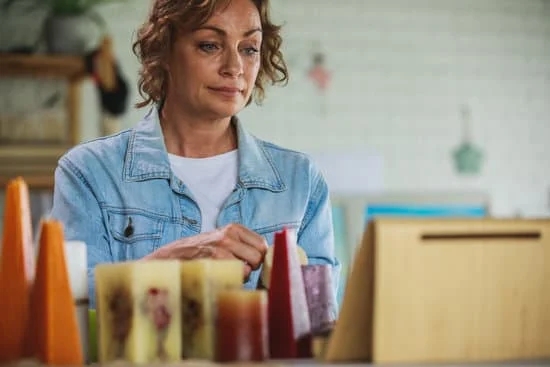
Candle making is not only a relaxing and enjoyable hobby, but it also allows for endless creativity when it comes to designing unique and eye-catching candles. One of the key tips for creating visually appealing candles is to experiment with different colors and textures. By mixing various shades of candle dyes or adding decorative elements like dried flowers or glitter, you can achieve stunning designs that stand out.
Another tip for creating unique candle designs is to play around with different mold shapes and sizes. Instead of sticking to traditional round or square molds, consider using novelty molds in shapes like hearts, stars, or even animals. These distinct shapes will make your candles more interesting and give them a touch of personality that sets them apart from mass-produced ones.
Additionally, incorporating layers or swirls into your candle designs can add depth and visual interest. To create layered candles, pour one color wax at a time and allow each layer to slightly harden before adding the next one. For swirl designs, gently swirl two or more colors together while the wax is still soft. These techniques require some practice but can result in beautiful and intricate patterns that make your homemade candles truly special.
| Tips for Candle Making | Unique Designs Insights |
|---|---|
| Experiment with different colors and textures. | Mix various shades of candle dyes or add decorative elements like dried flowers or glitter. |
| Try using novelty molds in unique shapes. | Shapes like hearts, stars, animals can give your candles personality. |
| Incorporate layers or swirls for added depth. | Create stunning patterns by pouring multiple colored wax layers or swirling them together. |
Safety Precautions to Keep in Mind While Making Candles
When it comes to candle making, safety should always be a top priority. Working with hot wax and open flames can pose risks if proper precautions are not taken. Here are some essential safety tips and tricks for candle making to ensure a safe and enjoyable crafting experience.
First and foremost, always work in a well-ventilated area to prevent the buildup of fumes from melted wax. It’s also crucial to use heat-resistant containers and equipment when handling hot wax to avoid burns or accidents. Additionally, never leave melting wax unattended on the heat source, as it can quickly reach flammable temperatures.
Another important safety measure is to keep a fire extinguisher nearby in case of emergencies. Knowing how to properly use it can help prevent small mishaps from turning into major disasters. When working with fragrances and dyes, be sure to follow the manufacturer’s instructions to avoid skin irritation or allergic reactions. Finally, always have a first aid kit on hand just in case of minor injuries while crafting your candles.
Creative Ways to Package and Present Your Homemade Candles
When it comes to the world of candle making, the presentation is just as important as the candle itself. Creative packaging and presentation can elevate your homemade candles to a whole new level, making them not only a beautiful addition to any space but also a thoughtful gift for loved ones. Here are some tips and tricks for packaging and presenting your homemade candles in unique and eye-catching ways.
One creative way to package your homemade candles is to use sustainable materials such as recycled paper, cardboard, or fabric. Not only does this add a rustic and eco-friendly touch to your candles, but it also aligns with the growing trend of sustainability in consumer products. You can experiment with different textures, colors, and patterns to create packaging that reflects the scent or theme of your candles.
Additionally, consider adding personalized touches to your candle packaging such as custom labels, ribbons, or charms. These small details can make a big impact and show that you put thought and care into every aspect of your candle making process. You can also incorporate elements from nature like dried flowers, leaves, or twigs to give your candles a botanical or organic feel.
In conclusion, by putting thought and creativity into how you package and present your homemade candles, you can truly make them stand out from store-bought alternatives. Whether you choose to go for a sleek and minimalist look or opt for a more elaborate style, remember that the presentation is part of the overall experience for anyone who receives one of your handmade creations.
So have fun experimenting with different ideas and materials to find unique ways to showcase your beautiful candles.
Frequently Asked Questions
What Not to Do When Making Candles?
When making candles, it is crucial not to leave the melting wax unattended, as it can be a fire hazard. Another mistake to avoid is using containers that are not designed for candle-making, which can crack or shatter when exposed to heat.
Additionally, inadequate measuring of fragrance oils and dyes can result in candles that are either too weak or too strong in scent.
How Can I Make My Candles More Effective?
To make your candles more effective, consider using high-quality ingredients like natural soy wax and premium fragrance oils. Properly wicking your candles is also essential for a clean and even burn. Experimenting with different waxes, fragrances, and colors can help you discover the perfect combination for long-lasting and aromatic candles.
What Are 3 4 Mistakes to Watch for When Making Soy Candles?
One common mistake when making soy candles is not heating the wax to the correct temperature, which can lead to poor adhesion of fragrances and dyes. Using incorrect wick sizes can also cause issues like tunneling or uneven burning. Overpouring or underpouring wax into containers may result in inconsistencies in the finished candles.

Welcome to my candle making blog! In this blog, I will be sharing my tips and tricks for making candles. I will also be sharing some of my favorite recipes.

