Introduction
Teacup candles are a delightful and creative way to showcase your artistic skills. From scented soy wax to classic paraffin, there are a wide range of materials available for the teacup candle maker. No matter if you like the classic look of wax in ceramic teacups or have a bolder design in mind, with the right supplies and tips, you can create beautiful tea cup candles for yourself and for your friends.
One of the most popular uses is as aromatherapy candles. Adding essential oils to tea cup candles such as lavender, cedarwood, or eucalyptus can give them a pleasant scent while also helping to reduce stress and anxiety. Other ingredients such as dried flowers, herbs or even coffee beans can be added to give them an extra special touch!
For those looking to make tea cup candles with a modern twist, silicone molds allow users to customize their shapes and sizes while still achieving the same great quality that comes from hand-poured wax. Colored dyes or even glitter will sparkle when added throughout the filling pattern giving it an extra wow-factor when lit!
Aside from making scented teacup candles, adding surprise trinkets inside each pour can add an element of fun for everyone involved in using them. Incorporating beads or tiny charms can be especially entertaining since once melted each piece reveals itself one by one.
Overall, no matter what types of candle making you pursue; making teacup candles bring joy and satisfaction that cannot be replicated with anything else out there! With just a few tips and straightforward steps anyone can jump into making these delightful pieces of art perfect for gifting occasions or simply enjoying at home with family and friends.
Planning and Designing a Teacup Candle Project
Making teacup candles is a fun and easy project that adds a unique touch to any home. Before beginning, it’s important to plan the project and gather the right supplies. First, decide which style and size of teacup you would like to use. It can be anything from an antique china cup to a modern chic one. Next, find out what type of wax you would like to use; soy wax is the most environmentally-friendly option, but paraffin wax will work too. Additionally, make sure you have enough wick material for your candle; many craft stores offer pre-made wick tabs with metal coils included for easier insertion. Finally, select which scents or aromas you would like for your candles as well as any color dyes or decals if desired. Once everything has been planned and purchased, the fun part can begin!
Choosing the Right Teacup and Embellishments
When selecting a teacup for your candle-making project, it is important to choose one that is appropriate for burning candles. Materials such as plastic, metal, or ceramic coating should all be avoided due to the risk of fire and melting wax. To get a beautiful and safe finished product, look for glazed porcelain tea cups and unglazed stoneware options with no protective coating. Once you have chosen the right cup material, you can personalize your candle by adding embellishments like beads, ribbons or dried flowers before starting the candle making process. Additionally, if you are looking to add an extra touch of glamour or uniqueness to your teacup candle, applying stencils will provide a professional-looking finish. Just make sure that these designs do not contain hard edges which can cause cracks in the finished product. Finally, when using any decorations on your candle make sure they are specifically approved for use in heated wax. This will ensure that there are no safety hazards once you have lit the wick!
Gathering Your Necessary Supplies
Before beginning the process of making teacup candles, it is important to gather all the necessary supplies. First, you will need to find your supply of teacups for which you plan to use for this project. You can source these from thrift stores or other sources that sell vintage items. You’ll also want to pick up candle wax, wicks, and any decorations such as glitter, polka dots, or sequins. Be sure to measure out the correct amounts in order to yield the highest quality candles. Additionally, you’ll need a double boiler and some type of holder for dipping the wicks into the melted wax. Finally, have safety equipment handy like safety goggles and gloves in case any hot wax is spilled. With your supplies gathered and ready for use, you can get started on making unique tea cup candles!
Step by Step Instructions for Melting Wax
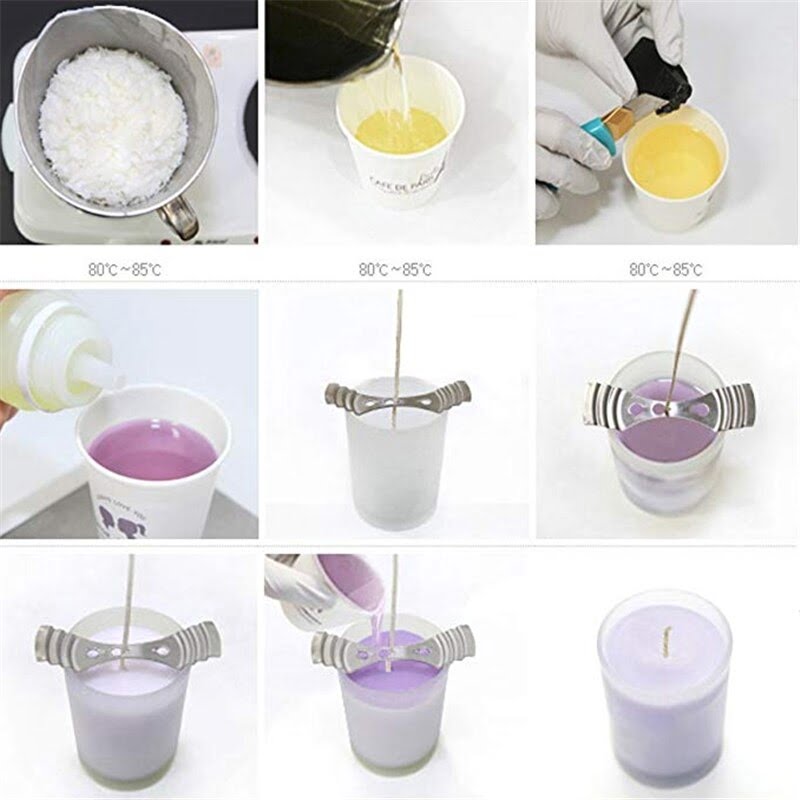
When it comes to melting wax for making teacup candles, there are a few tips to keep in mind. First, the wax should be melted gradually over low heat or in small increments with a double boiler. This will prevent scorching and ensure that all of the wax has melted evenly. Second, use a thermometer to monitor the temperature of the wax as it melts so you can make sure that it remains at an appropriate level”generally between 130 and 150 degrees Fahrenheit is recommended. Additionally, add any fragrance oil or dye while the wax is still liquid before pouring it into your molds. Lastly, when pouring the liquid wax into your desired molds use extreme caution and give the mold enough time to cool completely before handling”as hot wax can cause burns to skin and surfaces.
Now that you have those tips in mind, here is a step by step process on how to properly handle melting wax using these methods. Start with preparing a double boiler (or an improvised version of one) then add your desired amount of beeswax (or another type of candle making wax such as paraffin or soy). Place this over low heat and let it begin melting slowly until mostly liquid but still slightly solid at its center. At this point attach a reliable thermometer to the pot or container inside which you are melting and monitor its temperature constantly as it approaches 140 degrees Fahrenheit. Once this temperature is met add any fragrances or dyes simultaneously while mixing them quickly with a spoon or spatula until they are fully incorporated throughout the molten wax. Now carefully pour into whichever molds you desire, giving each one enough time to settle down before moving onto another one until all are full and left undisturbed for at least three hours for complete cooling period before removing from their respective moulds!
Adding Color, Fragrance and Shaping Techniques
Making teacup candles is a fun and easy craft for people of all levels. With just a few supplies and careful attention, you can make stunning candles in no time. To give your candles an extra punch, consider adding color and scent to them as well as playing with shaping techniques.
For coloring, there are many candle-specific options which are not just food-safe dyes but also designed to resist burning away in the heat of the flame. Likewise, there are also fragrance oils available that act similarly to the colors when exposed to open flame. Both come in an array of scents so you can pick out the perfect one for your candle making project.
As far as shaping techniques go, depending on the shape of your teacup you should use wicks and staples to keep it secure inside the measurement within your cup. For rounder shapes, using a roller is also helpful to create a circular motion while smoothing down uneven areas or gaps along the sides of your cups before pouring in wax or oil. You may also need to adjust any pieces that extend beyond their adhesion points too. Not only will this give your teacup candles a unique shape but it will ensure that your teacups hold securely when placed on any surface after being filled with wax or lubricant.
Assembling Your Teacup Candle with Proper Wick Placement
One of the most important steps in making a teacup candle is properly placing the wick. Before you even pour your wax, make sure to measure out the approximate circumference of your teacup. Cut a piece of wicking that is several inches longer than this measurement so that there is enough excess length to anchor it to the bottom of your cup. Take some non-toxic glue, or double-sided tape, and use it to affix one end of the wick to the bottom of your teacup. Make sure that your wick is centered within your cup, and hold it in place for a few moments until satisfied. After you’ve finished securing your wick, it’s time to move on to pouring in the melted wax.
Finishing Touches on Decorating and Display
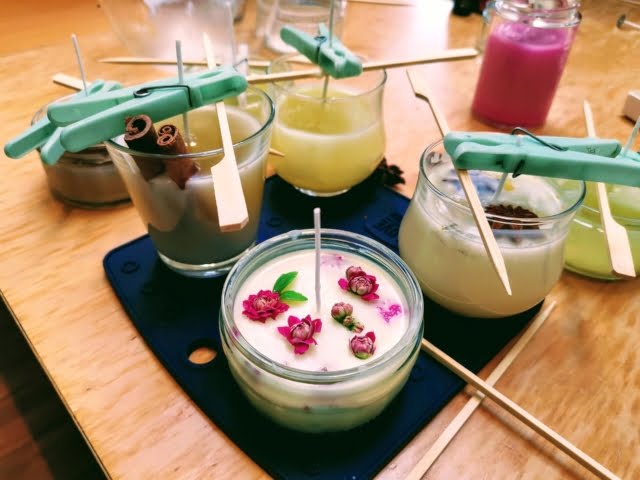
When it comes to the finishing touches on a teacup candle, you can go bold or keep it classic. You may want to embellish your teacup with some paint, string, beads, cloth or feathers. Another great way to make your candle more decorative is by using stencils and adding an intricate pattern around the outside of the cup itself. Depending on what type of look you are going for you can use sequins, small jewelry pieces, and dried flowers to give your candle character. Once you’re finished with designing your teacup candle, don’t forget about display options. For a rustic farmhouse look consider using empty mason jars and arranging them on shelves or tables at different heights for maximum effect. Grouping multiple candles together in a set of bowls or planters also gives a creative visual presentation wherever displayed in the home. Another unique idea is to add colorful ribbons and hang up your candles around doorways or windows allowing natural light to catch the beautiful colors in each cup!
Safety and Maintenance Tips for Teacup Candles
Safety is of the utmost importance when creating and using teacup candles. First, ensure you are working in a safe space with minimal flammable objects. Additionally, teacup candles should be kept away from drafts so they do not burn too quickly and to prevent the risk of fire. When creating the teacup candle, it is important to wear heat-resistant gloves and safety glasses. Before burning your candle, you should also make sure there are no cracks or chips in the cup that can cause a fire hazard.
Maintenance tips for teacup candles revolve around proper use and storage. To maintain your candle’s appearance and lifespan, always keep it out of direct sunlight or overly humid environments. After each use, gently remove any debris from the cup such as wax residue, wick trimmings, dirt, and dust. Then store it in a cool dry place for the next time you plan to light your teacup candle. For best results use a long match or lighter when lighting; this will help to evenly distribute the flame without splattering hot wax on hands or nearby surfaces. Lastly, maintain proper safety protocol while burning your candle by never leaving it unattended and always placing it on a non-flammable surface such as an all-ceramic plate or tray before lighting.
Conclusion
Making teacup candles is a fun and rewarding activity. With some basic materials, you can create unique, beautiful and practical decorations for your home. Not only are they nice to look at but they can also provide a relaxing scent to enhance any atmosphere. In addition, their small size makes them great gifts to friends and family as both a decorative item and conversation piece. So next time you’re looking for something interesting to light up the room, why not try your hand at creating some stunning teacup candles?

Welcome to my candle making blog! In this blog, I will be sharing my tips and tricks for making candles. I will also be sharing some of my favorite recipes.

