Introduction
Making candles at home can be very enjoyable and rewarding. Creating your own personalized candles allows you to express your creativity and experience the joy of creating your own products. Home made candles can also be used as decorations for various occasions or holidays, and they make great gifts for friends and family. Additionally, making your own candles is a cost-effective way to enjoy scented candles without breaking the bank.
In order to make candles at home, you will need some essential supplies such as wax, wicks, fragrances, dyes, melting pots, pouring pitchers, molds and any additional decorative items for the outside of the candle (e.g. ribbons). Depending on how intricate or complex your design is going to be, there are several types of wax available including paraffin, beeswax and soy wax. You can also choose from many different kinds of wick sizes depending on how large or small your candle is going to be. Fragrances are an important part of most candles; adding scent will not only create a pleasant atmosphere but it can also infuse your room with sweet aromas too! Lastly, if you would like to customize the color of your candle then dyes that are oil-based or specially formulated for use with wax would work best. Finally don’t forget about all of the other fun accessories that can enhance the look of your candle – these could include glassware containers, taper holders and more!
Gathering Supplies
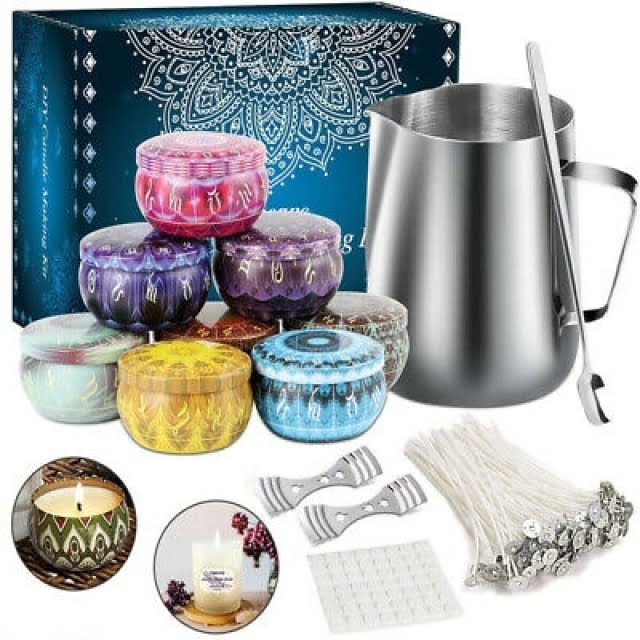
To make candles at home, you’ll need the right supplies. To get started, you will need candle wax of your choice, wick cord, containers for the candles, a double boiler or stainless steel pot with a glass bowl atop it to melt the wax, thermometers, measuring cups, stirring utensils and scissors. You might also consider purchasing a special pouring pot with spouts that can make pouring easy and mess-free. Depending on the type of process you choose, there may be other tools required such as full-size double boilers to hold large amounts of liquid when mixing oils and fragrances into molten wax.
The materials needed are easily available at craft stores or online candle making suppliers. You can also find many Do-It-Yourself (DIY) kits that include everything you need to get started making candles right away. The cost of the equipment may vary depending on the size and complexity of the tools used but they generally range from around $15-$200 USD. If you’re experienced in candle making or intend to pursue it regularly as a hobby or business venture then investing in quality equipment is highly recommended as it will ensure hifi results for your projects and last for far longer than cheaper alternatives.
Types of Wax
To make candles at home, you will need several materials. Firstly, you will need to select the right wax for your candle. There are many different types of wax available, each with its own melting temperature, texture and burning time depending on the purpose of the candle. Options include paraffin wax, beeswax, soy wax, palm and coconut oil wax blends, Bayberry wax and vegetable/vegan waxes like bayberry or hemp . Each type has a unique melting temperature and texture; paraffin melts at 122 degrees while beeswax melts at 150 degrees. Additionally, different types of wax can require additional additives such as stearic acid or UV inhibiter to help them maintain shape during the cooling process.
The wick used in your candle is just as important as the type of wax; using too big a wick can cause your candle to burn too quickly and create soot while small wicks cancause candles to become difficult to light/extinguish. Wood core cotton-core hemp-core organic cotton-core paper-core are some types of wicks commonly used. Depending on the size and style of the container you use for your candle, you may find that different sizes work better than others; consult this guide for information about appropriate wick sizes for container sizes. Last but not least, if desired you can add fragrances or essential oils to your candles to enhance their smell (just make sure these additives are given adequate curing time before lighting).
Fragrances and Colors
Making candles at home can be a fun, creative experience that allows you to create something totally unique for yourself or as a gift for someone else. Before you start experimenting with materials and working on the actual candle-making process, it’s important to have all the necessary components ready. These include wax (usually paraffin or soy wax), wicks, fragrances/scents, molds and/or containers, melting equipment (double boiler or microwave), thermometer (to keep track of wax temperature), and colorants such as dyes or pigments. Additionally, for counter-crafted pillar candles or tapered candles it is important to have wick holders or stands with which the wicks can align straight during the cooling period.
Another important tool in candle-making is a fragrance calculator which helps you figure out how much scent oil should ideally be added to your molten wax. Generally speaking, 1 oz of oil should be used per pound of wax; however adding more scent will not necessarily make the candle smell stronger but may lead to ‘sooting’. Soot is dark particles released by combustion which forms around open flame if too much fragrance has been poured into the hot wax – so always use a calculator do get accurate measurements! Another great way to add extra allure and personalized touch is through colors – either natural or synthetic dyes can be used depending on preference. When using synthetic coloring dye blocks are the most popular option since they offer variety of shades that can be mixed in order to achieve beautiful hues for any creative project!
Candle Containers
When attempting to make a successful candle at home, choosing the right candle container is important. Candle containers come in a variety of shapes and sizes, including molds, jars, and tins. When deciding on the ideal container for your project, consider the size you want your finished candle to be, as well as how the wax will look once it’s poured.
Molds are often used when making pillar-style candles or if you want candles in an unusual shape that can’t be acquired elsewhere. They usually come as metal or silicone molds and tend to produce crisp results that pop out easily once hardened. Jars are perhaps one of the most familiar containers used when crafting candles. Molded glasses allow for smooth finishes on the outside and use less wax than a standard mold. Transparent jars offer great visibility; however colored glass can also create a beautiful display of colors especially when more than one color wax is used inside. Finally, tins are popular for travel candles or even seasonal scents since they offer solid seals with lids keeping dust and dirt out so people don’t have to worry about their candles melting away when not in use. Be sure to add small label indicate what type of scent is contained inside!
Safety Considerations
It is important to practice safety when working with hot wax for candle making. Since the wax is flammable, it is essential to work in a well ventilated area, away from any open flames or sparks. Additional safety measures include:
• Wear safety googles and protective gloves when melting and pouring the wax, as it can cause burns.
• Keep all materials such as wax, wicks, an old pot, stirring sticks, markers and newspaper away from children and pets.
• Make sure that the pot is deep enough to contain spilled wax if necessary.
• Place a thermometer into the melted wax to ensure that it does not exceed 150 degrees. Do not ever let it become too hot.
• Use an oven mitt to protect your hands as you move the pot of melted wax around.
• Always pour the hot melted wax onto a heat resistant surface such as a glass jar or metal tray which should never be left unattended while there is still wax inside or close by.
• Allow candles to cool completely before attempting to move or handle them.
Creating a Masterpiece
To make candles at home, you will need the following materials: wax, a container of some kind to contain your candle, wick(s), a base (such as a jar or holder), and scents or color dye as desired. Before getting started, make sure to buy quality wax and wicks, as they are necessary for a successful candle. Then decide upon the type of scent or color that you would like in your creation.
Once all supplies have been secured, begin melting your wax using either a double boiler method on the stovetop or in a microwave-safe bowl. When melted, add any desired fragrances while stirring constantly so they disperse evenly throughout the wax. Then take spoonfuls of melted wax and slowly pour into containers that have prepared wicks already installed. Allow each layer to cool before pouring the next layer. Be careful when handling hot wax!
Once cooled, trim extra length from the wick and enjoy your creation! While this guide covers basic steps for creating different types of candles at home, experimentation is always encouraged for those light-seekers who want to make something truly unique!
Troubleshooting
If your wax isn’t melting properly, you may need to adjust the temperature or heat source. If you’re using a microwave or hot plate, try increasing the power setting slightly. Alternatively, if you’re using a double boiler, try adding water to the bottom pot to help transfer more of the heat to the wax. If your wax is still not melting properly, invest in a thermometer and check that it’s reaching an optimal temperature (usually around 160F for beeswax and 180F for paraffin).
Another issue you may encounter is that your candles won’t stay lit. This could be due to too much air in the room, draughts from windows and doors or simply wick that has been trimmed too short. To fix this problem make sure to keep windows and doors closed as much as possible during candle making (not just while burning), and always trim off at least 5/8th inch from each wick before inserting them into your molds.
Finally, if you find your candles are cracking after pouring or extending up their sides when they set, this can indicate that there is too much fragrance oil in relation to wax content or that they haven’t been left to cool at a steady rate (lessening possible thermal shock). To avoid this issue make sure you leave yourself plenty of time for cooling sessions between each step of the process (you should generally wait 30-60 minutes between pours). Additionally reduce any fragrance oils used by up to half of what is recommended by manufacturers – completely omitting them altogether can also be beneficial in certain cases.
Resources
To make candles at home, you will need several essential items. First, you will need some form of wax. There are various types available, such as beeswax, paraffin wax, and soy wax. Second, you will need a wick. Most craft stores sell pre-made wicks in a variety of sizes. Thirdly, you will need a mold to hold the wax while it hardens. Lastly, you may also want to have a double boiler or pot for melting your wax as well as scissors for trimming the wick once the candle is hardened and in its final shape.
Further materials that may be helpful include colorants or fragrances to add scent and flair to the candle. You can find colorants and fragrance oils at many craft stores or online retailers which specialize in candle making supplies. If you would like more guidance on learning how to make candles at home there are many candle-making books available with step-by-step instructions that can help even the beginner get started creating beautiful candles. Additionally, there are videos available online through websites such as YouTube which provide tutorials and live demonstrations of the candle making process. Finally, some local craft stores may offer classes on how to create handcrafted scented candles for those interested in an interactive educational experience about this fascinating hobby.
Conclusion
Making your own candles at home can provide a wonderful experience, allowing you to create something unique and special for yourself or as a gift for someone else. The tools and supplies needed to do this can be relatively inexpensive, making the hobby accessible to almost any budget. With the right steps and a little bit of practice, you can have fun creating beautiful handmade candles that provide an interesting and creative outlet as well as beautiful decorations or thoughtful gifts.
At the same time, making candles at home is not without its limitations. For example, it can take some time and effort to be successful at candlemaking. It also requires working with hot wax on a regular basis which can present safety issues if it is not done carefully, so appropriate precautions must always be taken when working with wax. Furthermore, due to inconsistency in wax burn times and qualities it may require some experimentation to get desired results when first starting out.
In conclusion, candlemaking at home offers many benefits such as being creative and saving money while showing your loved ones you care. However there are certain limits that must be kept in mind to ensure safety while making your creations become reality!

Welcome to my candle making blog! In this blog, I will be sharing my tips and tricks for making candles. I will also be sharing some of my favorite recipes.


